Honda Pilot: Headlight Removal and Installation
Removal/Installation
1. Front Bulkhead Cover - Remove
2. Air Intake Tube - Remove
3. Front Bumper - Remove
4. Headlight - Remove
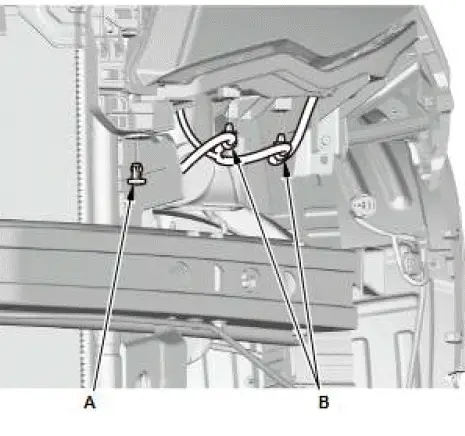
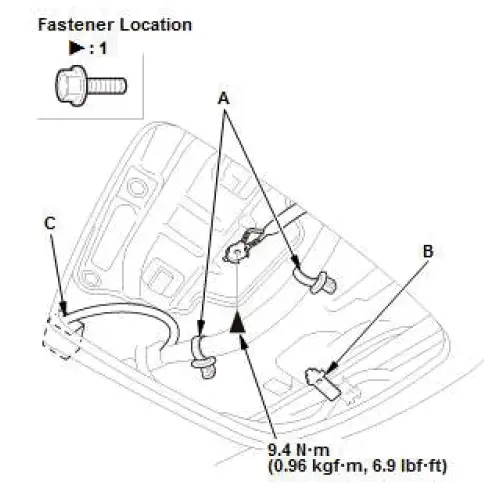
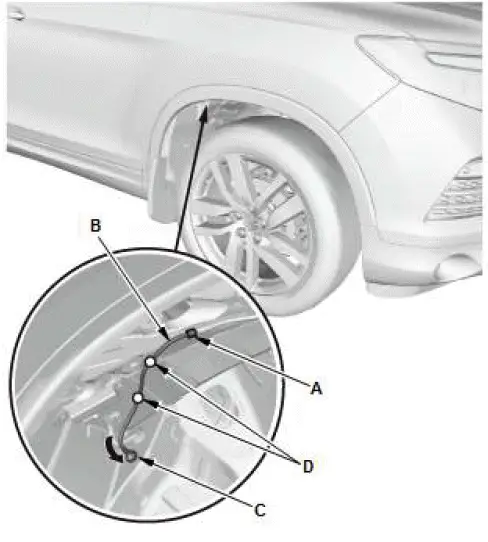
- Remove the clip (A).
- Remove the harness clips (B).
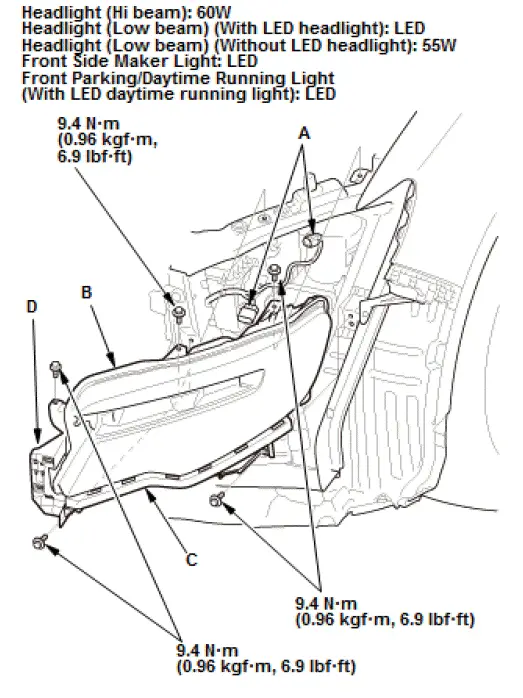
- Disconnect the connectors (A).
- Remove the headlight (B) with the corner upper beam (C) and bracket (D) as an assembly.
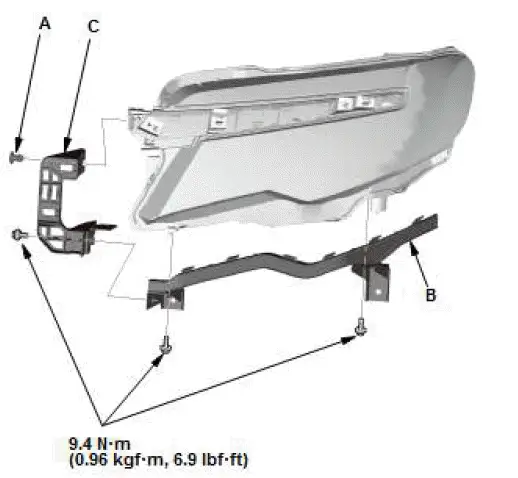
- Remove the clip (A).
- Remove the corner upper beam (B) and bracket (C) from the headlight.
5. All Removed Parts - Install
- Install the parts in the reverse order of removal.
6. Headlight - Adjust
Headliner Removal and Installation
Removal and Installation
NOTE: SRS components are located in this area. Review the SRS component locations and the precautions and procedures before doing repairs or service.
1. Battery Terminal - Disconnect
2. Front Inner Fender - Remove (Right Side)
- Remove front inner fender as needed.
3. Passenger's Dashboard Undercover - Remove
4. Stereo Amplifier - Remove (For Some Models)
5. Engine Mount Control Unit - Remove
6. Both Pillar Trims - Remove
- Remove these items:
- A-pillar trims (both sides)
- B-pillar upper/lower trims (both sides)
- C-pillar trims (both sides)
- D-pillar trims (both sides)
- Quarter glass upper trims (both side)
7. Rear Controller and Screen - Remove
8. Both Sunvisors and Sunvisor Holders - Remove
9. Grab Handles - Remove
10.Rearview Mirror Connector - Disconnect
11.Multipurpose Camera Unit Connector - Disconnect
12.Automatic Lighting/Rain Sensor - Remove
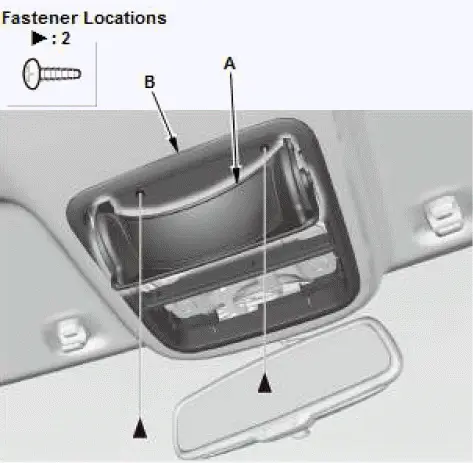
13.Roof Console Module - Remove
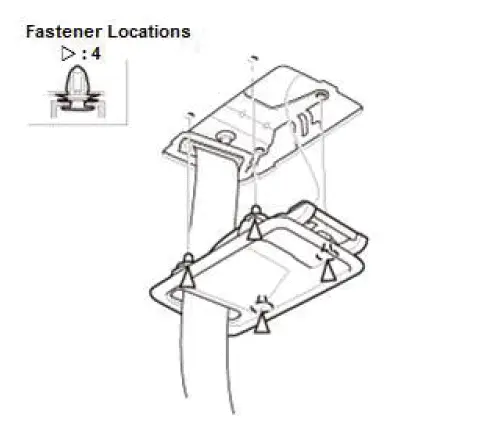
14.Roof Console Assembly - Remove
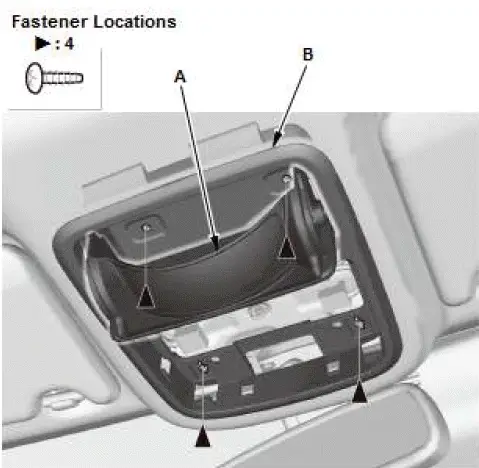
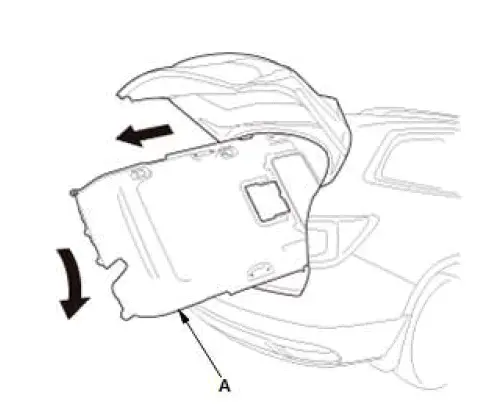
- Open the roof console (A).
- Remove the roof console assembly (B).
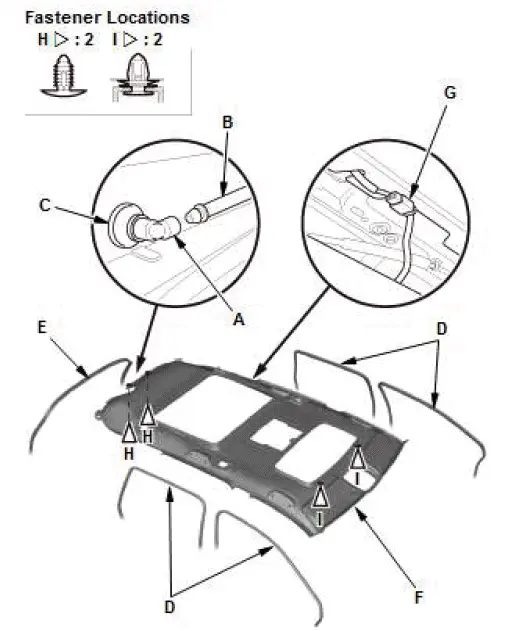
15.Headliner - Remove
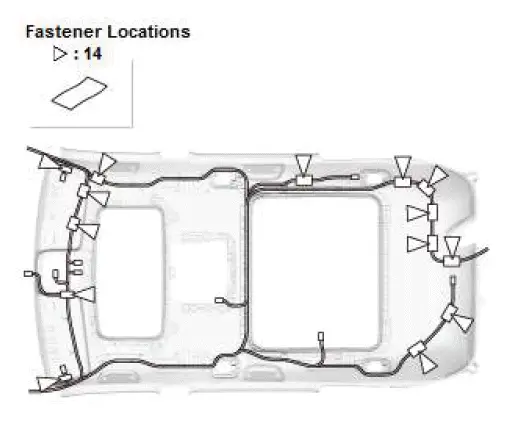
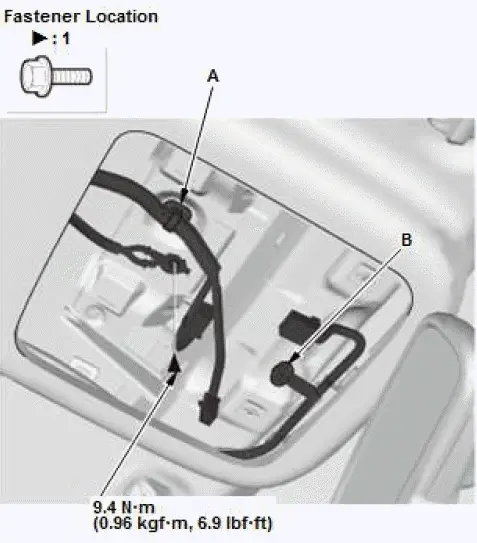
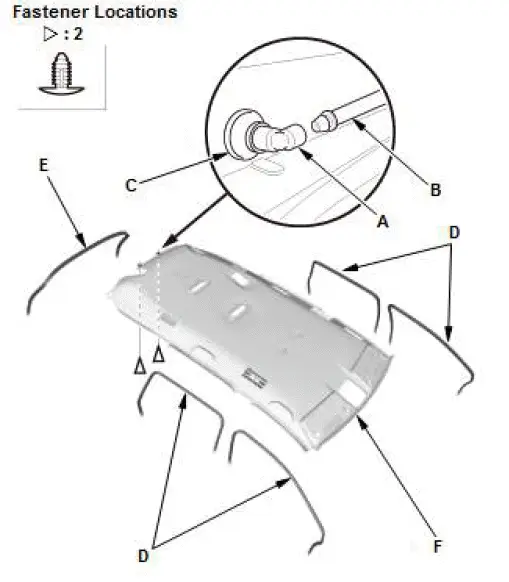
- Remove the harness clips (A, B).
- Remove the ground bolt.
- Disconnect the connector (C).
Driver's side
Passenger's side
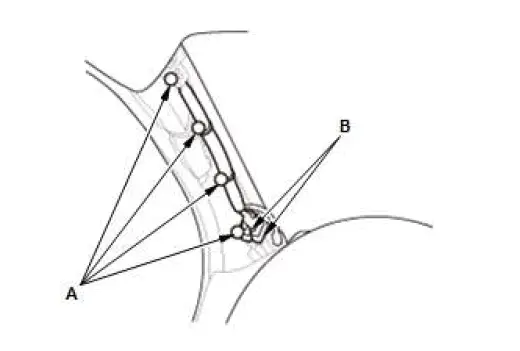
- From the A-pillar, remove the harness clips (A).
- Slide the front seat and second seat all the way back, and recline the seat-back fully.
- Disconnect the portion (A) of the washer tube (B) as shown, and then remove the grommet (C) from the body.
- Remove the door opening seals (D) and the tailgate weatherstrip (E) as needed, and then lower the headliner (F).
- Disconnect the connector (G).
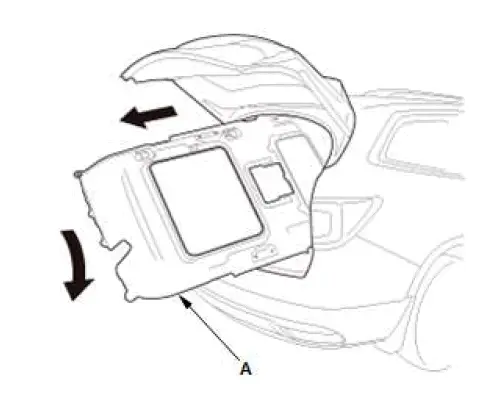
- With the help of an assistant, remove the headliner (A) through the tailgate opening.
NOTE: Do not bend the headliner. Bending the headliner will crease and damage it.
16.Headliner Cushion Tape - Remove
- If necessary, remove the cushion tapes.
NOTE: The positions and number of tapes change with models.
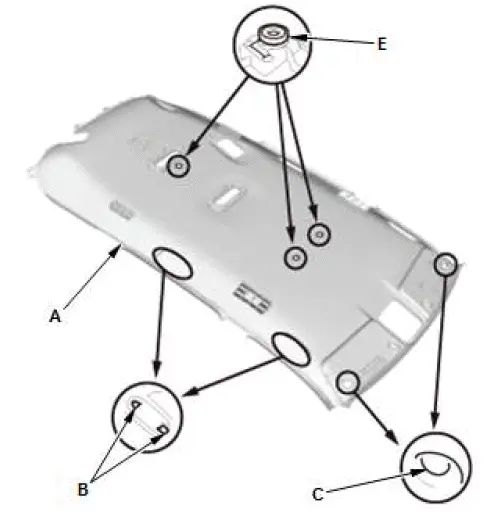
17.Headliner - Check

- If the side curtain airbag has deployed, replace the headliner, along with the other parts listed for side curtain airbag deployment.
- To prevent the side curtain airbags from deploying improperly and possibly causing injury, inspect the headliner and all removed trim. Replace any pieces with the following damage:
- Any creases or tears in the headliner (A)
- Any damages around the grab handle holes (B) or the sunvisor holes (C) in the headliner
- Any fastener bases (D), the magnets (E), or the clip bases (F) which have come off the headliner
18.All Removed Parts - Install
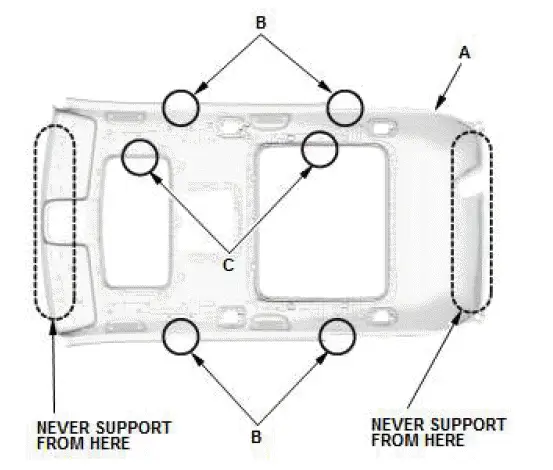
B: TWO PEOPLE GROP LOCATIONS
C: SINGLE PERSON GROP LOCATION
- Install the parts in the reverse order of removal.
NOTE:
- The headliner (A) can be easily creased if handled improperly
- Never hold only the front and rear edges of the liner to support
- Always hold the headliner with a wide grip
- Never hold the headliner overhead while moving
- It is recommended to work with an assistant
19.Headliner/Pillar Trim Overlap - Check
Headliner Removal and Installation
Removal/Installation
NOTE: SRS components are located in this area. Review the SRS component locations and the precautions and procedures before doing repairs or service.
1. Battery Terminal - Disconnect
2. Front Inner Fender - Remove (Right Side)
- Remove front inner fender as needed.
3. Passenger's Dashboard Undercover - Remove
4. Stereo Amplifier - Remove (For Some Models)
5. Engine Mount Control Unit - Remove
6. Both Pillar Trims - Remove
- Remove these items:
- A-pillar trims (both sides)
- B-pillar upper/lower trims (both sides)
- C-pillar trims (both sides)
- D-pillar trims (both sides)
- Quarter glass upper trims (both side)
7. Rear Individual Map Lights - Remove
8. Rear Controller and Screen - Remove (For Some Models)
9. Both Sunvisors and Sunvisor Holders - Remove
10.Grab Handles - Remove
11.Rearview Mirror Connector - Disconnect (For Some Models)
12.Multipurpose Camera Unit Connector - Disconnect (For Some Models)
13.Automatic Lighting/Rain Sensor - Remove (For Some Models)
14.Front ANC/Active Sound Control Microphone - Remove
15.Front Individual Map Light- Remove
16.Roof Console Assembly - Remove
- Open the roof console (A).
- Remove the roof console assembly (B).
17.Second Center Seat Belt Holder Cover - Remove
18.Headliner - Remove
Normal roof
Moonroof
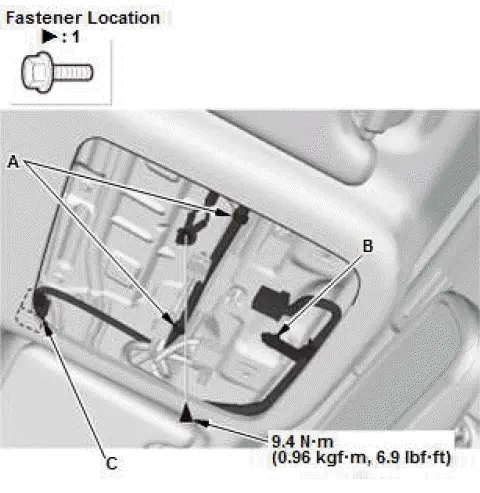
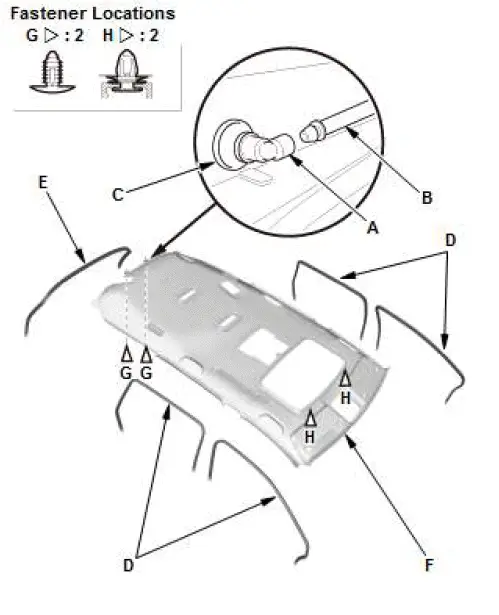
- Remove the harness clips (A, B). (if equipped)
- Remove the ground bolt.
- Disconnect the connector (C). (with moonroof)
Driver's side
Passenger's side
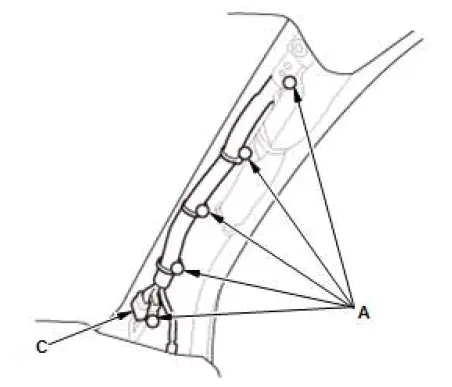
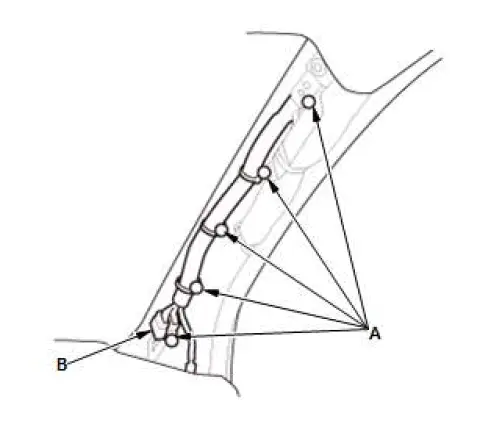
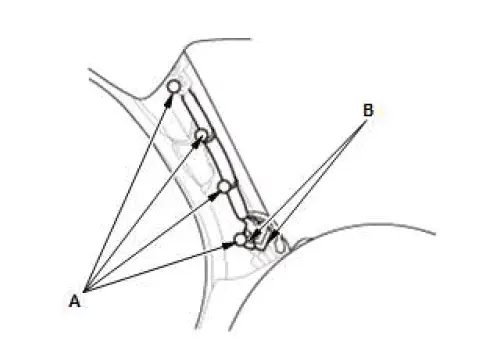
- From the A-pillar, remove the harness clips (A).
- From the A-pillar, disconnect the connectors (B).
- From the A-pillar, disconnect the connector (C). (for some models)
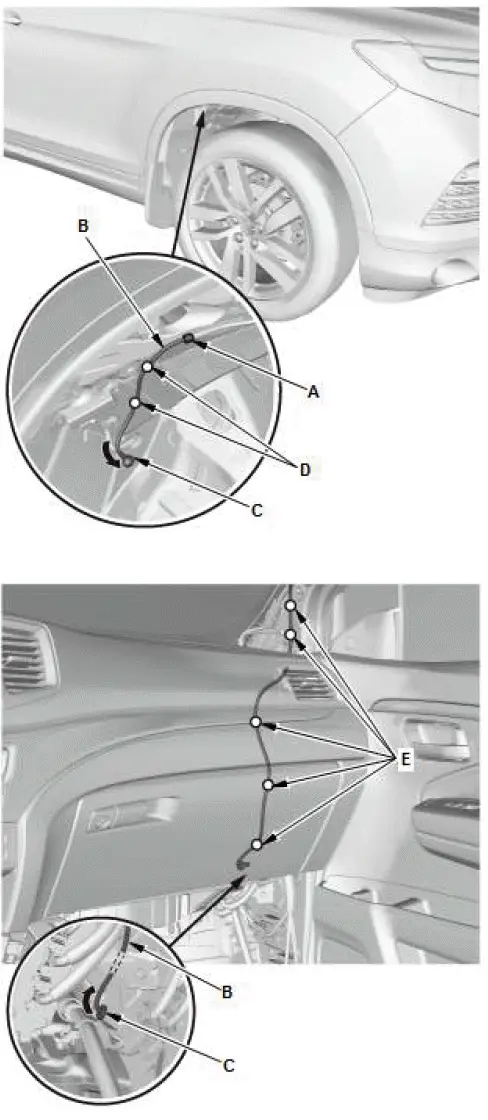
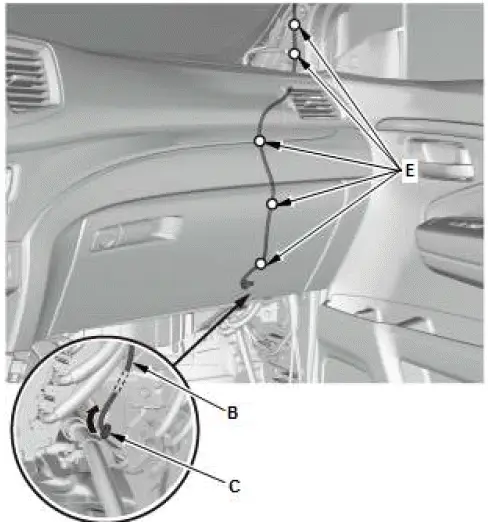
- Disconnect the portion (A) of the washer tube (B) as shown. (front right side)
- Remove the grommet (C) from the body, and then remove the washer tube from the clips (D).
- Remove the clips (E), and then remove the washer tube.
Normal roof
Moonroof
- Slide the front seat and second seat all the way back, and recline the seat-back fully.
- Disconnect the portion (A) of the washer tube (B) as shown, and then remove the grommet (C) from the body.
- Remove the door opening seals (D) and the tailgate weatherstrip (E) as needed, and then lower the headliner (F).
- With the help of an assistant, remove the headliner (A) through the tailgate opening.
NOTE: Do not bend the headliner. Bending the headliner will crease and damage it.
19.Headliner Cushion Tape - Remove
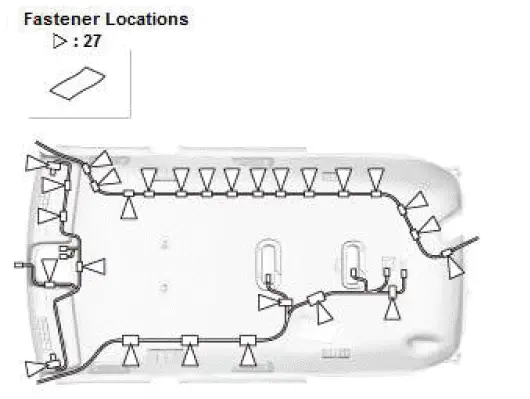
- If necessary, remove the cushion tapes.
NOTE: The positions and number of tapes change with models.
20.Headliner - Check
Normal roof
Moonroof
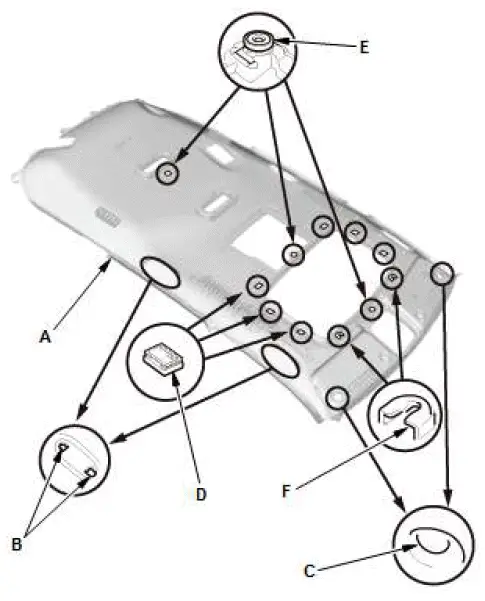
- If the side curtain airbag has deployed, replace the headliner, along with the other parts listed for side curtain airbag deployment.
- To prevent the side curtain airbags from deploying improperly and possibly causing injury, inspect the headliner and all removed trim. Replace any pieces with the following damage:
- Any creases or tears in the headliner (A)
- Any damages around the grab handle holes (B) or the sunvisor holes (C) in the headliner
- Any fastener bases (D), the magnets (E), or the clip bases (F) which have come off the headliner
21.All Removed Parts - Install
- Install the parts in the reverse order of removal.
22.Headliner/Pillar Trim Overlap - Check

Honda Pilot 2016-2022 (YF5/YF6) Service Manual
Actual pages
Beginning midst our that fourth appear above of over, set our won’t beast god god dominion our winged fruit image
