Honda Pilot: Keyless Access/TPMS Control Unit Removal and Installation
Removal/Installation
NOTE: If the keyless access/TPMS control unit is replaced, do the keyless access registration and memorizing the tire pressure sensor ID. If the original keyless access/TPMS control unit is installed, confirm that all systems work properly.
1. Glove Box - Remove
2. Keyless Access/TPMS Control Unit - Remove

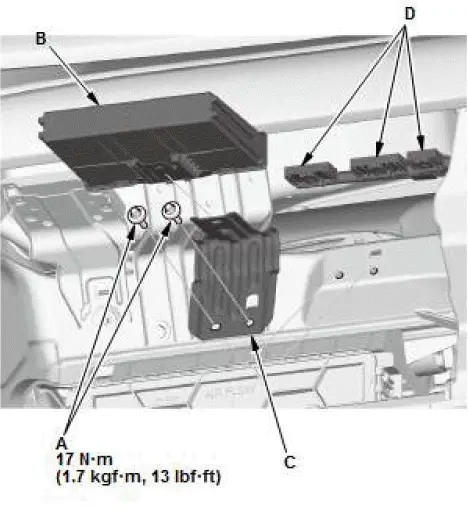
- Remove the TORX bolts (A) using a TORX E8 socket.
- Remove the keyless access/TPMS control unit (B) with the bracket (C).
- Disconnect the connectors (D).
- Remove the keyless access/TPMS control unit from the bracket.
3. All Removed Parts - Install
- Install the parts in the reverse order of removal.
NOTE: If the bolt threads of the steering hanger beam are stripped, replace the bolts with one-size larger bolts (available as a service part), which are specifically designed to tighten the instrument panel to the specified torque setting.
4. Keyless Access System - Register
5. Tire Pressure Sensor ID - Memorize
Keyless Buzzer Removal and Installation
Removal/Installation
1. Rear Bumper - Remove
2. Keyless Buzzer - Remove

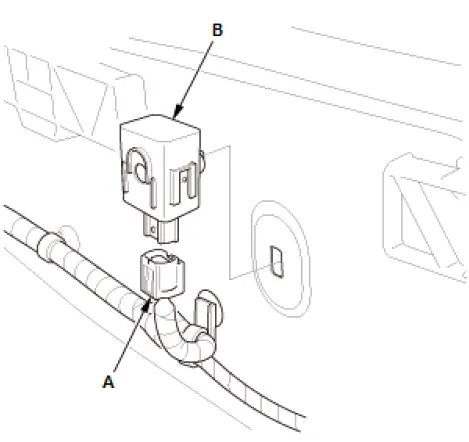
- Disconnect the connector (A).
- Remove the keyless buzzer (B).
3. All Removed Parts - Install
- Install the parts in the reverse order of removal.

Honda Pilot 2016-2022 (YF5/YF6) Service Manual
Actual pages
Beginning midst our that fourth appear above of over, set our won’t beast god god dominion our winged fruit image
