Honda Pilot: Tools
Types of Tools
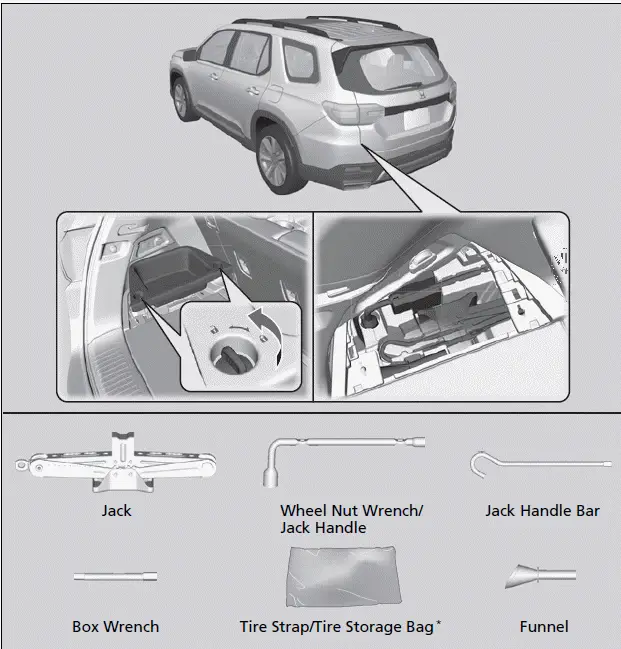
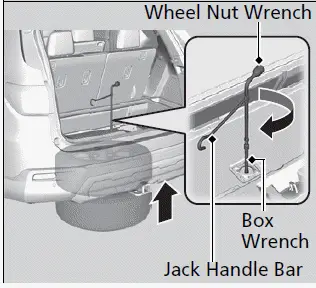
The tools are stored in the cargo area.
If a Tire Goes Flat
Changing a Flat Tire
If a tire goes flat while driving, grasp the steering wheel firmly and brake gradually to reduce speed. Then, stop in a safe place. Replace the flat tire with a compact spare tire*/full-size spare tire*. Go to a dealer as soon as possible to have the fullsize tire repaired or replaced.
1. Park the vehicle on a firm, level, non-slippery surface and apply the parking brake.
2. Put the transmission into (P).
3. Turn on the hazard warning lights and set the power mode to VEHICLE OFF (LOCK).
Follow compact spare* precautions: Periodically check the tire pressure of the compact spare. It should be set to the specified pressure.
Specified Pressure: 60 psi (420 kPa, 4.2 kgf/cm2) When driving with the compact spare tire, keep the vehicle speed under 50 mph (80 km/h). Replace with a full-size tire as soon as possible.
The compact spare tire and wheel in your vehicle are specifically for this model. Do not use them with another vehicle. Do not use another type of compact spare tire or wheel with your vehicle.
Do not mount tire chains on a compact spare tire.
If a chain-mounted front tire goes flat, remove one of the full-size rear tires and replace it with the compact spare tire. Remove the flat front tire and replace it with the full-size tire that was removed from the rear.
Mount the tire chains on the front tire.
NOTICE
Do not use the jack if it doesn't work properly. Call your dealer or a professional towing service.
■ Getting Ready to Replace the Flat Tire
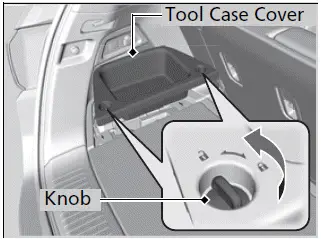
1. Turn the knobs counter-clockwise to remove the tool case cover.
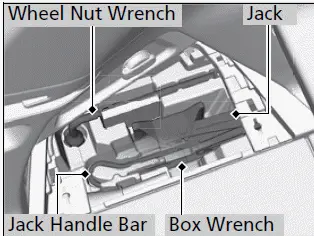
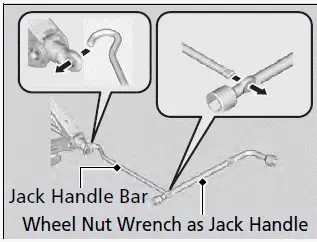
2. Take the jack, wheel nut wrench, jack handle bar, and box wrench out of the tool case.
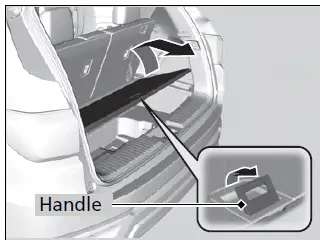
3. Pull the rear edge of the handle on the floor lid and remove the lid.
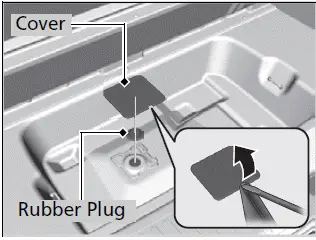
4. Use a flat-tip screwdriver and remove the cover.
Remove the rubber plug on the cargo area lining to access the shaft for the spare tire hoist.
- Wrap the flat-tip screwdriver with a cloth to prevent scratches.
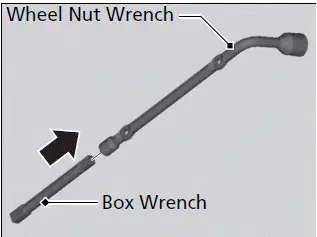
5. Connect the wheel nut wrench with the box wrench.
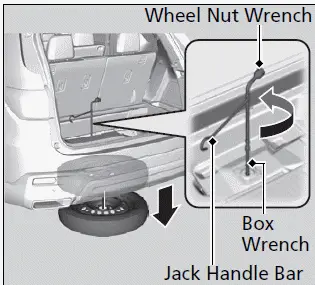
6. Put the wheel nut wrench with the jack handle bar on the hoist shaft.
Turn the wrench to the left to lower the spare tire to the ground.
The wheel nut wrench supplied with your vehicle is specially adapted to fit the hoist shaft. Do not use any other tool.
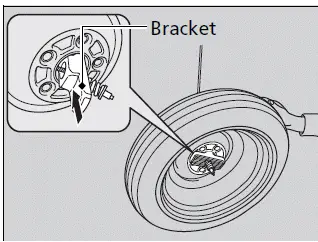
7. Keep turning the wheel nut wrench to create slack in the cable.
8. Remove the bracket from the spare tire.
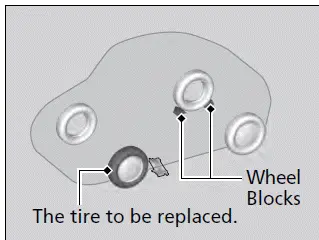
9. Place a wheel block or rock in front and rear of the wheel diagonal to the flat tire.
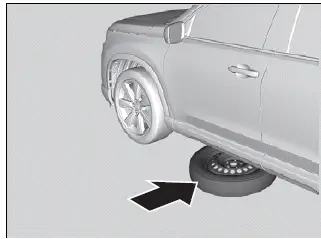
10. Place the spare tire (wheel side up) under the vehicle body, near the tire that needs to be replaced.
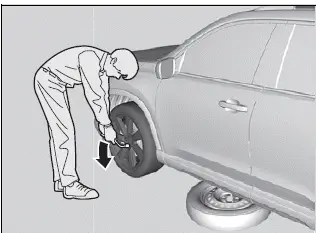
11. Loosen each wheel nut about one turn using the wheel nut wrench.
■ How to Set Up the Jack
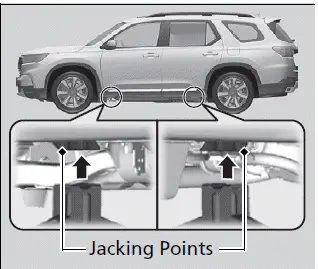
1. Place the jack under the jacking point closest to the tire to be changed.
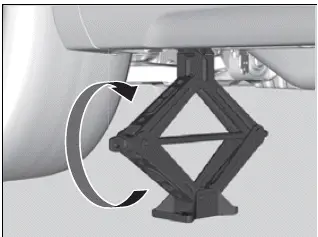
2. Turn the end bracket clockwise as shown in the image until the top of the jack contacts the jacking point.
- Make sure that the jacking point tab is resting in the jack notch.
WARNING
The vehicle can easily roll off the jack, seriously injuring anyone underneath.
Follow the directions for changing a tire exactly, and never get under the vehicle when it is supported only by the jack.
Do not use the jack with people or luggage in the vehicle.
Use the jack provided in your vehicle.
Other jacks may not support the weight ("load") or may not fit the jacking point.
The following instructions must be followed to use the jack safely:
- Do not use while the engine is running.
- Use only where the ground is firm and level.
- Use only at the jacking points.
- Do not get in the vehicle while using the jack.
- Do not put anything on top of or underneath the jack.
3. Raise the vehicle, using the jack handle bar and the jack handle, until the tire is off the ground.
■ Replacing the Flat Tire

1. Remove the wheel nuts and flat tire.
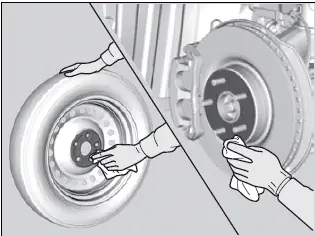
2. Wipe the mounting surfaces of the wheel with a clean cloth.
3. Mount the spare tire.
4. Screw the wheel nuts until they touch the lips around the mounting holes, then stop rotating.
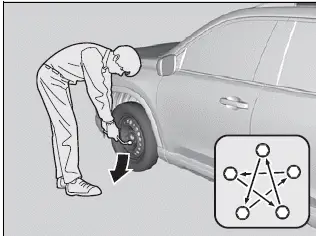
5. Lower the vehicle and remove the jack.
Tighten the wheel nuts in the order indicated in the image. Go around tightening the nuts two to three times in this order.
Wheel nut torque: 94 lbf-ft (127 N-m, 13 kgf-m)
Do not over tighten the wheel nuts by applying extra torque using your foot or a pipe.
Models with compact spare tire
■ Storing the Flat Tire
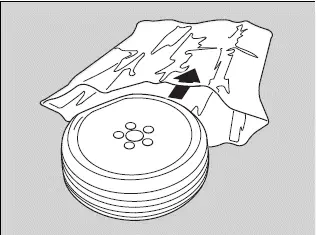
1. Put the flat tire in the tire storage bag provided with your vehicle.
- The tire storage bag is in the tool case.
2. Knot the top of the tire storage bag.
3. Securely put the jack, wheel nut wrench, jack handle bar, and box wrench back in the tool case.
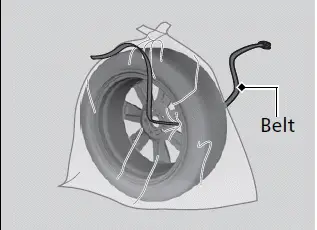
4. Bore through the bag, and pass the holding belt through the hole of the bag and the wheel of the flat tire as shown.
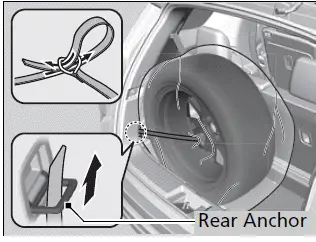
5. Place the cargo floor lid in the lower position.
6. Place the flat tire in the cargo area, and thread the belt through the rear anchor as shown.
7. Pass the belt through the ring, and tighten the belt to secure the flat tire in place.
WARNING
Loose items can fly around the interior in a crash and can seriously injure the occupants.
Store the wheel, jack, and tools securely before driving.
Models with full-size spare tire
■ Storing the Flat Tire
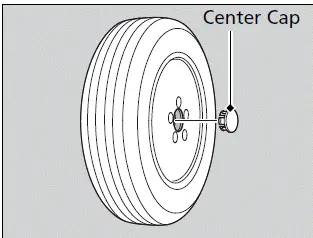
1. Remove the center cap and place the flat tire face up under the hoist.
2. Insert the hoist bracket into the center hole of the flat tire.
3. Connect the wheel nut wrench with the box wrench.
4. Slowly turn the wheel nut wrench clockwise to take up the hoist cable slack.
Make sure the bracket is seated in the center hole of the flat tire.
5. Turn the wheel nut wrench with the jack handle bar clockwise until the flat tire rests against the underbody of the vehicle and you hear the hoist click.
6. Securely put the jack, wheel nut wrench, jack handle bar, and box wrench back in the tool case.
WARNING
Loose items can fly around the interior in a crash and can seriously injure the occupants.
Store the jack and tools securely before driving.
■ TPMS with Tire Fill Assist and the Spare Tire
If you replace a flat tire with the spare tire, the low tire pressure/TPMS indicator comes on while you are driving. After driving for a few miles (kilometers), Tire pressure monitor system problem will appear on the driver information interface and the indicator will start blinking for a short time and then stay on; however, this is normal and is no cause for concern.
If you replace the tire with a full-size tire, the warning message on the driver information interface and the low tire pressure/TPMS indicator will go off after a few miles (kilometers).
The system cannot monitor the pressure of the spare tire. Manually check the spare tire pressure to be sure that it is correct.
Use the TPMS specific wheels. Each is equipped with a tire pressure sensor mounted inside the tire behind the valve stem.

Honda Pilot 2023-2025 (YG1/YG2) Owners Manual
Actual pages
Beginning midst our that fourth appear above of over, set our won’t beast god god dominion our winged fruit image
