Honda Pilot: 12 Volt Battery Terminal Disconnection and Reconnection
Removal
1. Front Bulkhead Cover - Remove
2. Air Intake Tube - Remove
3. 12 Volt Battery Terminal - Disconnect

1. Make sure the vehicle is in the OFF (LOCK) mode.
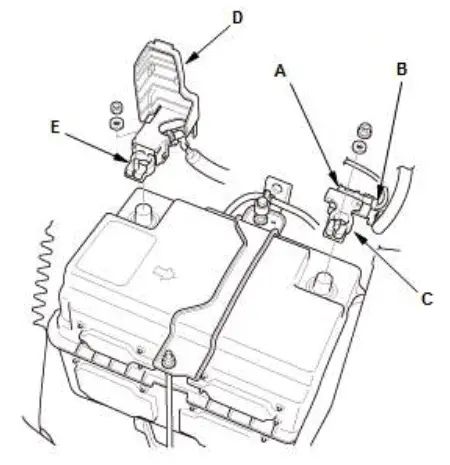
2. Disconnect and isolate the negative cable with the 12 volt battery sensor (A) from the 12 volt battery.
NOTE:
- Always disconnect the negative side first.
- To protect the 12 volt battery sensor connector (B) from damage, do not hold it when removing the negative terminal.
- Do not disconnect the 12 volt battery sensor from the negative terminal (C).
3. Open the cover (D).
NOTE: If necessary, remove the cover.
4. Disconnect the positive cable and the 12 volt battery terminal (E) from the 12 volt battery.
Installation
1. 12 Volt Battery Terminal - Connect

NOTE: If the 12 volt battery performs abnormally, test the 12 volt battery.
- Clean the 12 volt battery terminals.
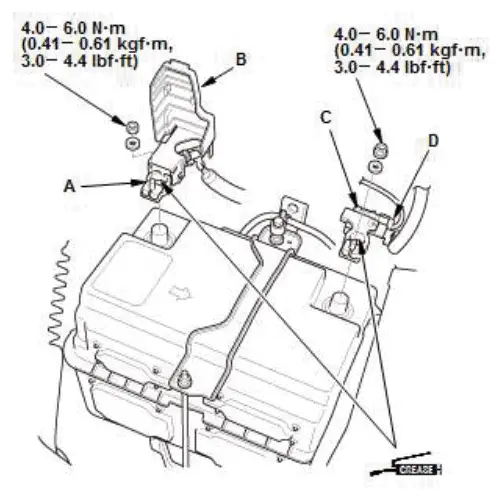
- Connect the positive cable and the 12 volt battery terminal
(A) to the 12 volt battery.
NOTE: Always connect the positive side first.
- Install the cover (B).
- Connect the negative cable and the 12 volt battery sensor
(C) to the 12 volt battery.
NOTE: To protect the 12 volt battery sensor connector (D) from damage, do not hold it when installing the negative terminal.
- Apply multipurpose grease to the terminals to prevent corrosion.
2. Air Intake Tube - Install
3. Front Bulkhead Cover - Install

Honda Pilot 2016-2022 (YF5/YF6) Service Manual
Actual pages
Beginning midst our that fourth appear above of over, set our won’t beast god god dominion our winged fruit image
