Honda Pilot: ATF Pump Inspection
Inspection
1. ATF Pump - Inspect
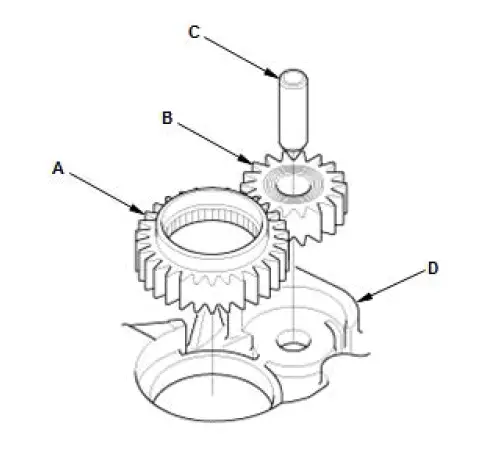
- Lubricate the ATF pump drive gear (A), the ATF pump driven gear (B), and the ATF pump driven gear shaft (C) with ATF.
- Install the ATF pump drive gear, the ATF pump driven gear, and the ATF pump driven gear shaft in the main valve body (D). Install the ATF pump driven gear with its grooved and chamfered side facing up.
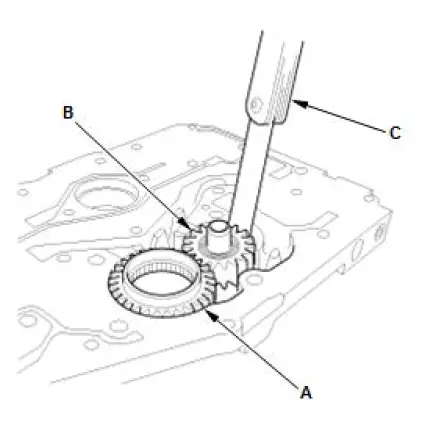
- Measure the side clearance of the ATF pump drive gear (A) and the ATF pump driven gear (B) using a feeler gauge (C).
ATF Pump Gears Side (Radial) Clearance
Standard (New):
ATF Pump Drive Gear
0.210-0.265 mm (0.009-0.010 in)
ATF Pump Driven Gear
0.070-0.125 mm (0.003-0.004 in)
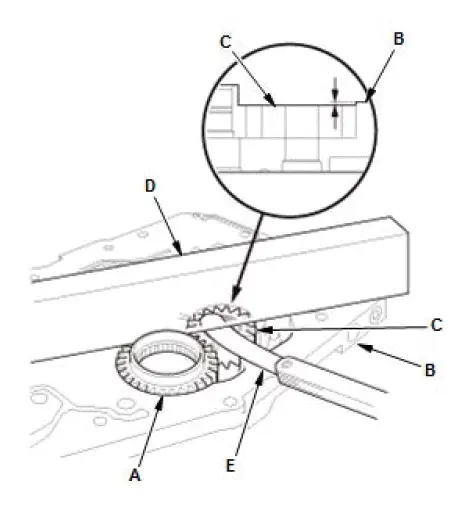
- Remove the ATF pump driven gear shaft.
- Measure the thrust clearance between the ATF pump drive gear (A) and the main valve body (B), and between the ATF pump driven gear (C) and the main valve body using a straight edge (D) and a feeler gauge (E).
ATF Pump Drive/Driven Gear Thrust (Axial) Clearance
Standard (New): 0.04-0.07 mm (0.002-0.002 in)
Service Limit: 0.07 mm (0.002 in)
- If the measurements are out of the standards, replace the main valve body assembly.
Auto Idle Stop System Inspection
NOTE:
- Before you do this inspection, check for the following conditions. If
any of the following
condition is found, reset the 12 volt battery sensor.
- 12 volt battery charge procedure; Check if the 12 volt battery
charge is properly done.
When the 12 volt battery charge procedure is not correctly followed such as charging the 12 volt battery using a 12 volt battery charger without disconnecting the 12 volt battery terminals, it may cause inaccurate measurement of the 12 volt battery sensor current and cause idle stop malfunction.
- 12 volt battery negative terminal; When any electric devices or additional earth cables are directly connected to the negative terminal, you need to remove them.
- 12 volt battery charge procedure; Check if the 12 volt battery
charge is properly done.
- 12 volt battery sensor reset procedure; Turn the vehicle to the OFF (LOCK) mode, and disconnect the 12 volt battery sensor connector, then reconnect it.
1. Check under these conditions:
- At higher altitudes, auto idle stop may be prevented because of the lack of vacuum in the brake booster.
- No indicators are on in the gauge.
- A/T gear position indicator does not blink.
- Starter system indication is not indicated.
- The 12 volt battery is fully charged.
NOTE: If the 12 volt battery is replaced, do the 12 volt battery internal resistance reset procedure.
- Hood is closed.
- All electrical items (headlights, blower fan, radiator fan, rear window defogger, A/C, etc.) are off.
- PCM idle learn procedure is completed.
- Drive the vehicle on a flat road or downhill.
- Idle stop off switch is not on.
NOTE: If there is a problem on the idle stop off switch operation, do the following procedure:
- Test the idle stop off switch.
- Do the gauge control module self-diagnostic function.
- Driver fasten the seat belt (check the seat belt indicator and caution).
- VSA sensor neutral position memorization learn is completed.
- AWD: Normal mode (intelligent traction management).
NOTE: If there is a problem on the integrated dynamics system, do the following procedure:
- Test the intelligent traction management switch.
- Do the gauge control module self-diagnostic function.
2. Drive the vehicle to warm up the vehicle, and check the following items that meet the temperature requirement:
- ECT SENSOR 1
- ESTIMATED BATTERY TEMPERATURE (BATTERY SENSOR)
NOTE: The 12 volt battery temperature is easy to rise when the engine is idling with the hood closed. If the outside air temperature is low condition, the 12 volt battery temperature does not rise enough. - ATF temperature
3. Start the engine, and test-drive the vehicle under these conditions:
- Drive the vehicle at 25 mph (40 km/h), then stop the vehicle within 5-15 seconds.
- Press and hold the brake pedal until the vehicle stops (do not pump the brake pedal or do not brake suddenly).
- Keep the brake pedal pressed after the vehicle stops.
NOTE: Do not turn the steering wheel when just before the vehicle stop.
4. Repeat steps 1 through 3 several times, then check the auto idle stop system. If the auto idle stop system works, the system is OK. If the auto idle stop system does not work, do the symptom troubleshooting.

Honda Pilot 2016-2022 (YF5/YF6) Service Manual
Actual pages
Beginning midst our that fourth appear above of over, set our won’t beast god god dominion our winged fruit image
