Honda Pilot: Clock
Adjusting the Clock
You can adjust the time in the clock display with the power mode in ON.
The clock is automatically updated through the audio system.
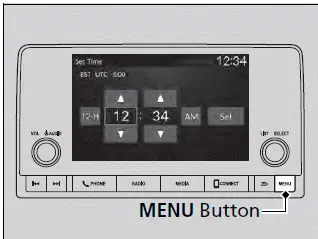
Models with 7-in. Color Touchscreen
You can also select and enter with the selector knob instead of the touch panel.
■ Adjusting the Time
Models with 7-in. Color Touchscreen

1. Press the MENU button.
2. Select Clock Settings.
3. Select Automatic Time, then select OFF.
4. Select Set Time.
5. Select 12H/24H to change 12 or 24 hour clock.
6. Select
 or
or
 .
.
7. Select Set to set the time.
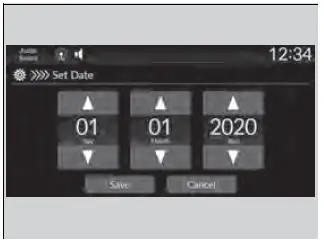
Models with 9-in. Color Touchscreen

1. Press the
 button.
2. Select General Settings.
3. Select System.
4. Select Date & Time.
5. Select Set Date & Time.
6. Select Automatic Date & Time, then select OFF.

To adjust date:
7. Select Set Date.
8. Select
 or
or
 .
.
9. Select Save to set the date.
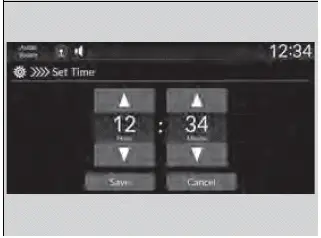
To adjust time:
7. Select Set Time.
8. Select
 or
or
 .
.
9. Select Save to set the time.
Models with 9-in. Color Touchscreen
You can also adjust the clock by touching the clock
displayed on the header area of the audio/
information screen, Clock displayed on the home
screen, or
 All Apps.
1. Touch the clock on the screen.
The clock screen of the face-type appears.
2. Select Settings.
3. Select Date & Time.
4. Select Set Date & Time.
5. Select Automatic Date & Time, then select OFF.
6. Select Set Date or Set Time.
7. Adjusting the dates, hours, and minutes by
selecting
 or
or
 .
.
8. Select Save to set the time.
You can customize the clock display to show the 12 hour clock or 24 hour clock.
You can customize the date display to MM/DD/ YYYY, DD/MM/YYYY, or YYYY/MM/DD.

Honda Pilot 2023-2025 (YG1/YG2) Owners Manual
Actual pages
Beginning midst our that fourth appear above of over, set our won’t beast god god dominion our winged fruit image
