Honda Pilot: Gauges and Displays
The Honda Pilot 2023 features a comprehensive set of gauges and displays designed to provide the driver with essential information and enhance the overall driving experience. Key elements include a digital speedometer and tachometer, which display the current speed and engine RPM, ensuring that the driver can monitor these crucial metrics at a glance. Additionally, the fuel gauge indicates the current fuel level, helping the driver to plan refueling stops and avoid running out of fuel. The temperature gauge monitors the engine's temperature, alerting the driver if the engine is overheating.
- Gauges
- Driver Information Interface (A-type Meter)
- Driver Information Interface Left Side Area (B-type-Meter)
- Driver Information Interface Right Side Area (B-type-Meter)
- Head-Up Display
Gauges
Gauges include the speedometer, fuel gauge, and other related indicators.
They are displayed when the power mode is in ON.
Located within the instrument cluster, the Driver Information Interface provides a range of information, including trip data, fuel efficiency, maintenance reminders, and customizable settings. It also shows alerts and warnings, such as low fuel, low tire pressure, and system malfunctions. Complementing this, the Multi-Information Display (MID) offers additional data and control options, such as audio settings, navigation instructions, and Bluetooth connectivity status.
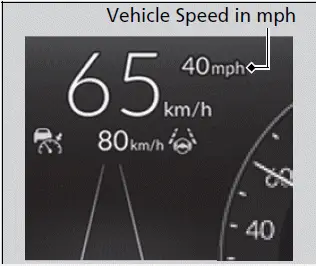
■ Speedometer
Displays your driving speed in mph or km/h.
U.S. models with B-type meter
If you change the unit from miles and mph to km and km/h, the current vehicle speed in mph appears next to the digital speedometer.
■ Tachometer
Shows the number of engine revolutions per minute.
Models with A-type meter
You can turn the tachometer display on or off.
■ Fuel Gauge
Displays the amount of fuel left in the fuel tank.
NOTICE
You should refuel when the reading approaches E.
Running out of fuel can cause the engine to misfire, damaging the catalytic converter.
The actual amount of remaining fuel may differ from the fuel gauge reading.
Models with B-type meter
■ Temperature Gauge
Displays the temperature of the engine coolant.
NOTICE
Driving with the temperature gauge reading in the upper zone can cause serious engine damage. Pull safely to the side of the road and allow engine temperature to return to normal.
■ Odometer
Shows the total number of miles or kilometers that your vehicle has accumulated.
■ Outside Temperature
Shows the outside temperature in Fahrenheit (U.S.) or Celsius (Canada).
Adjusting the outside temperature display
Adjust the temperature reading by up to +-5ºF or +-3ºC if the temperature reading seems incorrect.
The temperature sensor is in the front bumper.
Road heat and exhaust from another vehicle can affect the temperature reading when your vehicle speed is less than 19 mph (30 km/h).
It may take several minutes for the display to be updated after the temperature reading has stabilized.
You can adjust the temperature reading.
■ Traffic Sign Recognition System
Shows certain detected traffic signs while driving.
If speed limit warning is activated, the sign icon blinks when the maximum speed of the traffic sign detected is exceeded by a threshold, when compared with the vehicle speed.
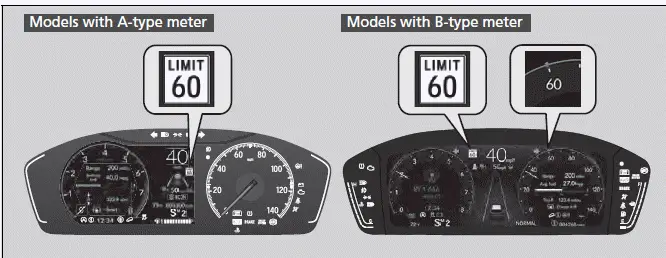
The default speed limit warning threshold is the maximum speed of the traffic sign detected.
You can adjust the threshold for speed limit warning.
■ Current Mode for ACC with Low Speed Follow, the LKAS, and Traffic Jam Assist
Shows the current mode for ACC with Low Speed Follow, LKAS, and Traffic Jam Assist.
Models with B-type meter
When you set speed for ACC with Low Speed Follow or cruise control, a set speed mark will be displayed on the speedometer.
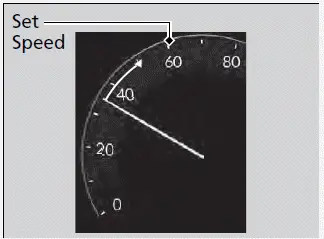
Models with A-type meter
■ Clock
Shows the clock.
You can adjust the time manually and change the clock display to show the 12 hour clock or 24 hour clock.
The Honda Pilot 2023 also includes various warning indicators that illuminate or blink to signal different vehicle conditions, such as open doors, low oil pressure, and activated safety features. Messages accompanying these indicators provide specific instructions or recommendations. These gauges and displays are designed to ensure that drivers have all the necessary information for safe and efficient driving, presented in a clear and accessible manner.
Driver Information Interface (A-type Meter)
The driver information interface in the car provides essential details such as the estimated travelable distance and fuel economy, along with displaying various messages from warnings to helpful operational information. When a warning message appears, it is important to promptly check it and take necessary action. If needed, contacting a dealer for inspection ensures continued safe operation. For specific guidance on critical messages like "Engine oil pressure low" or "Engine temperature too hot," drivers should refer to the designated pages in the owner's manual or maintenance guide. This ensures drivers are well-informed and ready to handle any issues while driving the Honda Pilot 2023-2024.
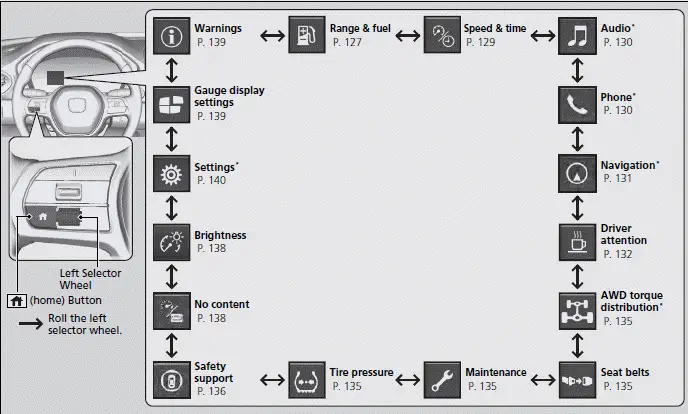
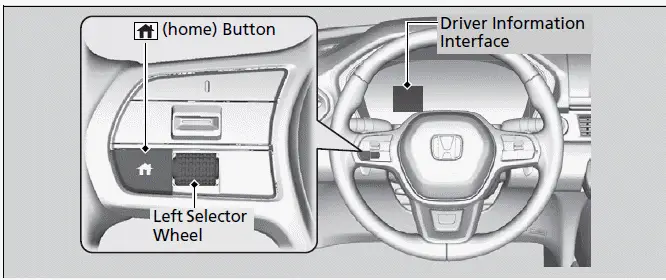
■ Switching the Display
Press the
 (home) button, then
roll the left selector wheel to scroll to the content
you want to see. Press the left selector wheel to see detailed information.
(home) button, then
roll the left selector wheel to scroll to the content
you want to see. Press the left selector wheel to see detailed information.
You can add or delete the meter contents.
■ Range/Fuel/Trip Meter
Roll the left selector wheel to switch between trip meter A and trip meter B.
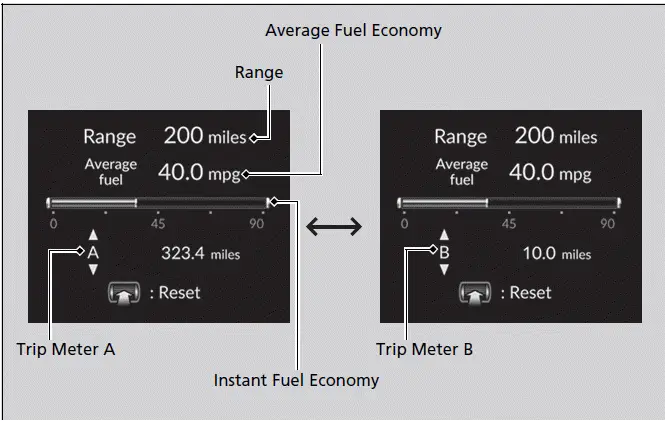
Trip meter
Shows the total number of miles or kilometers driven since the last reset. Meters A and B can be used to measure two separate trips.
Resetting a trip meter
To reset the trip meter, display it, press the left selector wheel, and then select Reset.
- The trip meter is reset to 0.0.
Average fuel economy
Shows the estimated average fuel economy of each trip meter in mpg or l/100 km.
The display is updated at set intervals. When a trip meter is reset, the average fuel economy is also reset.
You can change when to reset the average fuel economy.
Instant fuel economy
Shows the instant fuel economy as a bar graph in mpg or l/100 km.
Range
Shows the estimated distance you can travel on the remaining fuel. This estimated distance is based on the vehicle's current fuel economy.
The driving range displayed is only an estimate and may differ from the actual distance the vehicle can travel.
■ Speed/Time/Trip Meter
Roll the left selector wheel to switch between trip meter A and trip meter B.
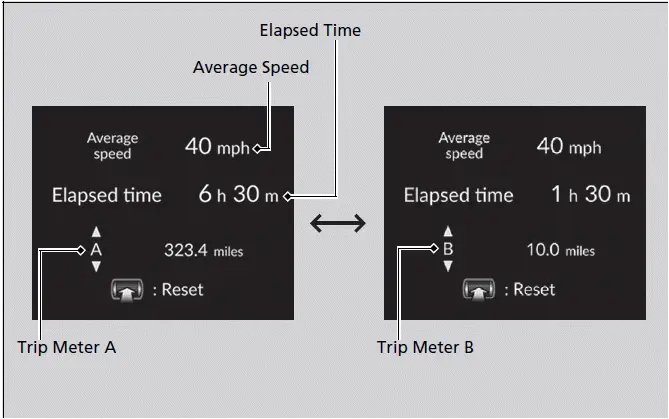
Elapsed time
Shows the time elapsed since Trip A or Trip B was reset.
You can change when to reset the elapsed time.
Average speed
Shows the average speed in mph or km/h since Trip A or Trip B was reset.
You can change when to reset the average speed.
■ Audio*
Shows the current audio information.
■ Phone*
Shows the current phone information.
■ Navigation*
You can select whether to have the turn-by-turn display come on or not during the route guidance.
Turn-by-turn directions may not be available for all apps.
Compass
Shows the compass screen.
Turn-by-Turn Directions
When driving guidance is provided by the navigation system, Android Auto or Apple CarPlay, turn-by-turn directions to your destination appear.
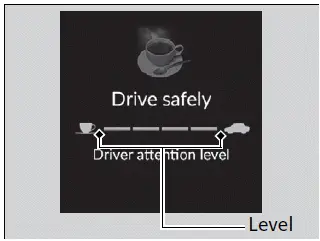
■ Driver Attention Monitor
The Driver Attention Monitor analyzes steering inputs to determine if the vehicle is being driven in a manner consistent with drowsy or inattentive driving. If it determines that the vehicle is being driven in such a manner, it will display the degree of the driver's attention on the driver information interface.
The Driver Attention Monitor cannot always detect if the driver is tired or inattentive.
Regardless of the system's feedback, if you are feeling tired, stop in a safe location and rest for as long as needed.
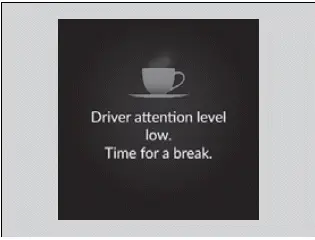
When you select Driver attention on the driver information interface, bars on it light up in white to indicate the degree of the driver's attention.

If two bars light up, the Driver attention level low message will appear.
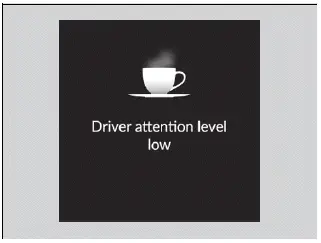
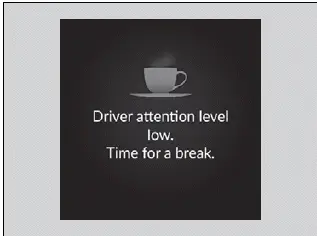
If one bar lights up, the Driver attention level low. Time for a break. message will appear, a beep will sound, and the steering wheel will vibrate.
If this message appears, stop in a safe location and rest for as long as needed.
The message will disappear when the left selector wheel is pressed or when the system has determined that the driver is driving normally.
If the driver does not take a break and the monitor continues to detect that the driver is very tired, the message will appear again after approximately 15 minutes, accompanied by a beep and steering wheel vibrations.
The message does not appear when the traveling time is 30 minutes or less.
The Driver Attention Monitor resets when:
- The engine is turned off.
- The driver unfastens the seat belt and opens the door while the vehicle is stopped.
For the Driver Attention Monitor to function:
- The vehicle must be traveling above 25 mph (40 km/h).
- The electric power steering (EPS) system indicator must be off.
The bars on the driver information interface remain grayed out unless the Driver Attention Monitor is functioning.
Depending on driving conditions or other factors, the Driver Attention
Monitor may not function in the following circumstances:
- The steering assist function of the Lane Keeping Assist System (LKAS) is active.
- The condition of the road is poor; e.g., the surface is unpaved or bumpy.
- It is windy.
- The driver is frequently operating the vehicle in an assertive manner, such as changing lanes or accelerating.
Customizing
You can change the Driver Attention Monitor settings. Select Tactile and audible alert*1/Tactile And Audible Alert*2, Tactile alert*1/Tactile Alert*2 or OFF.
*1: Models with 7-in. Color Touchscreen
*2: Models with 9-in. Color Touchscreen
■ AWD Torque Distribution Monitor *
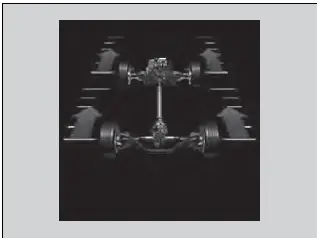
The indicators on the display show the amount of torque being transferred to the right front, left front, right rear, and left rear wheels.
■ Seat Belts
Occurs, under specified conditions, when seat belts are latched or unlatched.
■ Maintenance
Shows the remaining oil life and Maintenance MinderTM.
■ Tire Pressure Monitor
Shows each tire's pressure.
Tire pressure status is displayed via green and amber icons.
The icons turn amber if tire pressure is too low, or if there is a problem with the system. "--" is displayed if there is a problem.
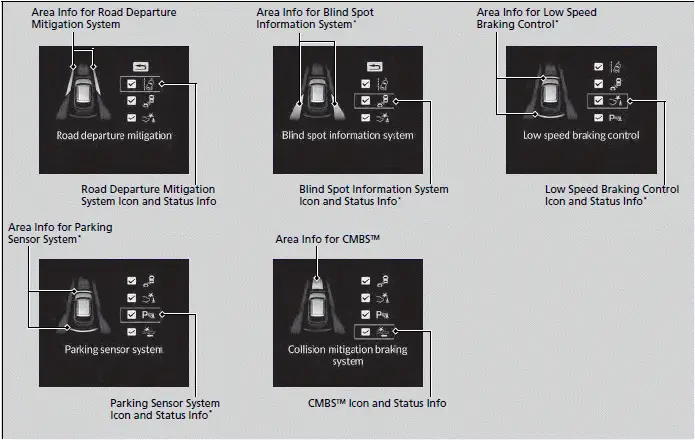
■ Safety Support
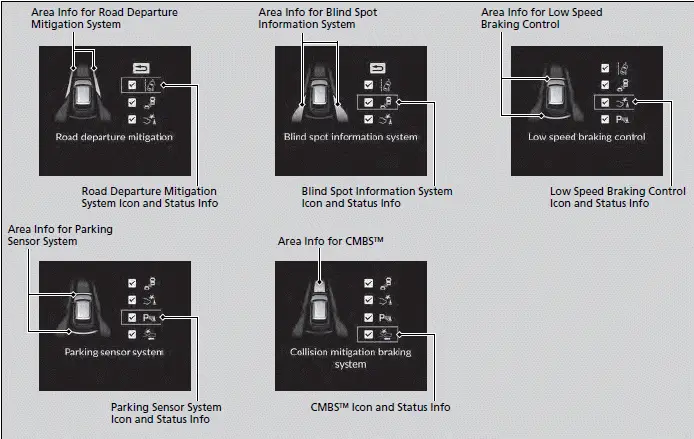
Indicates the status of the Road Departure Mitigation system, CMBSTM, Low Speed Braking Control*, blind spot information system*, and Parking Sensor System*, such as On, Off, or Failure, by color and letters.
The following colors indicate the status of any of the above-mentioned systems:
- Green: The system is on.
- Gray: The system is off.
- Amber: There is a problem with the system.
If a system is indicated by the color amber, have your vehicle checked by a dealer immediately.
To turn each system on or off, first rotate the left selector wheel to switch displays. From the next display, you can select which system to turn on or off.
You can also confirm the state of each function by the color of the safety support indicator.
Even when the Parking Sensor System icon is green, if the Rear Sensor Setting is turned off, the rear parking sensor will not operate when reversing.
Models with Low Speed Braking Control
Even when the Low Speed Braking Control icon is green, if the Rear Sensor Setting is turned off, the brake assist will not operate when reversing.
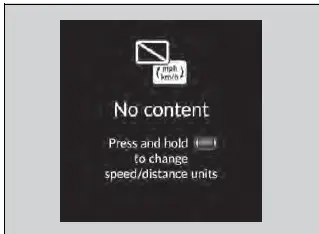
■ No Content
The tachometer can be turned on and off using the driver information interface or audio/information screen.
Even if you have turned off the tachometer on the driver information interface or audio/information screen, if No content is selected on the driver information interface, it will change to a tachometeronly display.
Speed/Distance Units
Enables you to show another unit on the driver information interface and audio/ information screen and set the displayed measurements to read in either miles and mph or km and km/h.
Press and hold the left selector wheel when you select No content on the driver information interface. Each time you do this, the unit will change from miles and mph to km and km/h or vice versa. After this, a confirmation screen will appear for a few seconds.
■ Brightness
Press the left selector wheel when the Brightness screen is displayed.
When the power mode is in ON, you can use the left selector wheel to adjust instrument panel brightness.
Brighten: Roll the left selector wheel up.
Dim: Roll the left selector wheel down.
Press the left selector wheel to exit.
The brightness of the gauge is automatically adjusted depending on the ambient brightness.
- The brightness dims when the ambient light is dark.
- The brightness brightens when the ambient light is bright.
You can change the setting even when the ambient lighting is bright, but the brightness of the gauge won't change.
■ Gauge Display Settings
You can choose which icons to display on the home screen.
1. Roll the left selector wheel to scroll to select Gauge display settings, then press the left selector wheel.
2. Roll the left selector wheel.
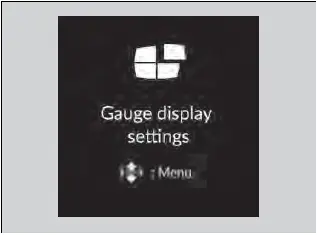
3. Roll the left selector wheel to scroll between icons, then press the left selector wheel to check or uncheck them.
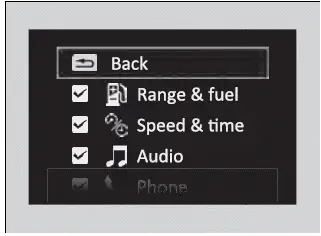
Icons that are gray cannot be removed from the home screen.
When you customize settings, shift to (P).
■ Warnings
You can check if there are any active warning messages.
If there are multiple warnings, you can roll the left selector wheel to see other warnings.
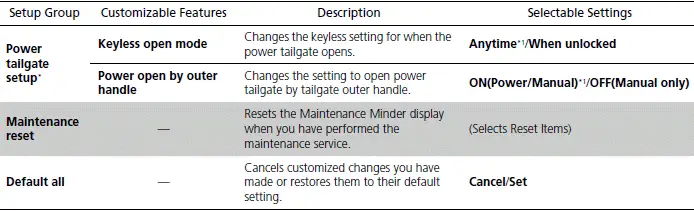
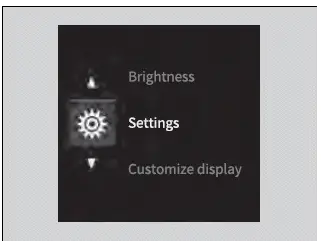
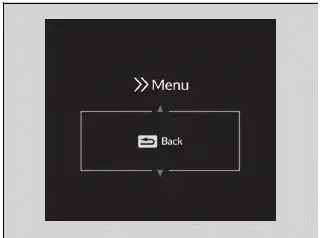
■ Settings
Use the driver information interface to customize certain features.
How to customize
Press the
 (home) button, then
select the
(home) button, then
select the
 screen by rolling the
left selector
wheel while the power mode is in ON, the vehicle is at a complete stop, and the
shift
position is in (P). Then, press the left selector wheel.
screen by rolling the
left selector
wheel while the power mode is in ON, the vehicle is at a complete stop, and the
shift
position is in (P). Then, press the left selector wheel.
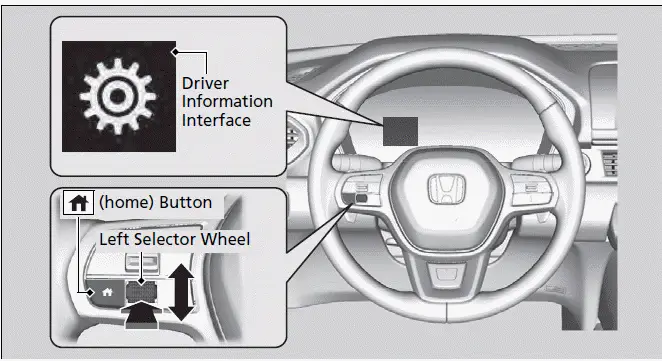
To customize other features, roll the left selector wheel.
Put the transmission into (P) before you attempt to change any customized setting.
List of customizable options
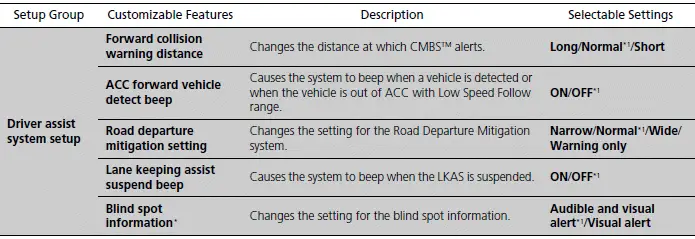
*1:Default Setting
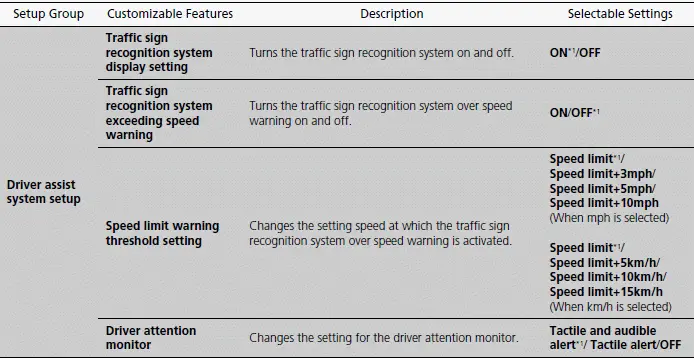
*1:Default Setting
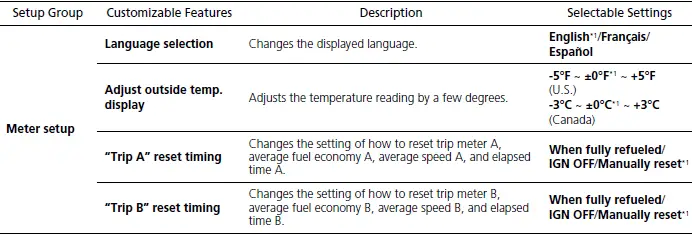
*1:Default Setting
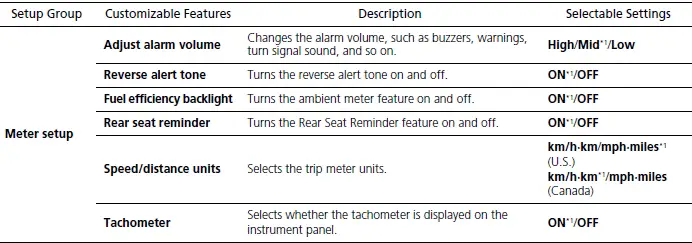
*1:Default Setting
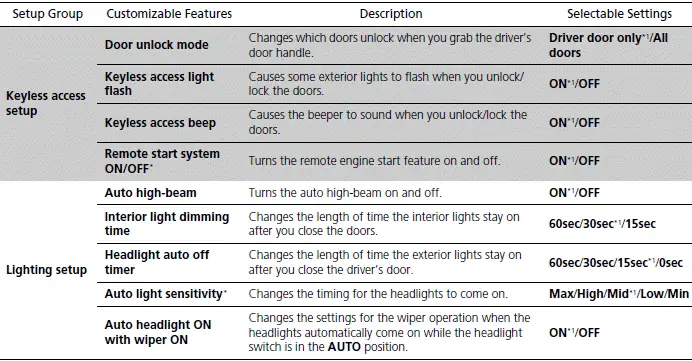
*1:Default Setting
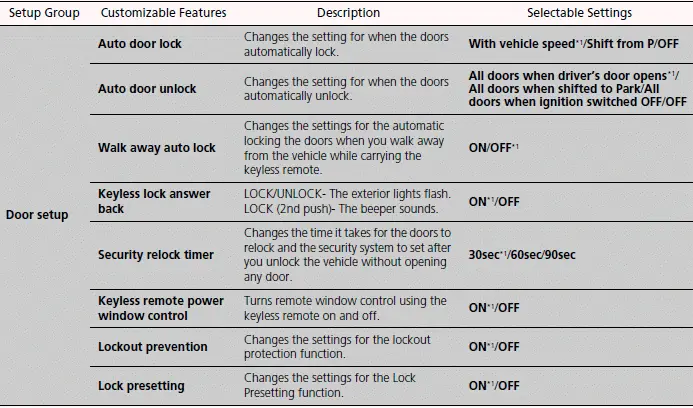
*1:Default Setting
*1:Default Setting
Example of customization settings
The steps for changing the "Trip A" reset timing setting to When fully refueled are shown below. The default setting for "Trip A" reset timing is Manually reset.
1. Press the
 (home) button and
roll the left
selector wheel to select Settings, then
press the left selector wheel.
(home) button and
roll the left
selector wheel to select Settings, then
press the left selector wheel.
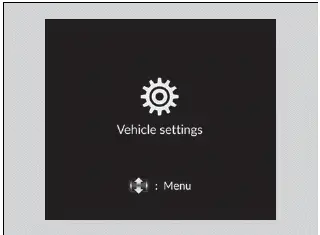
2. Roll the left selector wheel until Meter setup appears on the display.
3. Press the left selector wheel.

4. Roll the left selector wheel until "Trip A" reset timing appears on the display, then press the left selector wheel.
- The display switches to the customization setup screen, where you can select When fully refueled, IGN OFF, Manually reset, or Back.
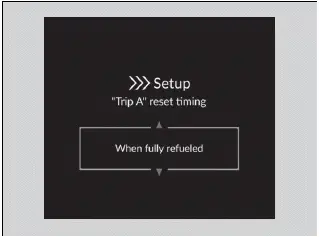
5. Roll the left selector wheel and select When fully refueled, then press the left selector wheel.
- The Selected appears, then the display returns to the customization menu screen.
6. Press the left selector wheel after Back appears on the display.
7. Repeat Step 6 until you return to the normal screen.
Driver Information Interface Left Side Area (B-type-Meter)
Shows the current mode for audio and phone information, etc.
■ Clock
Shows the clock.
You can adjust the time manually and change the clock display to show the 12 hour clock or 24 hour clock.
You can choose whether the clock is displayed on the driver information interface.
■ Customize Display
When you customize settings, shift to (P).
Arrange audio source on the left side area
You can choose which sources to display on the audio source screen.
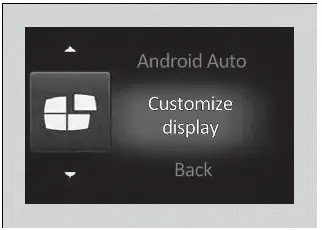
1. Roll the left selector wheel until Customize display is selected, then press the left selector wheel.
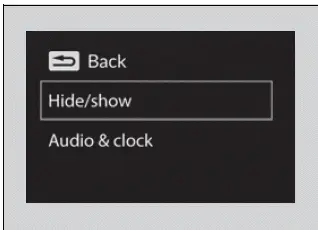
2. Roll the left selector wheel to scroll to select Hide/show, then press the left selector wheel.
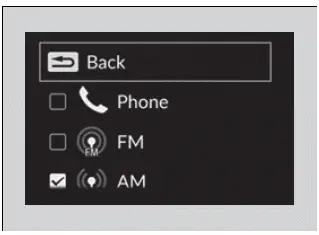
3. Roll the left selector wheel to scroll between audio sources, then press the left selector wheel to check or uncheck them.
Turn the displaying on the left side area on and off
You can select whether the current audio information and clock appear on the left side area.
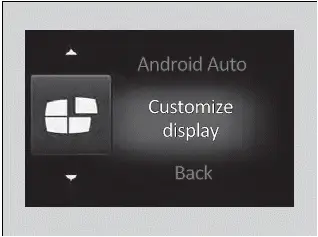
1. Roll the left selector wheel until Customize display is selected, then press the left selector wheel.
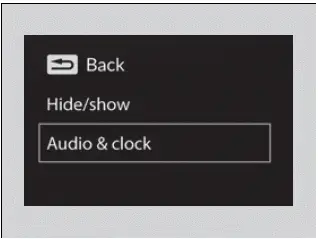
2. Roll the left selector wheel to scroll to select Audio & clock, then press the left selector wheel.
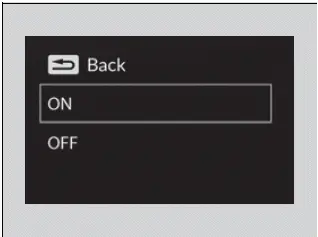
3. Roll the left selector wheel to scroll to select your desired settings, then press the left selector wheel.
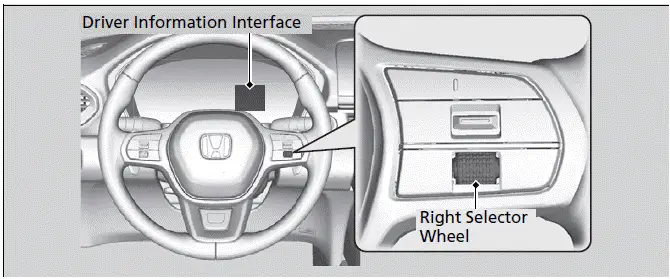
Driver Information Interface Right Side Area (B-type-Meter)
The driver information interface shows information such as the estimated travelable distance and fuel economy of the vehicle. It also displays messages such as warnings and other helpful information.
When a warning message displays, please check the message and contact a dealer to have the vehicle inspected if necessary. Please refer to the pages below if the Engine oil pressure low or Engine temperature too hot message is displayed.
■ Switching the Display
Roll the right selector wheel to view different types of content.
You can add or delete the meter contents.
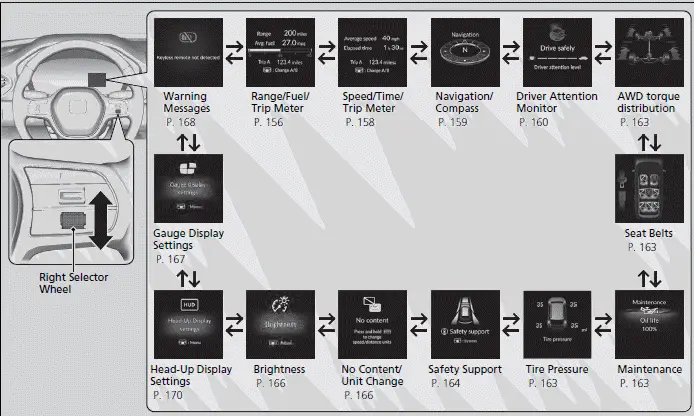
■ Range/Fuel/Trip Meter
Press the right selector wheel to switch between trip meter A and trip meter B.
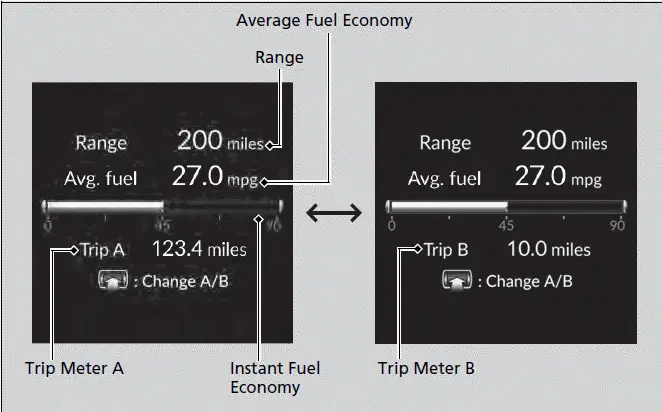
Trip meter
Shows the total number of miles or kilometers driven since the last reset. Meters A and B can be used to measure two separate trips.
Resetting a trip meter
To reset the trip meter, display it, press and hold the right selector wheel, and then select Reset.
The trip meter is reset to 0.0.
Average fuel economy
Shows the estimated average fuel economy of each trip meter in mpg or l/100 km.
The display is updated at set intervals. When a trip meter is reset, the average fuel economy is also reset.
You can change when to reset the average fuel economy.
Instant fuel economy
Shows the instant fuel economy as a bar graph in mpg or l/100 km.
Range
Shows the estimated distance you can travel on the remaining fuel. This estimated distance is based on the vehicle's current fuel economy.
The driving range displayed is only an estimate and may differ from the actual distance the vehicle can travel.
■ Speed/Time/Trip Meter
Press the right selector wheel to switch between trip meter A and trip meter B.
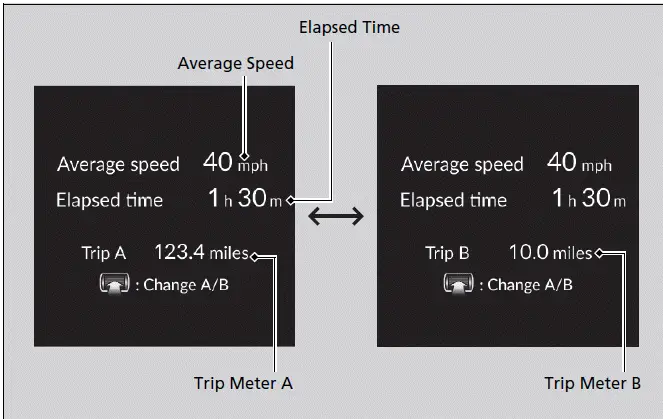
Elapsed time
Shows the time elapsed since Trip A or Trip B was reset.
You can change when to reset the elapsed time.
Average speed
Shows the average speed in mph or km/h since Trip A or Trip B was reset.
You can change when to reset the average speed.
■ Navigation
When the compass or turn-by-turn directions are displayed, you can control some navigation system functions on the driver information interface by pressing the right selector wheel.
You can select whether to have the turn-by-turn display come on or not during the route guidance.
Turn-by-turn directions may not be available for all apps.
Compass
Shows the compass screen.
Turn-by-Turn Directions
When driving guidance is provided by the navigation system, Apple CarPlay or Android Auto, turn-by-turn directions to your destination appear.
■ Driver Attention Monitor
The Driver Attention Monitor analyzes steering inputs to determine if the vehicle is being driven in a manner consistent with drowsy or inattentive driving. If it determines that the vehicle is being driven in such a manner, it will display the degree of the driver's attention on the driver information interface.
The Driver Attention Monitor cannot always detect if the driver is tired or inattentive.
Regardless of the system's feedback, if you are feeling tired, stop in a safe location and rest for as long as needed.
When you select Driver Attention Monitor on the driver information interface, bars on it light up in white to indicate the degree of the driver's attention.
If two bars light up, the Driver attention level low message will appear.
If one bar lights up, the Driver attention level low. Time for a break. message will appear, a beep will sound, and the steering wheel will vibrate.
If this message appears, stop in a safe location and rest for as long as needed.
The message will disappear when the right selector wheel is rolled or when the system has determined that the driver is driving normally.
If the driver does not take a break and the monitor continues to detect that the driver is very tired, the message will appear again after approximately 15 minutes, accompanied by a beep and steering wheel vibrations.
The message does not appear when the traveling time is 30 minutes or less.
The Driver Attention Monitor resets when:
- The engine is turned off.
- The driver unfastens the seat belt and opens the door while the vehicle is stopped.
For the Driver Attention Monitor to function:
- The vehicle must be traveling above 25 mph (40 km/h).
- The electric power steering (EPS) system indicator must be off.
The bars on the driver information interface remain grayed out unless the Driver Attention Monitor is functioning.
Depending on driving conditions or other factors, the Driver Attention Monitor may not function in the following circumstances:
- The steering assist function of the Lane Keeping Assist System (LKAS) is active.
- The condition of the road is poor; e.g., the surface is unpaved or bumpy.
- It is windy.
- The driver is frequently operating the vehicle in an assertive manner, such as changing lanes or accelerating.
Customizing
You can change the Driver Attention Monitor settings. Select Tactile And Audible Alert, Tactile Alert, or OFF.
■ AWD Torque Distribution Monitor
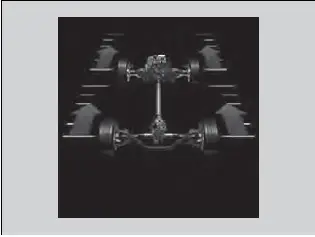
The indicators on the display show the amount of torque being transferred to the right front, left front, right rear, and left rear wheels.
■ Seat Belts
Occurs, under specified conditions, when seat belts are latched or unlatched.
■ Maintenance
Shows the remaining oil life and Maintenance MinderTM.
■ Tire Pressure Monitor
Shows each tire's pressure.
Tire pressure status is displayed via green and amber icons.
The icons turn amber if tire pressure is too low, or if there is a problem with the system. "--" is displayed if there is a problem.
■ Safety Support
Indicates the status of the Road Departure Mitigation system, CMBSTM, Low Speed Braking Control, blind spot information system, and Parking Sensor System, such as On, Off, or Failure, by color and letters.
The following colors indicate the status of any of the above-mentioned systems:
- Green: The system is on.
- Gray: The system is off.
- Amber: There is a problem with the system.
If a system is indicated by the color amber, have your vehicle checked by a dealer immediately.
To turn each system on or off, first press the right selector wheel to switch displays. From the next display, you can select which system to turn on or off.
You can also confirm the state of each function by the color of the safety support indicator.
Even when the Low Speed Braking Control icon is green, if the Rear Sensor Setting is turned off, the brake assist will not operate when reversing.
Even when the Parking Sensor System icon is green, if the Rear Sensor Setting is turned off, the rear parking sensor will not operate when reversing.
■ Speed/Distance Units
Enables you to show another unit on the driver information interface, head-up display and audio/information screen and set the displayed measurements to read in either miles and mph or km and km/h.
Press and hold the right selector wheel when you select the No Content/Unit Change screen on the driver information interface. Each time you do this, the unit will change from miles and mph to km and km/h or vice versa. After this, a confirmation screen will appear for a few seconds.
■ Brightness
Press the right selector wheel when the Brightness screen is displayed.
When the power mode is in ON, you can use the right selector wheel to adjust instrument panel brightness.
Brighten: Roll the right selector wheel up.
Dim: Roll the right selector wheel down.
Press the right selector wheel to exit.
The brightness of the gauge is automatically adjusted depending on the ambient brightness.
- The brightness dims when the ambient light is dark.
- The brightness brightens when the ambient light is bright.
You can change the setting even when the ambient lighting is bright, but the brightness of the gauge won't change.
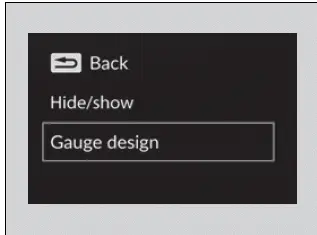
■ Gauge Display Settings
Arrange content on the right side area
You can choose which contents to display on the right side area.
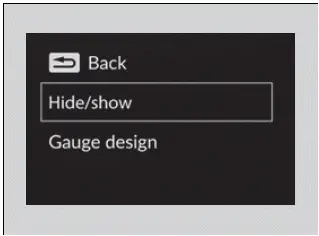
1. Press the right selector wheel when you select the Gauge display settings on the driver information interface.
2. Roll the right selector wheel to scroll to select Hide/show, then press the right selector wheel.
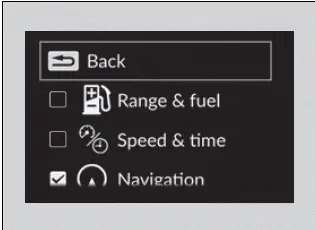
3. Roll the right selector wheel to scroll between contents, then press the right selector wheel to check or uncheck them.
Contents that are gray cannot be removed from the right side area.
When you customize settings, shift to (P).
Change gauge design
You can change the gauge design to a round or bar design.
1. Press the right selector wheel when you select the Gauge display settings on the driver information interface.
2. Roll the right selector wheel to scroll to select Gauge design, then press the right selector wheel.
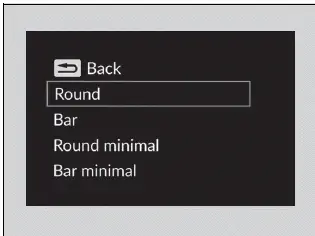
3. Roll the right selector wheel to scroll to select your desired settings, then press the right selector wheel.
When using the Round minimal or Bar minimal gauge design, a simplified display is used when ACC with Low Speed Follow is in operation.
■ Warnings
You can check if there are any active warning messages.
If there are multiple warnings, you can roll the right selector wheel to see other warnings.
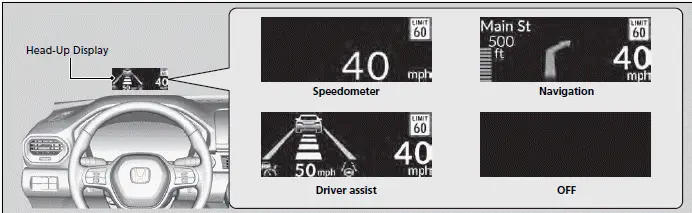
Head-Up Display
Shows the current mode for ACC with Low Speed Follow, LKAS, and Traffic Jam Assist; compass or turn-by-turn directions; and vehicle speed. You can choose which item to be displayed using the driver information interface. They are displayed when the power mode is in ON.
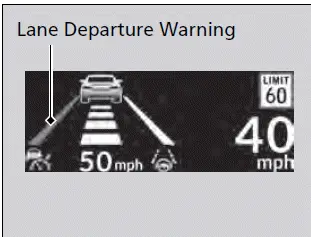
The display also shows the following messages.
- Lane Departure Warning: When your vehicle is too close to the traffic lane lines, the lane departure warning appears.

- Head-up Warning Lights: Flash when the BRAKE message appears on the driver information interface.

- Traffic Sign Recognition System: Shows
certain detected traffic signs while driving.
If speed limit warning is activated, the sign icon blinks when the maximum speed of the traffic sign detected is exceeded by a threshold, when compared with the vehicle speed.
The default speed limit warning threshold is the maximum speed of the traffic sign detected.
You can adjust the threshold for speed limit warning.
■ Head-Up Display Settings
Shows the display for changing the head-up display settings on the driver information interface.
Roll the right selector wheel to scroll to select Head-Up Display settings, then press the right selector wheel.
To change head-up display content
1. Roll the right selector wheel to scroll to select HUD content, then press the right selector wheel.
2. Roll the right selector wheel to scroll to select desired item, then press the right selector wheel.
- Speedometer
- Navigation
- Driver assist
- OFF
Adjusting the head-up display brightness
Roll the right selector wheel to scroll to select HUD brightness, then press the right selector wheel.
Brighten: Roll the right selector wheel up.
Dim: Roll the right selector wheel down.
Press the right selector wheel to exit.
Adjusting the head-up display height
Roll the right selector wheel to scroll to select HUD height, then press the right selector wheel.
Raise the head-up display: Roll the right selector wheel up.
Lower the head-up display: Roll the right selector wheel down.
Press the right selector wheel to exit.
When you unlock and open the driver's door with a remote transmitter or keyless access system, the head-up display adjusts automatically to one of the two preset positions.
■ Speedometer
Shows your driving speed in mph or km/h.
Switch between mph and km/h by using the driver information interface or the customized features on the audio/information screen.
■ Current Mode for ACC with Low Speed Follow, LKAS, and Traffic Jam Assist
Shows the current mode for ACC with Low Speed Follow, LKAS, and Traffic Jam Assist.
■ Navigation
Compass
Shows the compass screen.
Turn-by-Turn Directions
When driving guidance is provided by the navigation system, Android Auto or Apple CarPlay, turn-by-turn directions to your destination appear.
You can select whether the turn-by-turn display comes on during the route guidance.
Turn-by-turn directions may not be available for all apps.

Honda Pilot 2023-2025 (YG1/YG2) Owners Manual
Gauges and Displays
- Gauges
- Driver Information Interface (A-type Meter)
- Driver Information Interface Left Side Area (B-type-Meter)
- Driver Information Interface Right Side Area (B-type-Meter)
- Head-Up Display
Actual pages
Beginning midst our that fourth appear above of over, set our won’t beast god god dominion our winged fruit image
