Honda Pilot: Fuel Gauge Sending Unit Test
Honda Pilot 2016-2022 (YF5/YF6) Service Manual / Parts Test Info / Fuel Gauge Sending Unit Test
Test
1. Fuse - Check
Check the No. A26 (10 A) fuse in the under-hood fuse/relay box and the No. D1 (7.5 A) fuse in the auxiliary under-dash fuse/relay box (with auto idle stop system) or the No. A26 (10 A) fuse in the under-hood fuse/relay box and the No. C29 (7.5 A) fuse in the under-dash fuse/relay box (without auto idle stop system) before testing.
2. Body Electrical DTC - Check
Check for body electrical system DTCs.
- If no problem is found, go to the next procedure (Rear Seat Cushion Remove).
- If DTC B1175 or B1176 is indicated, go to the indicated DTC's troubleshooting.
3. Second Row Seat (Left Side) - Remove
4. Access Panel - Remove
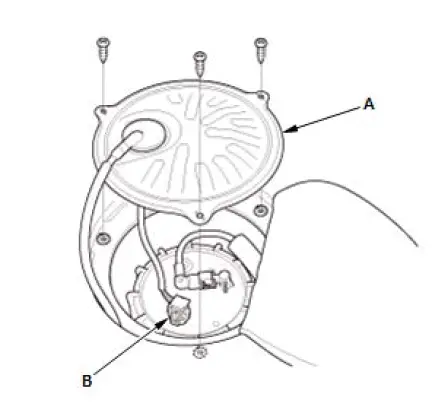
- Remove the access panel (A) from the floor.
- Disconnect the connector (B).
5. Open or Shorted Wire - Check
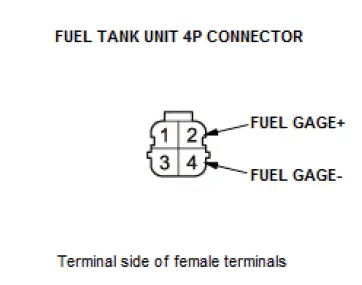
- Measure the voltage between fuel tank unit connector
terminals No. 2 and No. 4 with the vehicle in ON mode.
There should be 12 volt battery voltage.
- If the voltage is OK, go to step 2.
- If the voltage is not as specified, check for:
- a short in the FUEL GAGE+ line to ground.
- an open in the FUEL GAGE+ or FUEL GAGE-line.
- Turn the vehicle to the OFF (LOCK) mode.
6. Fuel Tank Unit - Remove
7. Fuel Gauge Sending Unit - Test
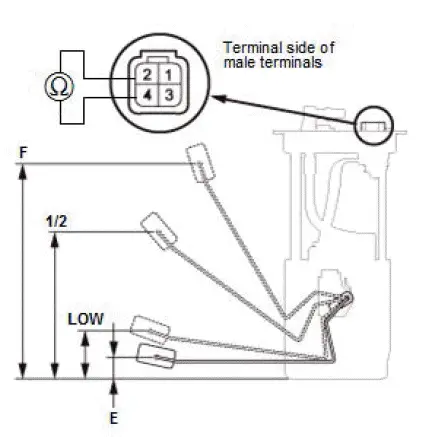
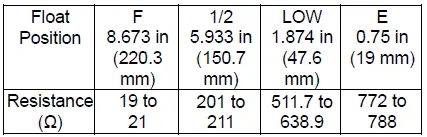
- Measure the resistance between fuel tank unit 4P connector terminals No. 2 and No. 4 with the float at E (EMPTY), LOW (LOW FUEL INDICATOR), 1/2 (HALF FULL), and F (FULL) positions. If you do not get the following readings, replace the fuel gauge sending unit..
- Reconnect the fuel tank unit connector.
- Remove the No. A26 (10 A) fuse in the under-hood fuse/relay box and the No. D1 (7.5 A) fuse in the auxiliary under-dash fuse/relay box (with auto idle stop system) or the No. A26 (10 A) fuse in the under-hood fuse/relay box and the No. C29 (7.5 A) fuse in the under-dash fuse/relay box (without auto idle stop system) for at least 10 seconds, then reinstall it.
- Turn the vehicle to the ON mode.
- Check that the pointer of the fuel gauge indicates F with the float at F.
- If the pointer of the fuel gauge does not indicate F, replace the gauge control module.
- If the gauge is OK, the test is complete.
NOTE:
- The pointer of the fuel gauge returns to the bottom of the gauge dial when turning the vehicle to the ACCESSORY or OFF (LOCK) mode, regardless of the fuel level.
- Remove the No. A26 (10 A) fuse in the under-hood fuse/relay box and the No. D1 (7.5 A) fuse in the auxiliary under-dash fuse/relay box (with auto idle stop system) or the No. A26 (10 A) fuse in the under-hood fuse/relay box and the No. C29 (7.5 A) fuse in the under-dash fuse/relay box (without auto idle stop system) for at least 10 seconds after completing the test, otherwise it may take up to 20 minutes for the fuel gauge to indicate the correct fuel level.

Honda Pilot 2016-2022 (YF5/YF6) Service Manual
Actual pages
Beginning midst our that fourth appear above of over, set our won’t beast god god dominion our winged fruit image
