Honda Pilot: HFL Switch Test
Test
SRS components are located in this area. Review the SRS component locations and the precautions and procedures before doing repairs or service.
NOTE: The HFL-navigation voice control switch and the HFL switch are the same parts.
1. Steering Wheel Trim Remove
2. HFL Switch Test
With Heated Steering Wheel
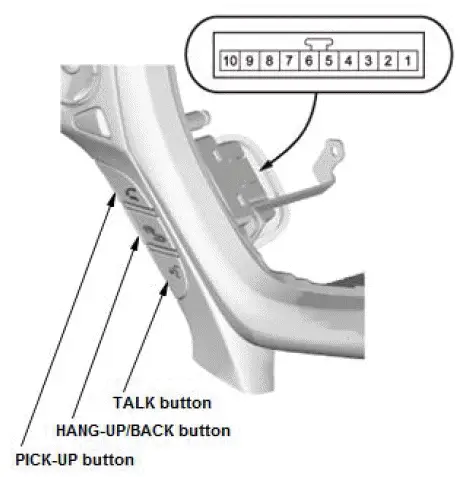
- With Heated Steering Wheel: Measure the resistance between terminals No. 2 and No. 7 in each switch position according to the table.
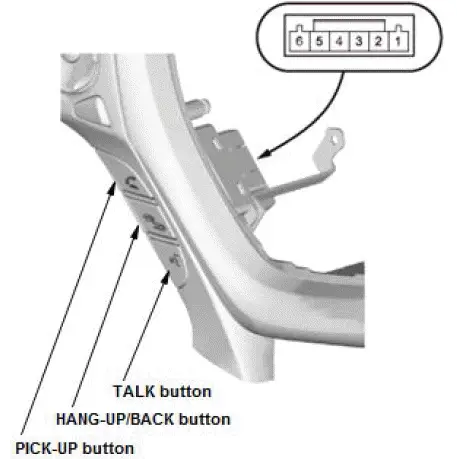
- Without Heated Steering Wheel: Measure the resistance between terminals No. 3 and No. 4 in each switch position according to the table.
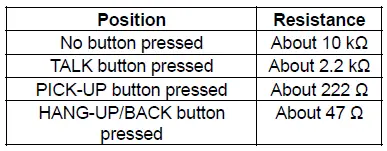
- If the resistance is not as specified, replace the HFL switch.
Without Heated Steering Wheel
3. Steering Wheel Trim - Install
Install the parts in the reverse order of removal.
HomeLink Remote Control System Test
NOTE:
- Explain to the client that garage door remote transmitters come in two types: Fixed code and rolling code. Each type has its own programming method, and each method is covered in the Owner's Manual. If the client has concerns about the HomeLink unit, have the client contact the HomeLink assistance desk at 800-355-3515.
- If HomeLink will not open the client's garage, do the following procedures.
1. Press any of the buttons on the HomeLink unit.
- If the red indicator comes on, go to step 5.
- If the red indicator does not come on, go to step 2.
2. Do the HomeLink switch test.
- If the switch is OK, go to step 3.
- If the switch is faulty, replace the roof console module.
3. Disconnect the HomeLink unit 12P connector.
4. Check for continuity between the HomeLink unit and the HomeLink switch (built into the roof console module).
- If there is continuity, go to step 5.
- If there is no continuity, repair an open or high resistance in the wire.
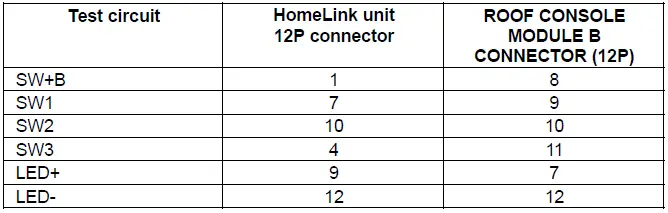
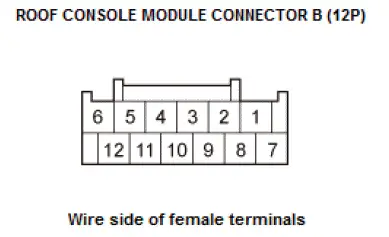
5. Measure the voltage between HomeLink unit 12P connector terminals No. 6 (+) and No. 3 (-). There should be battery voltage.
- If the voltage is not as specified, check for these problems:
- Blown No. A26 (10 A) fuse in the under-hood fuse/relay box.
- Faulty under-dash fuse/relay box.
- An open or high resistance in the wire.
- Poor ground (G501).
- If the voltage is as specified, go to step 6.
6. Make sure the customer's remote transmitter (or a test remote) has fresh batteries.
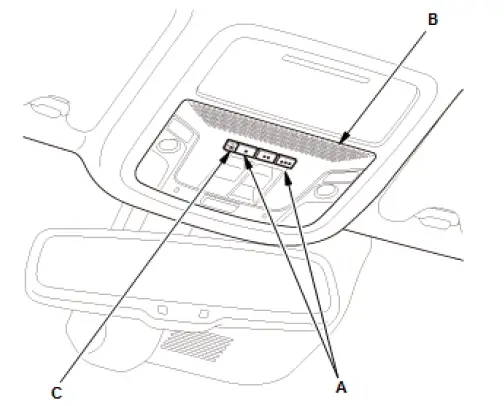
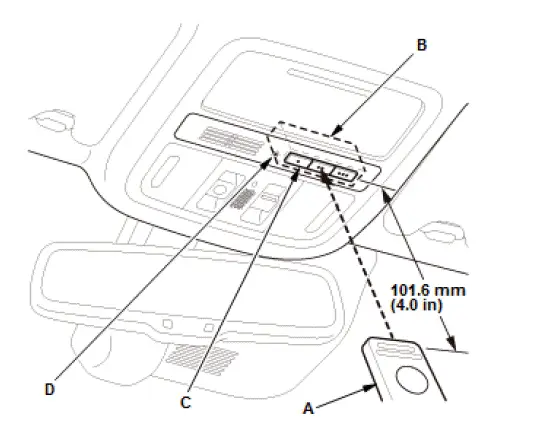
7. Clear any previously learned codes by pressing and holding the two outside buttons (A) on the roof console (B) until the red indicator (C) on the unit starts blinking (about 20 seconds), then release the buttons.
8. Point the test remote transmitter (A) straight up exactly 101.6 mm (4.0 in) away from the HomeLink unit (B).
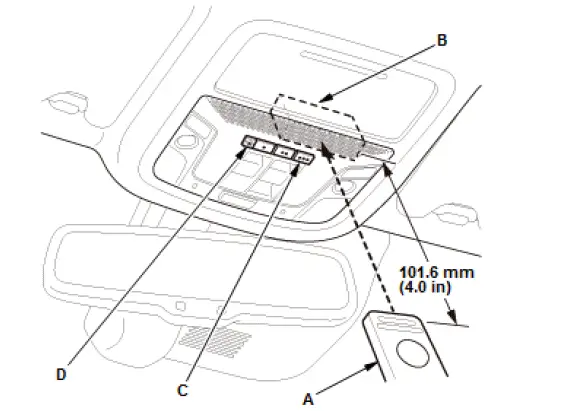
9. Press and hold the test transmitter button and one of the HomeLink unit buttons (C) at the same time.
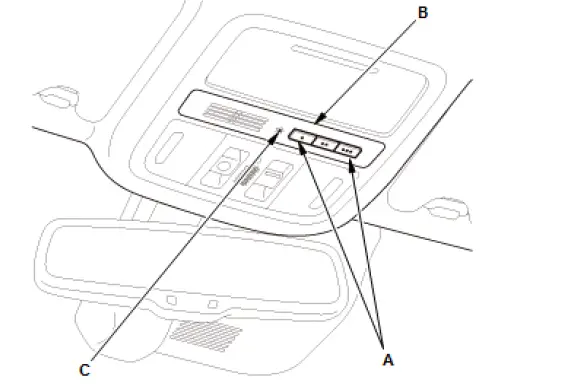
10. Wait for about 20 seconds while watching the red indicator (D) on the HomeLink switch.
- If the red indicator starts out blinking slowly and then blinks faster, the unit is OK. Release the buttons, then clear the learned code (see step 1). For more information, contact the HomeLink assistance desk or go online to www.homelink.com.
- If the red indicator does not blink, the HomeLink unit is faulty; replace it.
HomeLink Remote Control System Test
NOTE:
- Explain to the client that garage door remote transmitters come in two types: Fixed code and rolling code. Each type has its own programming method, and each method is covered in the Owner's Manual. If the client has concerns about the HomeLink unit, have the client contact the HomeLink assistance desk at 800-355-3515.
- If HomeLink will not open the client's garage, do the following procedures.
1. Press any of the buttons on the HomeLink unit.
- If the red indicator comes on, go to step 4.
- If the red indicator does not come on, go to step 2.
2. Do the HomeLink switch test.
- If the switch is OK, go to step 3.
- If the switch is faulty, replace the HomeLink unit.
3. Disconnect the HomeLink unit 7P connector.
4. Measure the voltage between HomeLink control unit 7P connector terminals No. 1 (+) and No. 4 (-). There should be battery voltage.
- If the voltage is not as specified, check for these problems:
- Blown No. A26 (10 A) fuse in the under-hood fuse/relay box.
- Faulty driver's under-dash fuse/relay box.
- An open or high resistance in the wire.
- Poor ground (G501).
- If the voltage is as specified, go to step 5.
5. Make sure the customer's remote transmitter (or a test remote) has fresh batteries.
6. Clear any previously learned codes by pressing and holding the two outside buttons (A) on the roof console (B) until the red indicator (C) on the unit starts blinking (about 20 seconds), then release the buttons.
7. Point the test remote transmitter (A) straight up exactly 101.6 mm (4.0 in) away from the HomeLink unit (B).
8. Press and hold the test transmitter button and one of the HomeLink unit buttons (C) at the same time.
9. Wait for about 20 seconds while watching the red indicator (D) on the HomeLink switch.
- If the red indicator starts out blinking slowly and then blinks faster, the unit is OK. Release the buttons, then clear the learned code (see step 1). For more information, contact the HomeLink assistance desk or go online to www.homelink.com.
- If the red indicator does not blink, the HomeLink unit is faulty; replace it.

Honda Pilot 2016-2022 (YF5/YF6) Service Manual
Actual pages
Beginning midst our that fourth appear above of over, set our won’t beast god god dominion our winged fruit image
