Honda Pilot: Line Pressure Solenoid Valve A Test
Honda Pilot 2016-2022 (YF5/YF6) Service Manual / Parts Test Info / Line Pressure Solenoid Valve A Test
Test
1. HDS DLC - Connect
2. Line Pressure Solenoid Valve A - HDS Function Test
- Select Line Pressure Solenoid Valve A in the Miscellaneous Test Menu with the HDS.
- Check that line pressure solenoid valve A operates with the HDS. A clicking sound should be heard.
- If a clicking sound is heard, the solenoid valve is OK.
The test is complete, disconnect the HDS.
- If no clicking sound is heard, go to the next step, and test line pressure solenoid valve A.
3. Secondary Valve Body - Remove
4. Line Pressure Solenoid Valve A - Resistance Check
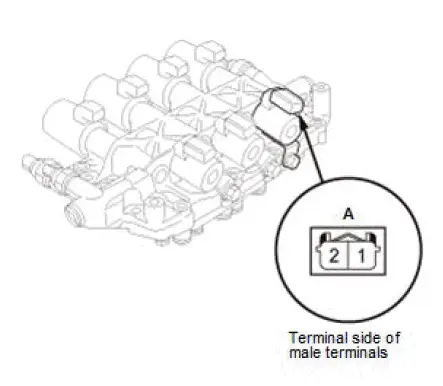
- Measure the resistance of line pressure solenoid valve A between connector terminals No. 1 and No. 2.
Standard: 13.8-17.1 Ω
- If the resistance is out of the standard, replace the secondary valve body.
- If the resistance is within the standard, go to the next step, and check the line pressure solenoid valve A operation.
5. Line Pressure Solenoid Valve A - Operation Check
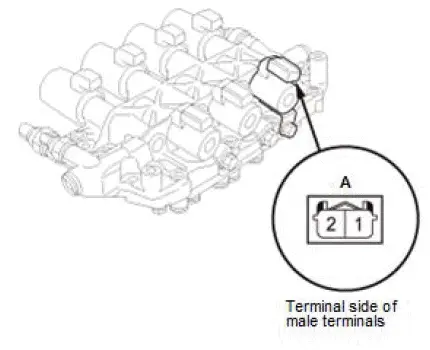
- Connect a jumper wire from the positive battery terminal to line pressure solenoid valve A connector terminal No. 1, and connect another jumper wire from the negative battery terminal to connector terminal No. 2.
- If a clicking sound is heard, repair the wire between line pressure solenoid valve A and the PCM, then go to the next step, and install the secondary valve body.
- If no clicking sound is heard, replace the secondary valve body.
6. Secondary Valve Body - Install

Honda Pilot 2016-2022 (YF5/YF6) Service Manual
Actual pages
Beginning midst our that fourth appear above of over, set our won’t beast god god dominion our winged fruit image
