Honda Pilot: PCM Removal and Installation
Removal
NOTE:
- Make sure the HDS or the MVCI has the latest HDS software version.
- If you are replacing the PCM after substituting a known-good PCM, reinstall the original PCM, then do this procedure.
- If you are removing or substituting the PCM, skip the procedures of READ DATA (Engine Oil Life and Starter Counter) .
1. HDS - Connect
2. READ DATA (Engine Oil Life and Starter Counter) - Select (USA and Canada Models)
- Select the PGM-FI system with the HDS.
- Select the REPLACE PCM MENU, then select READ DATA, and follow the screen prompts.
NOTE:
- Doing this step copies (READS) the engine oil life data and the starter counter data from the original PCM so you can later download (WRITES) them into the new PCM.
- If the READ DATA indicates FAILED, continue with this procedure.
3. SCS - Short
- Jump the SCS line with the HDS, and wait more than 1 minute.
- Turn the vehicle to the OFF (LOCK) mode.
4. Front Bulkhead Cover - Remove
5. PCM - Remove
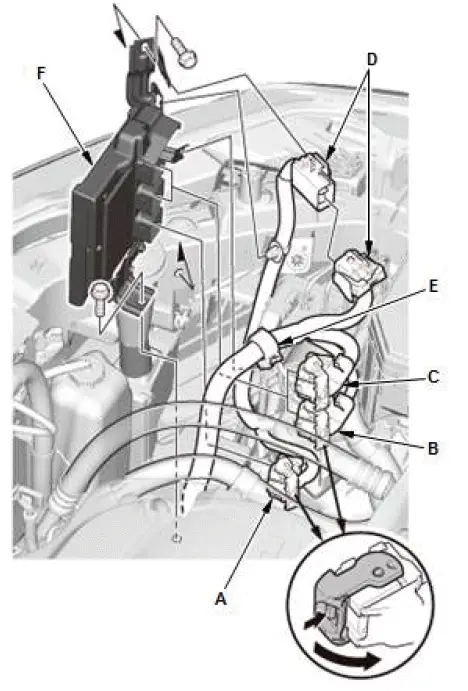
- Disconnect PCM connectors A, B, and C.
NOTE: PCM connectors A, B, and C have symbols (A=□, B=△, C=○) embossed on them for identification.
- Remove the connector (D), and the harness holder (E).
- Remove the PCM assembly (F).
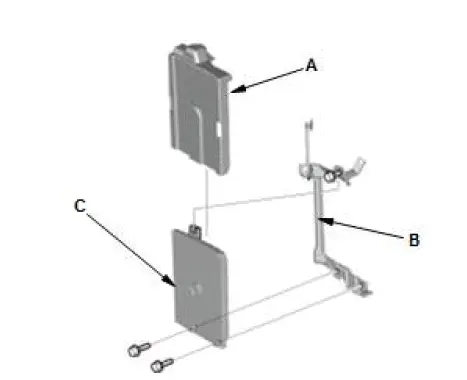
- Remove the cover (A) and the bracket (B) from the PCM (C).
Installation
NOTE:
- If you are removing the PCM, skip the procedures of using the HDS.
1. PCM - Install
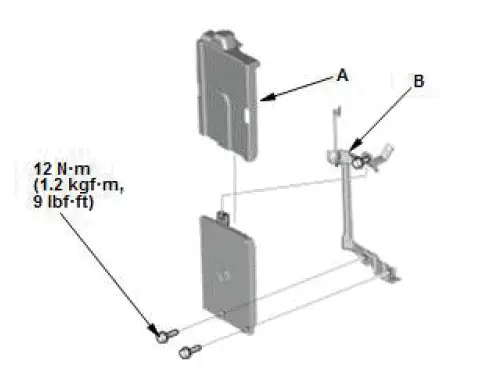
- Install the cover (A) and the bracket (B).
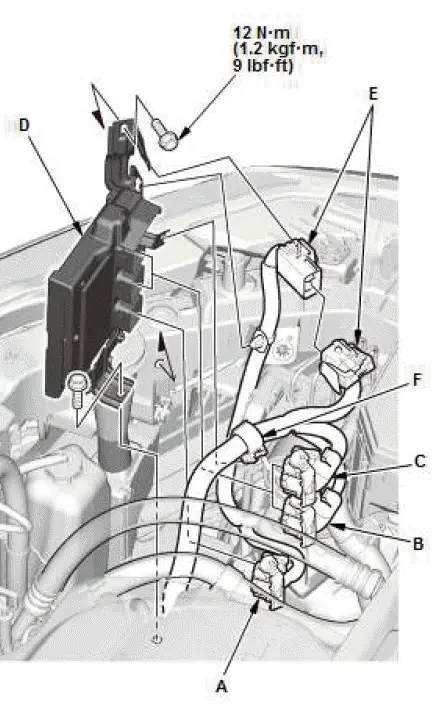
- Install the PCM assembly (D).
- Connect PCM connectors A, B, and C.
NOTE: PCM connectors A, B, and C have symbols (A=□, B=△, C=○) embossed on them for identification.
- Install the connector (E), and the harness holder (F).
2. Front Bulkhead Cover - Install
3. SCS - Open
- Exit the SCS mode with the HDS.
Procedure After Replacing PCM
4. VIN - Input
- Turn the vehicle to the ON mode.
NOTE: DTC P0630 VIN Not Programmed or Mismatch may be stored because the VIN has not been programmed into the PCM; ignore it, and continue this procedure.
- Manually input the VIN to the PCM with the HDS.
5. WRITE DATA (Engine Oil Life and Starter Counter) - Select (USA and Canada Models)
NOTE: If the READ DATA (engine oil life and starter counter) failed in "READ DATA (Engine Oil Life and Starter Counter) - Select", skip this procedure.
- Select the REPLACE PCM MENU, then select WRITE DATA, and follow the screen prompts.
6. Other Procedures for PCM Replacement - Do (USA and Canada Models)
- If the READ DATA (engine oil life) failed in "READ DATA (Engine Oil Life and Starter Counter) - Select", replace the engine oil and the engine oil filter.
7. Keyless Access System - Registration
8. DTC - Clear
- Clear the Pending or Confirmed DTCs with the HDS.
9. PCM - Update
10.PCM - Idle Learn
PCV Valve Removal and Installation
Removal and Installation
1. Engine Cover - Remove
2. Engine Harness Holder - Lift
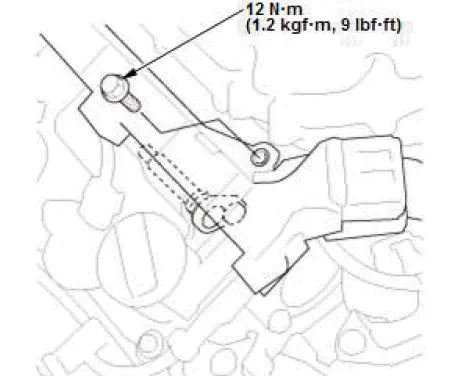
3. PCV Valve - Remove
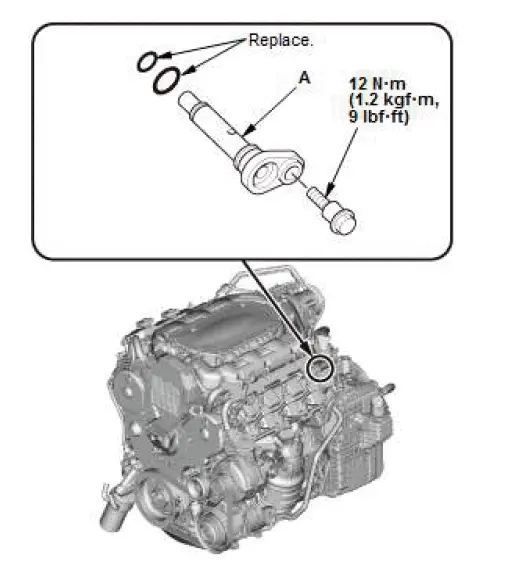
- Remove the PCV valve (A).
NOTE: Take care not to spill any oil on the hot exhaust manifold.
4. All Removed Parts - Install

Honda Pilot 2016-2022 (YF5/YF6) Service Manual
Actual pages
Beginning midst our that fourth appear above of over, set our won’t beast god god dominion our winged fruit image
