Honda Pilot: Rear Blower Power Transistor Test
Honda Pilot 2016-2022 (YF5/YF6) Service Manual / Parts Test Info / Rear Blower Power Transistor Test
Test
NOTE: Before testing the rear blower power transistor, check for HVAC control DTCs or climate control DTCs.
1. Driver's Side Center Console Side Cover - Remove
2. Rear Blower Power Transistor - Test
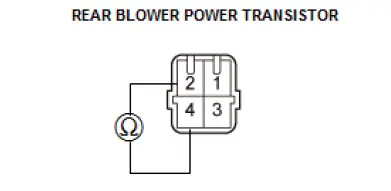
- Disconnect the rear blower power transistor connector.
- Measure the resistance between terminals No. 2 and No. 4
of the rear blower power transistor. It should be about
1.5 kΩ.
- If the resistance is within the specifications, go to step 3.
- If the resistance is not within the specifications, replace
the rear blower power transistor.
NOTE: Also check the rear blower motor. Rear blower power transistor failure can be caused by a defective rear blower motor.
- Reconnect the rear blower power transistor connector.
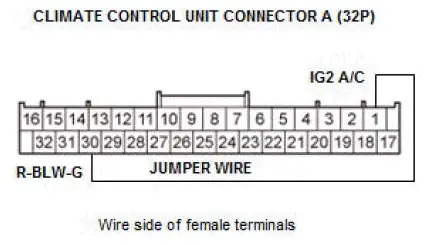
- Disconnect climate control unit connector A (32P).
- Connect climate control unit connector A (32P) terminals No. 1 and No. 30 with a jumper wire.
- Turn the vehicle to the ON mode.
- Check that the rear blower motor runs.
- If the rear blower motor does not run, replace the rear
blower power transistor.
NOTE: A faulty rear blower motor can cause the rear blower power transistor to fail. Before replacing the rear blower power transistor, check the rear blower motor for binding, and replace the rear blower motor if necessary.
- If the rear blower motor runs, the rear blower power transistor is OK.
- If the rear blower motor does not run, replace the rear
blower power transistor.
3. All Removed Parts - Install
- Install the parts in the reverse order of removal.

Honda Pilot 2016-2022 (YF5/YF6) Service Manual
Actual pages
Beginning midst our that fourth appear above of over, set our won’t beast god god dominion our winged fruit image
