Honda Pilot: Rear Brake Caliper Removal and Installation
Removal
NOTICE
Do not spill brake fluid on the vehicle; it may damage the paint. If brake fluid does contact the paint, wash it off immediately with water.
1. Vehicle - Lift
2. Rear Wheel - Remove
3. Brake Caliper Body - Remove
NOTE: After removal, plug the ends of the hoses and the joints to prevent spilling brake fluid.
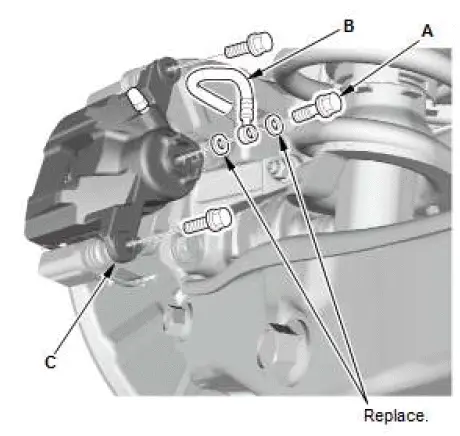
- Remove the banjo bolt (A), and disconnect the brake hose (B) from the caliper body (C).
- Remove the caliper body.
4. Brake Pad - Remove
5. Caliper Pin and Pin Boot - Remove
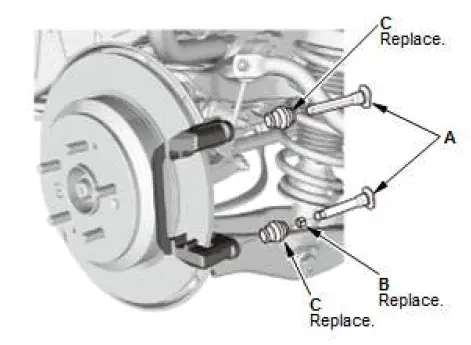
- Remove the caliper pins (A).
NOTE: The upper and lower caliper pins are different.
During installation, make sure the caliper pins are in the proper positions.
- Remove the bush (B) from the upper caliper pin.
- Remove the pin boots (C).
Installation
NOTICE
Do not spill brake fluid on the vehicle; it may damage the paint. If brake fluid does contact the paint, wash it off immediately with water.
1. Caliper Pin and Pin Boot - Install
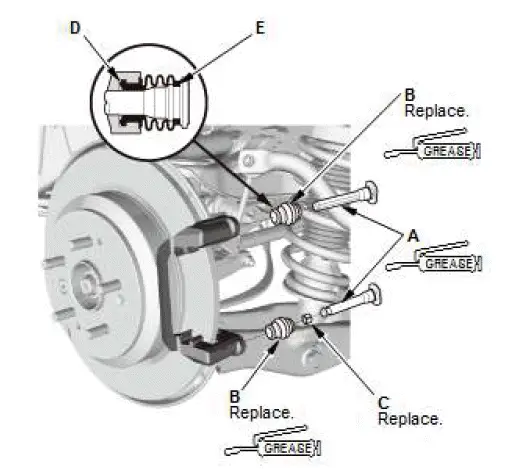
- Apply a thin coat of Honda silicone grease (P/N 08C30-
B0234M) to the caliper pins (A) and the new pin boots (B).
NOTE: Use recommended greases in the rear caliper set.
- Install the bush (C) to the upper caliper pin.
- Install the caliper pins and the new pin boots.
NOTE:
- Make sure that the caliper pins are installed correctly.
The upper caliper pin and the lower caliper pin are different. If these caliper pins are installed in the wrong location, it will cause vibration, uneven or rapid brake pad wear, and possibly uneven tire wear.
- Make sure that the pin boots are properly positioned into the grooves (D) of the caliper pin and the grooves (E) of the caliper body.
- Remove air from within of the pin boots.
2. Brake Pad - Install
3. Brake Caliper Body - Install

- Install the caliper body (A).
- Connect the brake hose (B) to the caliper body with the banjo bolt (C) and new sealing washers (D).
4. Brake System - Bleed
5. Brake Hose and Line - Check
NOTE:
- Check for leaks at hose and line joints or connections, and retighten if necessary.
- Check the brake hoses for interference and twisting.
6. Rear Wheel - Install

Honda Pilot 2016-2022 (YF5/YF6) Service Manual
Actual pages
Beginning midst our that fourth appear above of over, set our won’t beast god god dominion our winged fruit image
