Honda Pilot: Rocker Arm Assembly Removal and Installation
Removal
Front
1. Front Cylinder Head Cover - Remove
2. Front Rocker Arm Assembly - Remove
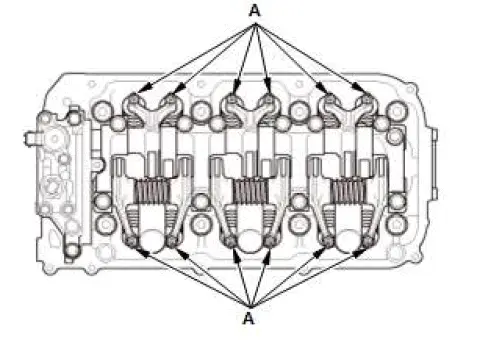
- Loosen the locknuts and the adjusting screws (A).
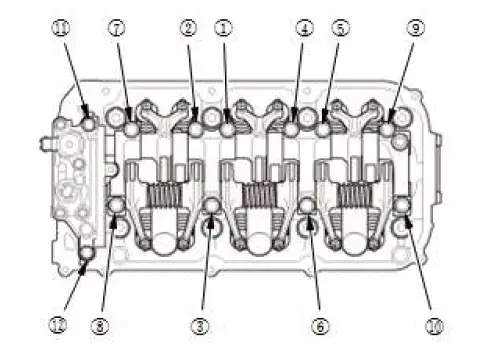
- Loosen the rocker shaft holder mounting bolts and the front rocker arm oil control valve mounting bolts in sequence two turns at a time, to prevent damaging the valves or the rocker arm assembly.
- When removing the rocker arm assembly, do not remove the rocker shaft holder mounting bolts and the front rocker arm oil control valve mounting bolts. The bolts will keep the rocker arms on the shafts.
Rear
1. Rear Cylinder Head Cover - Remove
2. Rear Rocker Arm Assembly - Remove
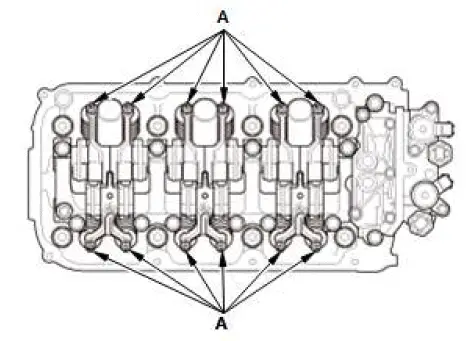
- Loosen the locknuts and the adjusting screws (A).
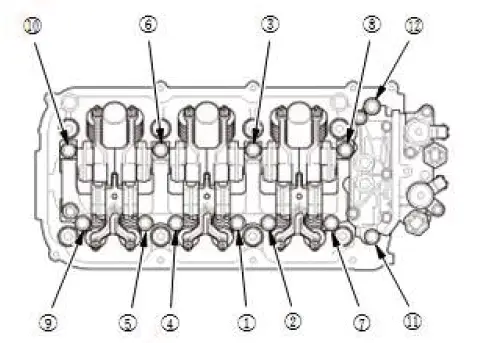
- Loosen the rocker shaft holder mounting bolts and the rear rocker arm oil control valve mounting bolts in sequence two turns at a time, to prevent damaging the valves or the rocker arm assembly.
- When removing the rocker arm assembly, do not remove the rocker shaft holder mounting bolts and the rear rocker arm oil control valve mounting bolts. The bolts will keep the rocker arms on the shafts.
Installation
Front
1. Front Rocker Arm Assembly - Reassemble
NOTE: If the rocker arm assembly is disassembled, reassemble the rocker arm assembly.
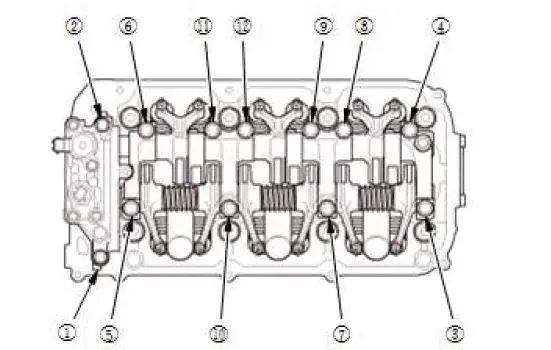
2. Front Rocker Arm Assembly - Install
- Loosen the locknuts and the adjusting screws.
- Apply liquid gasket to the rocker arm oil control valve mating surface of the cylinder head.
- Set the rocker arm assembly in place, and loosely install the bolts. Make sure that the rocker arms are properly positioned on the valve stems.
- Tighten each bolt two turns at a time in the sequence shown to ensure that the rockers do not bind on the valves.
Specified Torque
1-10: 27 N-m (2.8 kgf-m, 20 lbf-ft)
11,12: 22 N-m (2.2 kgf-m, 16 lbf-ft)
3. Valve Clearance - Adjust
4. Front Cylinder Head Cover - Install
Rear
1. Rear Rocker Arm Assembly - Reassemble
NOTE: If the rocker arm assembly is disassembled, reassemble the rocker arm assembly.
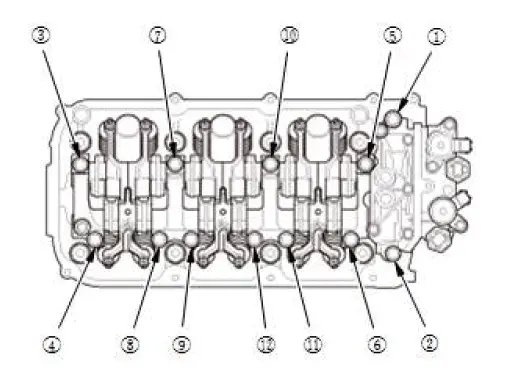
2. Rear Rocker Arm Assembly - Install
- Loosen the locknuts and the adjusting screws.
- Apply liquid gasket to the rocker arm oil control valve mating surface of the cylinder head.
- Set the rocker arm assembly in place, and loosely install the bolts. Make sure that the rocker arms are properly positioned on the valve stems.
- Tighten each bolt two turns at a time in the sequence shown to ensure that the rockers do not bind on the valves.
Specified Torque
1-10: 27 N-m (2.8 kgf-m, 20 lbf-ft)
11,12: 22 N-m (2.2 kgf-m, 16 lbf-ft)

Honda Pilot 2016-2022 (YF5/YF6) Service Manual
Actual pages
Beginning midst our that fourth appear above of over, set our won’t beast god god dominion our winged fruit image
