Honda Pilot: Throttle Body Carbon Accumulation Check
Honda Pilot 2016-2022 (YF5/YF6) Service Manual / Remove, Install, Replace, Check info / Throttle Body Carbon Accumulation Check
Test
1. HDS - Connect
2. Throttle Body - Test
- Start the engine. Hold the engine speed at 3,000 rpm without load (in P or N) until the radiator fan comes on, then let it idle.
- Check the REL TP SENSOR in the DATA LIST with the HDS. The reading should be below 2.46 deg. If it is not, clean the throttle body.
Throttle Body Removal and Installation
Removal/Installation
CAUTION
Do not insert your fingers into the installed throttle body when you turn the vehicle to the ON mode, or while the vehicle is in ON mode. If you do, you will seriously injure your fingers if the throttle valve is activated.
NOTE:
- If you are replacing the throttle body, do the all procedures.
- If you are removing the throttle body, do 3rd procedure (Engine Cover - Remove) through 5th procedure (All Removed Parts - Install).
1. HDS - Connect
2. TP POSITION CHECK - Select
- Select the INSPECTION MENU on the HDS.
- Do the TP POSITION CHECK in the ETCS TEST.
- Turn the vehicle to the OFF (LOCK) mode.
- Turn the vehicle to the ON mode, and wait 2 seconds without pressing the accelerator pedal.
3. Engine Cover - Remove
4. Throttle Body - Remove
- Remove the intake air duct (A).
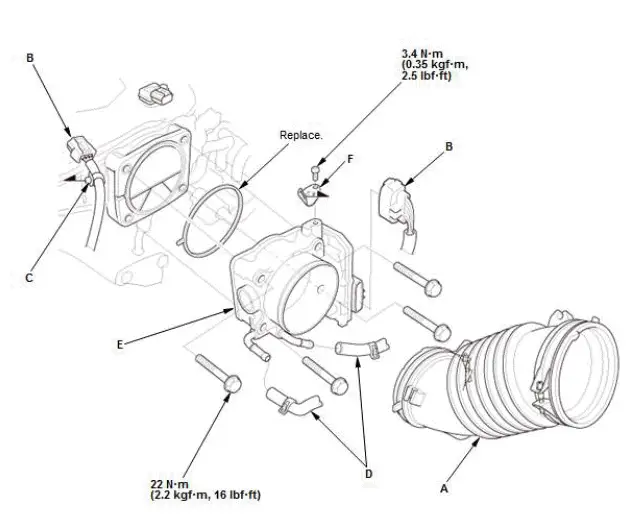
- Disconnect the connectors (B) and remove the harness clip (C).
- Disconnect and plug the water bypass hoses (D).
- Remove the throttle body (E).
- If needed, remove the harness bracket (F).
5. All Removed Parts - Install
- Install the parts in the reverse order of removal with a new gasket.
NOTE:
- Tighten the throttle body mounting bolts in a cross
pattern in three steps:
- Tighten the bolts until they sit on the throttle body.
- Tighten the bolts until the gasket is compressed and both parts are contacted.
- Tighten the bolts to specified torque.
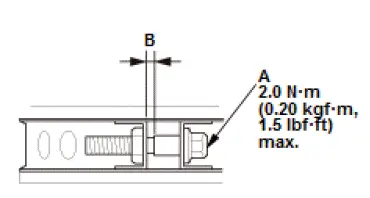
- Do not overtighten the hose band screw (A).
- After tightening the hose band screw, make sure the clearance (B) is less than 0.04 in (1.0 mm).
6. PCM - Reset
7. PCM - Idle Learn

Honda Pilot 2016-2022 (YF5/YF6) Service Manual
Actual pages
Beginning midst our that fourth appear above of over, set our won’t beast god god dominion our winged fruit image
