Honda Pilot: Wheel Bolt Removal and Installation
Removal
NOTICE
- Do not use a hammer or impact tools (pneumatic or electric).
- Be careful not to damage the threads of the wheel bolts.
Front
1. Vehicle - Lift
2. Wheel - Remove
3. Wheel Hub - Remove
4. Wheel Bolt - Remove
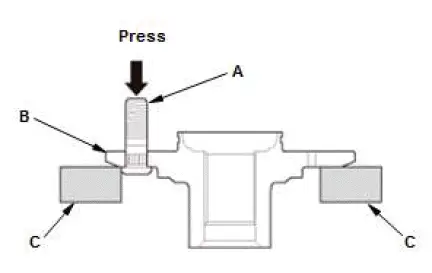
- Separate the wheel bolt (A) from the hub (B) using a hydraulic press. Support the hub with hydraulic press attachments (C) or equivalent tools.
Rear
1. Vehicle - Lift
2. Wheel - Remove
3. Brake Disc/Drum - Remove
4. Wheel Bolt - Remove
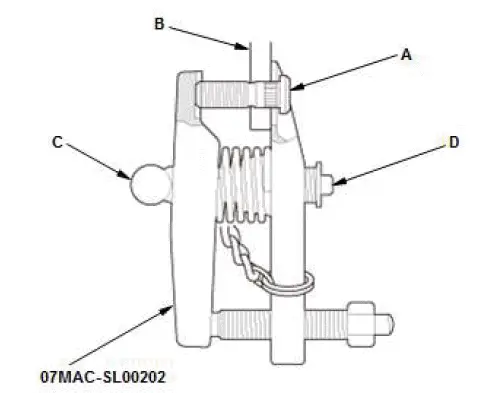
- Separate the wheel bolt (A) from the hub (B).
NOTE: If the angle of the remover against the wheel bolt is not vertical, readjust the ball joint remover by turning the head (C) of the adjusting bolt (D).
Installation
NOTICE
- Do not use a hammer or impact tools (pneumatic or electric).
- Be careful not to damage the threads of the wheel bolts.
Front
1. Wheel Bolt - Install
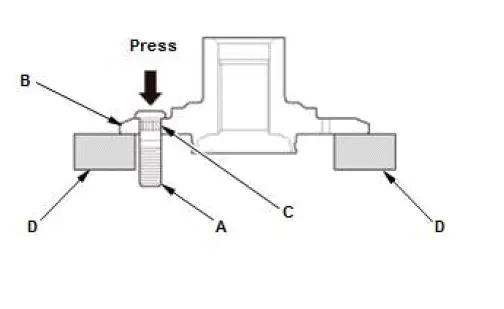
- Insert the new wheel bolt (A) into the hub (B) while aligning the splined surfaces (C) on the hub hole with the wheel bolt.
NOTE:
- Degrease the area around the wheel bolt.
- Make sure the wheel bolt is installed vertically to the hub disc surface.
- Before installing the new wheel bolt, clean the mating surfaces on the bolt and the hub.
- Install the wheel bolt using a hydraulic press until the wheel bolt shoulder is fully seated. Support the hub with hydraulic press attachments (D) or equivalent tools.
2. Wheel Hub - Install
3. Wheel - Install
NOTE: If you cannot tighten the wheel nut to the specified torque when installing the wheel, replace the front hub.
Rear
1. Wheel Bolt - Install
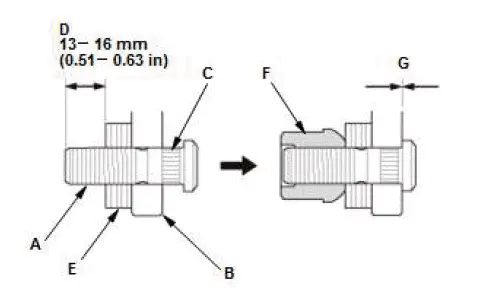
- Insert the new wheel bolt (A) into the hub (B) while aligning the splined surfaces (C) on the hub hole with the wheel bolt.
NOTE:
- Before installing the new wheel bolt, clean the mating surfaces on the bolt and the hub.
- Degrease the area around the wheel bolt and the threaded section of the nut.
- Adjust the measurement (D) with the washers (P/N 94101- 14800 or equivalent) (E).
- Install a nut (P/N 90304-SHJ-A91 or equivalent) (F) hand- tight.
NOTE:
- Make sure the wheel bolt is installed vertically to the hub disc surface.
- Do not install the nut and the washers that have been used as tools on a vehicle.
- Tighten the nut.
NOTE:
- Do not exceed the maximum torque limit.
- Make sure there is no gap (G) between the bolt and the hub.
Limited torque: 127 N-m (13.0 kgf-m, 94 lbf-ft) max.
NOTE: If you cannot tighten the wheel nut to the specified torque when installing the wheel, replace the rear hub bearing unit as an assembly.
2. Brake Disc/Drum - Install
3. Wheel - Install
Special Tool Required
- Ball Joint Remover, 28 mm 07MAC-SL00202

Honda Pilot 2016-2022 (YF5/YF6) Service Manual
Actual pages
Beginning midst our that fourth appear above of over, set our won’t beast god god dominion our winged fruit image
