Honda Pilot: A/T Pressure Test
Exploded View
1. Pressure Inspection Port - Exploded View
Exploded View

Test
NOTE:
- Check for DTCs. If any DTCs are stored, troubleshoot and clear them first.
- Do not allow dust or other foreign particles to enter the port while installing the pressure gauge adapter.
- Be sure to check the ATF level after each pressure port test. When installing or removing the pressure gauge adapter, ATF may run out of the pressure inspection ports.
- Disable the VSA by entering the VSA Maintenance Mode.
- VSA DTC(s) may come on during the test-drive.
If the VSA DTC(s) come on, clear the DTC(s) after testing is done with the HDS.
1. Vehicle - Lift Set
2. ATF Level - Check
3. HDS DLC - Connect
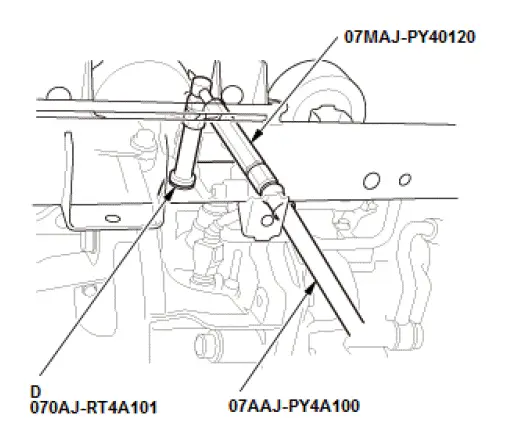
4. A/T Oil Pressure Gauge - Set
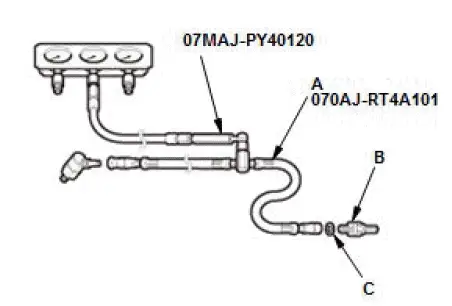
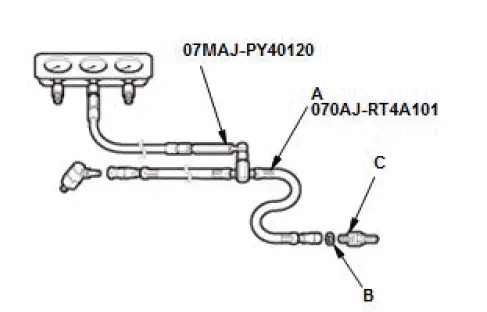
- Connect the A/T pressure test hose to the A/T oil pressure gauge set.
-
When testing the oil pressure at each inspection port, select a suitable adapter from the following table, and connect each adapter to the A/T oil pressure gauge assembled in the previous step.
| Inspection port | Tool |
| Line pressure |
|
| Torque converter clutch pressure |
|
| 1st clutch pressure |
|
| 2nd clutch pressure |
|
| 3rd clutch pressure |
|
| 4th clutch pressure |
|
| 5th clutch pressure | Pressure gauge adapter B |
| 6th clutch pressure |
|
5. Vehicle - Lift Up
6. Splash Shield - Remove
7. Line Pressure - Test
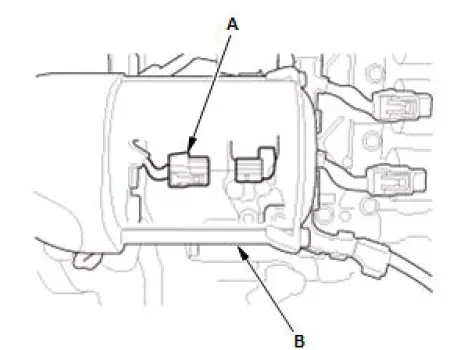
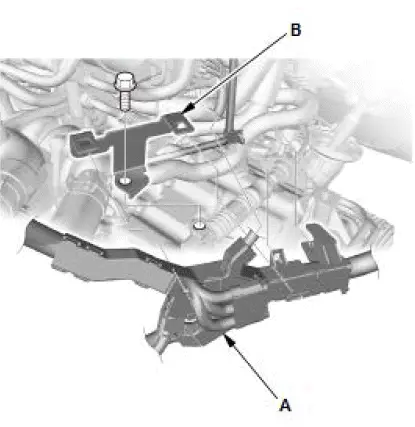
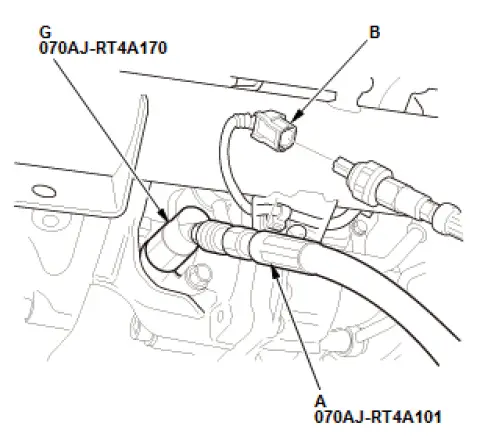
- Remove the connector clamp (A) and the harness clamp (B).
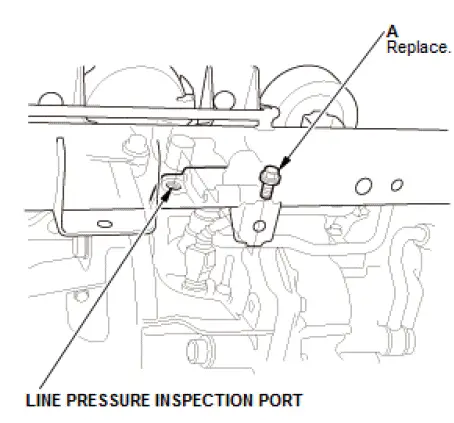
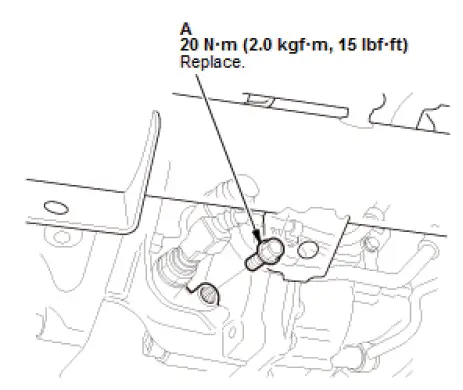
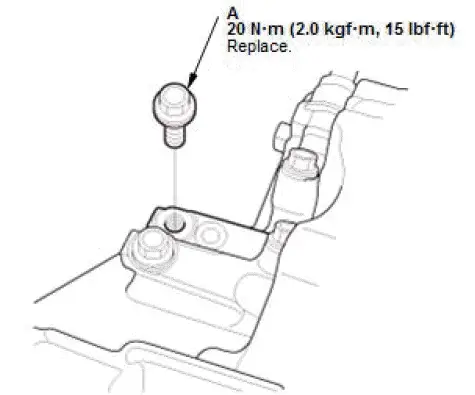
- Remove the sealing bolt (A).
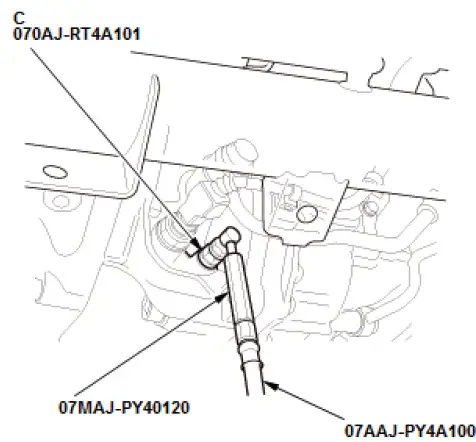
- Install the A/T oil pressure gauge with pressure gauge adapter D and the A/T pressure adapter to the line pressure inspection port.
- Start the engine in P, and warm it up to normal operating temperature (ATF temperature between 122 ºF and 212 ºF (50 ºC and 100 ºC) ).
- Shift the shift lever to D.
- Measure the low line pressure from the A/T oil pressure gauge when the APP Sensor (%) is less than 25 % and Line Pressure Sol VLV. A is ON with the HDS in the A/T Data List.
- Shift the shift lever to P or N.
- Measure the high line pressure from the A/T oil pressure gauge while
holding the engine speed at 2,000 rpm with the shift
lever in P or N.
NOTE: When measuring the normal line pressure, do not measure with the shift lever in other than P or N.

- Turn the engine off.
- If the line pressures are out of the service limit, refer to the problem and probable cause(s) listed in the table.
| Problem | Probable cause(s) |
| No or low line pressure |
|
- Remove the A/T oil pressure gauge.
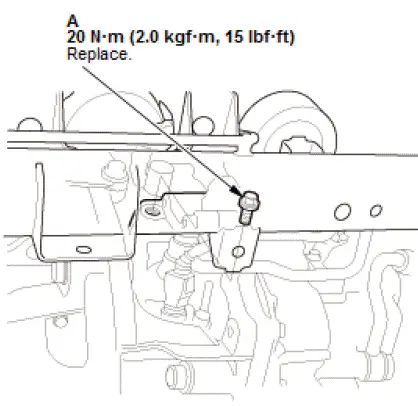
- Install a new sealing bolt (A).
NOTE: Do not reuse the old sealing bolt.
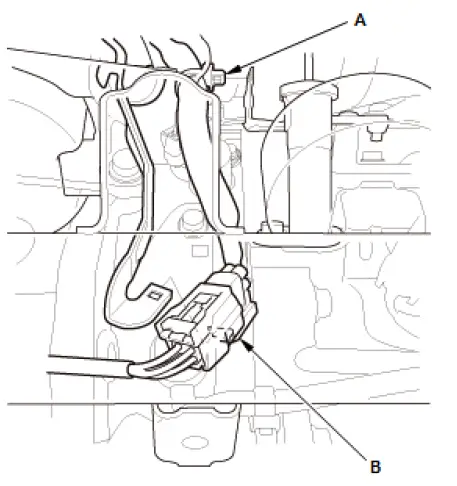
- Install the harness clamp (A) and the connector clamp (B).
8. Torque Converter Clutch Pressure - Test
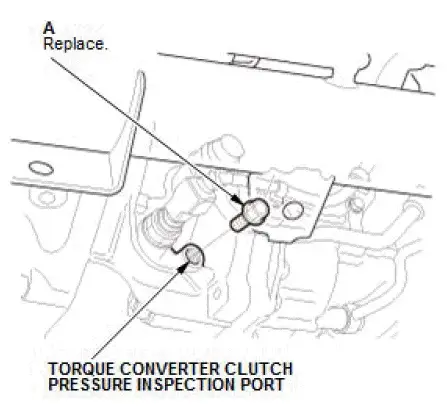
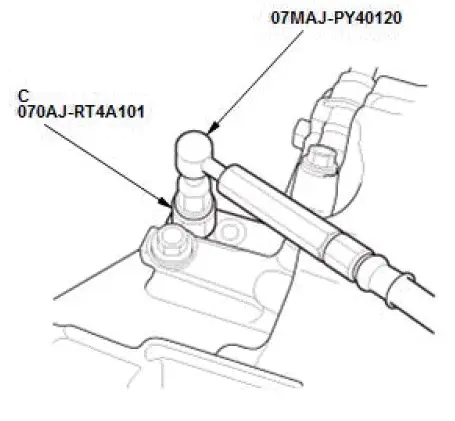
- Remove the sealing bolt (A).
- Install the A/T oil pressure gauge with pressure gauge adapter C and the A/T pressure adapter to the torque converter clutch pressure inspection port.
- Enter the VSA Maintenance Mode.
- Start the engine.
- Shift the shift lever to L.
- Run the vehicle in 2nd gear.
NOTE: Make sure the gear position with the HDS in the A/T Data List.
- Measure the torque converter clutch pressure from the A/T oil pressure gauge while holding the engine speed at 2,000 rpm in 2nd gear.

- Bring the engine back to an idle, then apply the brake pedal to stop the wheels from rotating.
- Shift the shift lever to P.
- Turn the engine off.
- If the torque converter clutch pressure is out of the service limit, refer to the problem and probable cause(s) listed in the table.
| Problem | Probable cause(s) |
| No or low torque converter clutch pressure |
|
- Remove the A/T oil pressure gauge.
- Install a new sealing bolt (A).
NOTE: Do not reuse the old sealing bolt.
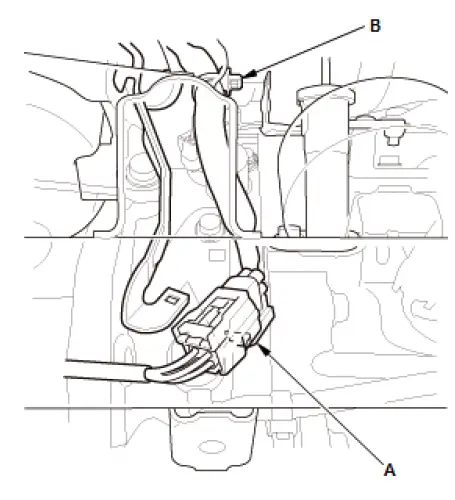
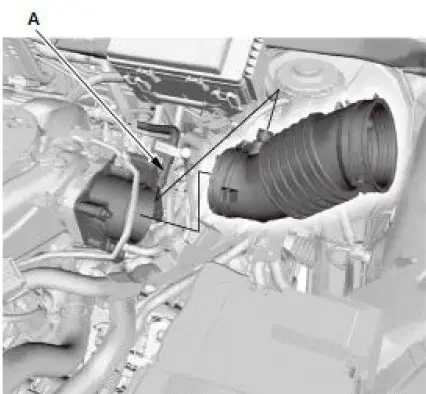
9. Line Pressure Solenoid Valve A Connector - Disconnect
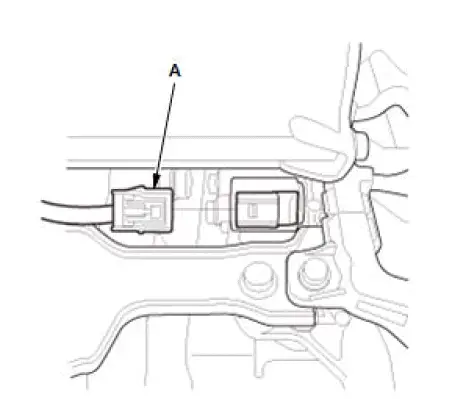
NOTE: Disconnect the line pressure solenoid valve A connector because the 1st, 2nd, 3rd, 4th, 5th, and 6th clutch pressure tests must be done by the normal line pressure mode.
- Disconnect the line pressure solenoid valve A connector (A) located behind the starter (B).
10.Engine Undercover - Remove
11.A/T Oil Pressure Gauge (2nd Clutch Pressure Inspection Port) - Install
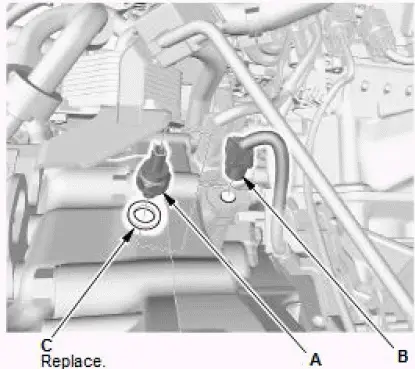
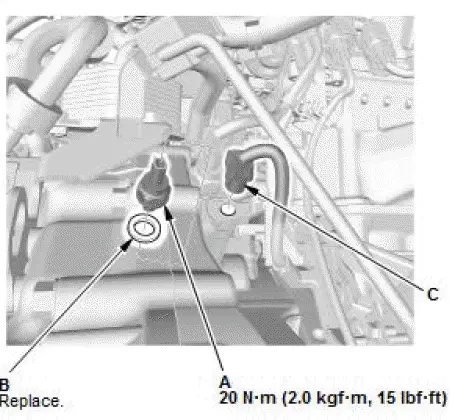
- Disconnect the transmission fluid pressure switch A (2nd clutch) connector (B).
- Remove transmission fluid pressure switch A (2nd clutch) with the sealing washer (C).
NOTE: Loosen the switch by gripping the metal part, not the plastic part.
- Temporarily install transmission fluid pressure switch A (2nd clutch) (B) with the sealing washer (C) to pressure gauge adapter A .
- Install the A/T oil pressure gauge with pressure gauge adapter A, pressure gauge adapter E, and the A/T pressure adapter to the 2nd clutch pressure inspection port (B).
- Connect the transmission fluid pressure switch A (2nd clutch) connector (C).
12.Vehicle - Lift Down
13.Front Bulkhead Cover - Remove
14.Air Intake Tube - Remove

15.Air Cleaner - Remove
16.Intake Air Duct - Remove
- Disconnect the breather pipe (A).
17.Harness Holder Bracket - Remove
- Remove the harness holder (A).
- Remove the harness holder bracket (B).
18.A/T Oil Pressure Gauge (1st Clutch Pressure Inspection Port) - Install

- Remove the sealing bolt (A).
- Install the A/T oil pressure gauge with pressure gauge adapter C and the A/T pressure adapter to the 1st clutch pressure inspection port.
19.A/T Oil Pressure Gauge (3rd Clutch Pressure Inspection Port) - Install

- Remove the bolt (A) with the sealing washer (B).
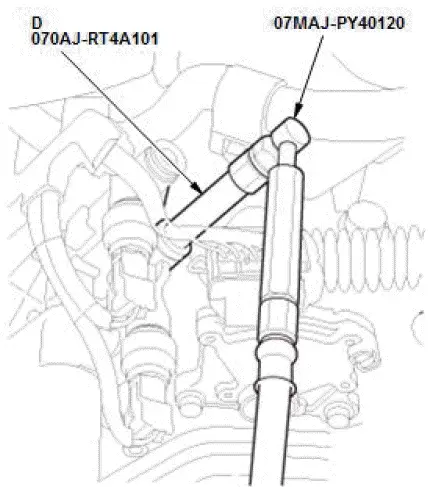
- Install the A/T oil pressure gauge with pressure gauge adapter D and the A/T pressure adapter to the 3rd clutch pressure inspection port.
20.1st, 2nd and 3rd Clutch Pressure - Test
- Temporarily install the intake air duct and the air cleaner.
- Enter the VSA Maintenance Mode.
- Start the engine.
- Shift the shift lever to L.
- Run the vehicle in 2nd gear.
NOTE: Make sure the gear position with the HDS in the A/T Data List.
- Measure the 1st and 2nd clutch pressure from the A/T oil pressure gauge while holding the engine speed at 2,000 rpm in 2nd gear.

- Bring the engine back to an idle, then apply the brake pedal to stop the wheels from rotating.
- Shift the shift lever to D.
- Run the vehicle in 3rd gear.
NOTE: Make sure the gear position with the HDS in the A/T Data List.
- Measure the 3rd clutch pressure from the A/T oil pressure gauge while holding the engine speed at 2,000 rpm in 3rd gear.

- Bring the engine back to an idle, then apply the brake pedal to stop the wheels from rotating.
- Shift the shift lever to P.
- Turn the engine off.
- If the clutch pressure is out of the service limit, refer to the problem and probable cause(s) listed in the table.
| Problem | Probable cause(s) |
| No or low 1st clutch pressure | 1st clutch |
| No or low 2nd clutch pressure | 2nd clutch |
| No or low 3rd clutch pressure | 3rd clutch |
- Remove the air cleaner and the intake air duct.
21.A/T Oil Pressure Gauge (3rd Clutch Pressure Inspection Port) - Remove
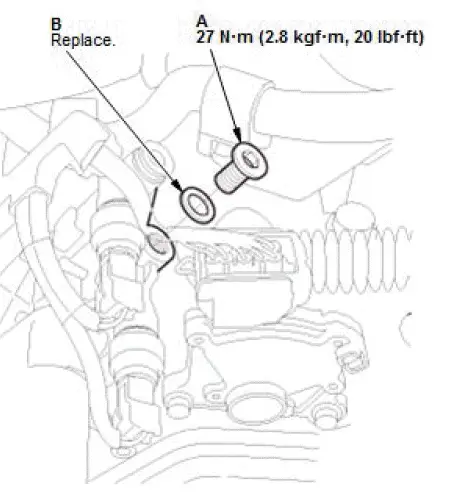
- Install the bolt (A) with a new sealing washer (B).
NOTE: Do not reuse the old sealing washer.
22.A/T Oil Pressure Gauge (1st Clutch Pressure Inspection Port) - Remove
- Install a new sealing bolt (A).
NOTE: Do not reuse the old sealing bolt.
23.Vehicle - Lift Up
24.A/T Oil Pressure Gauge (2nd Clutch Pressure Inspection Port) - Remove
- Install the transmission fluid pressure switch A (2nd clutch)
with a new sealing washer (B).
NOTE: Tighten the switch by gripping the metal part, not the plastic part.
- Connect the transmission fluid pressure switch A connector (C).
25.Engine Undercover - Install
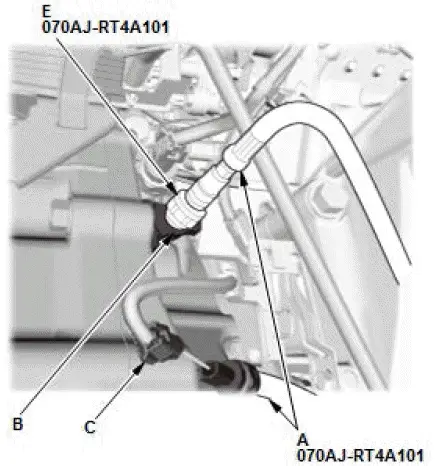
26.A/T Oil Pressure Gauge (4th Clutch Pressure Inspection Port) - Install
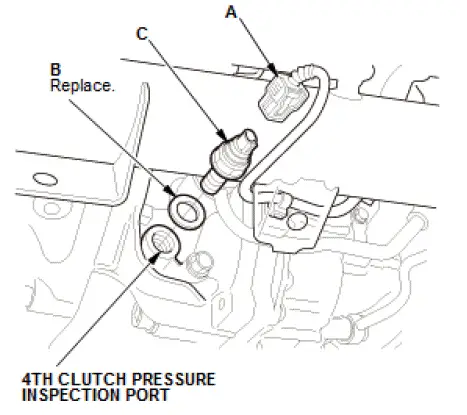
- Disconnect the transmission fluid pressure switch C (4th clutch) connector (A).
- Remove transmission fluid pressure switch C (4th clutch)
with the sealing washer (B).
NOTE: Loosen the switch by gripping the metal part, not the plastic part.
- Temporarily install transmission fluid pressure switch C (4th clutch) with the sealing washer (B) to pressure gauge adapter A.
- Install the A/T oil pressure gauge with pressure gauge adapter A and pressure gauge adapter G to the 4th clutch pressure inspection port.
- Connect the transmission fluid pressure switch C (4th clutch) connector (B).
27.Vehicle - Lift Down
28.A/T Oil Pressure Gauge (5th Clutch Pressure Inspection Port) - Install
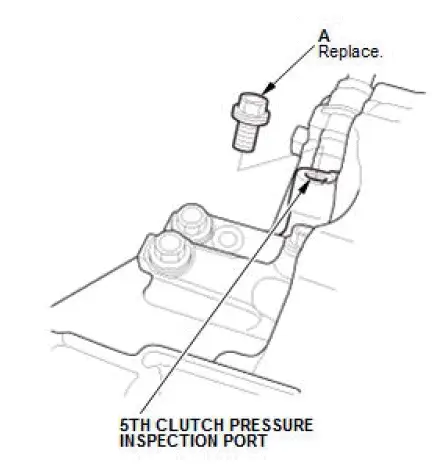
- Remove the sealing bolt (A).
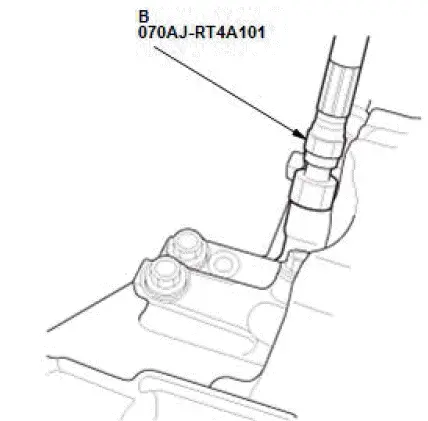
- Install the A/T oil pressure gauge with pressure gauge adapter B to the 5th clutch pressure inspection port.
29.A/T Oil Pressure Gauge (6th Clutch Pressure Inspection Port) - Install
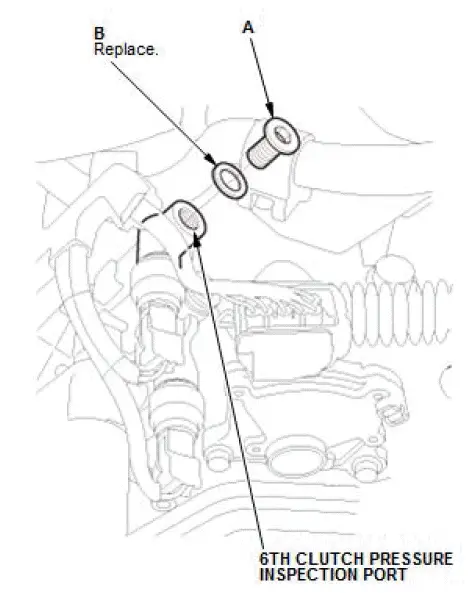
- Remove the bolt (A) with the sealing washer (B).
- Install the A/T oil pressure gauge with pressure gauge adapter D and the A/T pressure adapter to the 6th clutch pressure inspection port.
30.4th, 5th and 6th Clutch Pressure - Test
- Temporarily install the intake air duct and the air cleaner.
- Enter the VSA Maintenance Mode.
- Start the engine.
- Shift the shift lever to D.
- Run the vehicle in 4th gear.
NOTE: Make sure the gear position with the HDS in the A/T Data List.
- Measure the 4th clutch pressure from the A/T oil pressure gauge while holding the engine speed at 2,000 rpm in 4th gear.

- Run the vehicle in 5th gear.
NOTE: Make sure the gear position with the HDS in the A/T Data List.
- Measure the 5th clutch pressure from the A/T oil pressure gauge while holding the engine speed at 2,000 rpm in 5th gear.

- Run the vehicle in 6th gear.
NOTE: Make sure the gear position with the HDS in the A/T Data List.
- Measure the 6th clutch pressure from the A/T oil pressure gauge while holding the engine speed at 2,000 rpm in 6th gear.

- Bring the engine back to an idle, then apply the brake pedal to stop the wheels from rotating.
- If the clutch pressure is out of the service limit, refer to the problem and probable cause(s) listed in the table.
| Problem | Probable cause(s) |
| No or low 4th clutch pressure | 4th clutch |
| No or low 5th clutch pressure | 5th clutch |
| No or low 6th clutch pressure | 6th clutch |
31.4th Clutch Pressure (Engaging Reverse Gear) - Test
- Shift the shift lever to R.
- Release the brake pedal.
- Measure the 4th clutch pressure from the A/T oil pressure gauge while holding the engine speed at 2,000 rpm in R.

- Bring the engine back to an idle, then apply the brake pedal to stop the wheels from rotating.
- Shift the shift lever to P.
- Turn the engine off.
- If the 4th clutch pressure is out of the service limit, refer to the problem and probable cause(s) listed in the table.
| Problem | Probable cause(s) |
| No or low 4th clutch pressure in R |
|
- Remove the air cleaner and the intake air duct.
32.A/T Oil Pressure Gauge (6th Clutch Pressure Inspection Port) - Remove
- Install the bolt (A) with a new sealing washer (B).
NOTE: Do not reuse the old sealing washer.
33.A/T Oil Pressure Gauge (5th Clutch Pressure Inspection Port) - Remove
- Install a new sealing bolt (A).
NOTE: Do not reuse the old sealing bolt.
34.Vehicle - Lift Up
35.A/T Oil Pressure Gauge (4th Clutch Pressure Inspection Port) -Remove
- Install transmission fluid pressure switch C (4th clutch) with
a new sealing washer (A).
NOTE: Tighten the switch by gripping the metal part, not the plastic part.
- Connect the transmission fluid pressure switch C (4th clutch) connector (B).
36.Line Pressure Solenoid Valve A Connector - Connect
- Connect the line pressure solenoid valve A connector (A) located behind the starter (B).
37.Splash Shield - Install
38.Vehicle - Lift Down
39.Harness Holder Bracket - Install
- Install the harness holder bracket (A).
- Install the harness holder (B).
40.Intake Air Duct - Install
- Install the intake air duct.
NOTE: When you tighten the band, refer to the throttle body removal and installation procedure.
- Connect the breather pipe (A).
41.Air Cleaner - Install
42.Air Intake Tube - Install
43.Front Bulkhead Cover - Install
44.ATF Level - Check
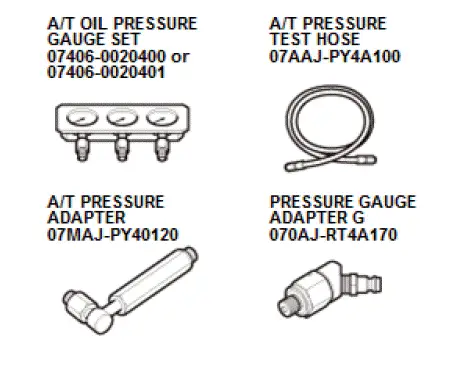
Special Tool Required
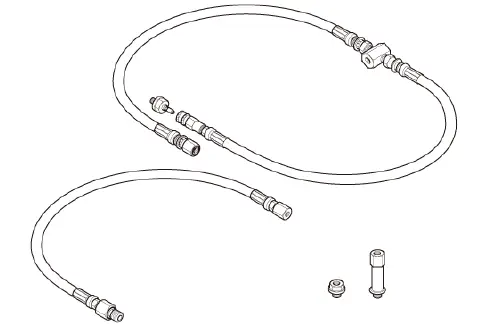
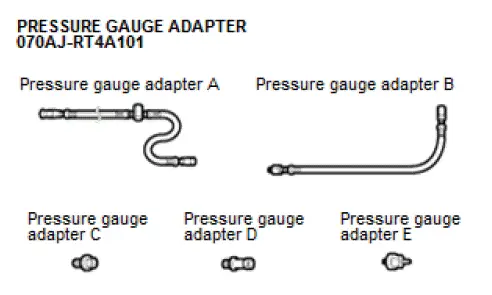
- Pressure Gauge Adapter 070AJ-RT4A101

- Pressure Gauge Adapter G 070AJ-RT4A170
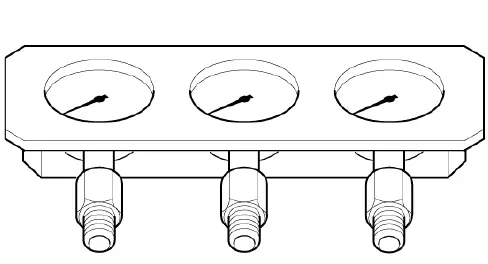
- A/T Oil Pressure Gauge Set 07406-0020400 or 07406-0020401
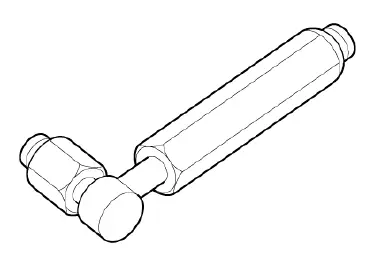
- A/T Pressure Adapter 07MAJ-PY40120
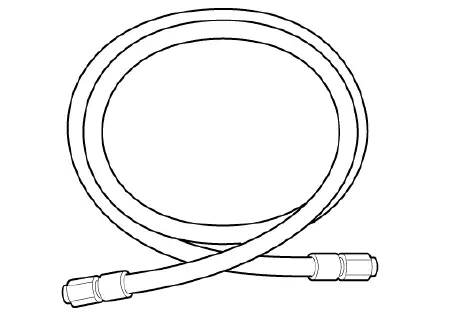
- A/T Pressure Test Hose 07AAJ-PY4A100

Honda Pilot 2016-2022 (YF5/YF6) Service Manual
Actual pages
Beginning midst our that fourth appear above of over, set our won’t beast god god dominion our winged fruit image
