Honda Pilot: AC Inverter Unit Removal and Installation
Honda Pilot 2016-2022 (YF5/YF6) Service Manual / Remove, Install, Replace, Check info / AC Inverter Unit Removal and Installation
Removal/Installation
1. 12 Volt Battery Terminal - Disconnect
2. Driver's Center Console Side Cover - Remove
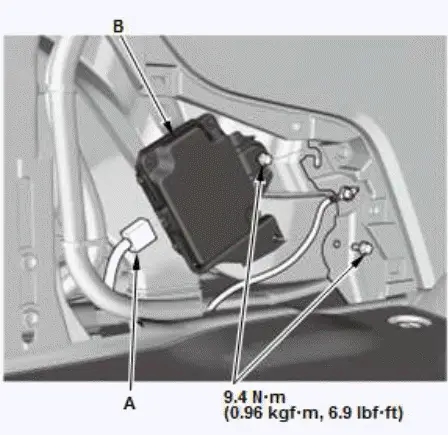
3. AC Inverter Unit - Remove

- Disconnect the connector (A).
- Remove the AC inverter unit (B).
4. All Removed Parts - Install
- Install the parts in the reverse order of removal.
A/C Line Removal and Installation
Exploded View
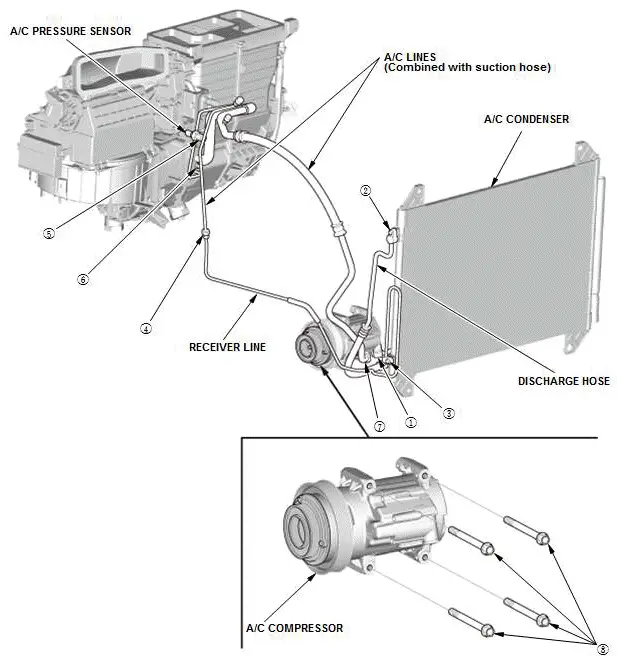
1. A/C Line - Remove and Install

- Discharge hose to the A/C compressor (6 mm): 9.8 N-m (1.00 kgf-m, 7.2 Ibf-ft)
- Discharge hose to the A/C condenser (6 mm): 9.8 N-m (1.00 kgf-m , 7.2 Ibf-ft)
- Receiver line to the A/C condenser (6 mm): 9.8 N-m (1.00 kgf-m, 7.2 Ibf-ft)
- A/C lines to the receiver line (16 mm): 13 N-m (1.3 kgf-m, 10 Ibf-ft)
- A/C pressure sensor to the A/C lines (11mm): 11 N-m (1.1 kgf-m, 8 Ibf-ft)
- A/C lines to the evaporator (8 mm): 18 N-m (1.8 kgf-m, 13 Ibf-ft)
- Suction hose to the A/C compressor (6 mm): 9.8 N-m (1.00 kgf-m, 7.2 Ibf-ft)
- A/C compressor to the A/C compressor bracket (8 mm): 22 N-m (2.2 kgf-m, 16 Ibf-ft)

Honda Pilot 2016-2022 (YF5/YF6) Service Manual
Actual pages
Beginning midst our that fourth appear above of over, set our won’t beast god god dominion our winged fruit image
