Honda Pilot: Automatic Transmission Removal and Installation
Exploded View
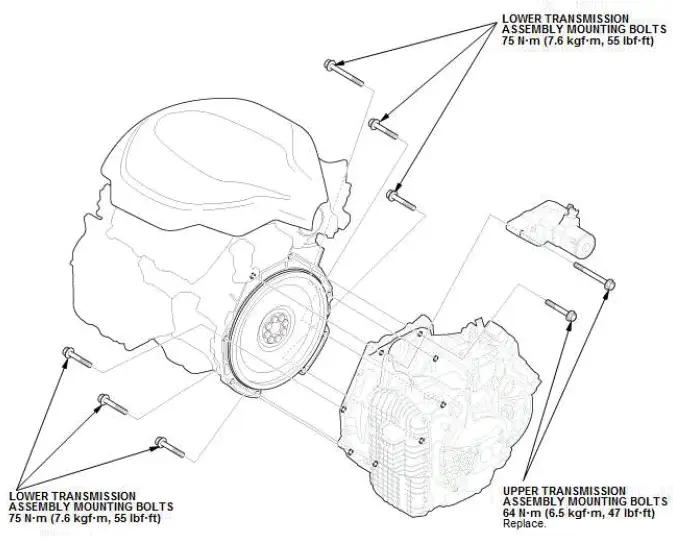
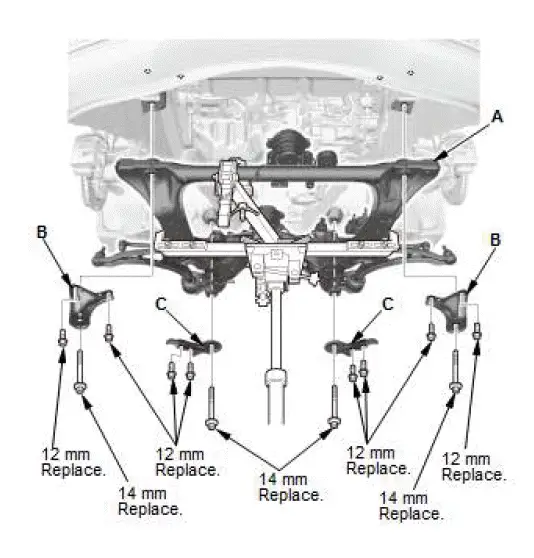
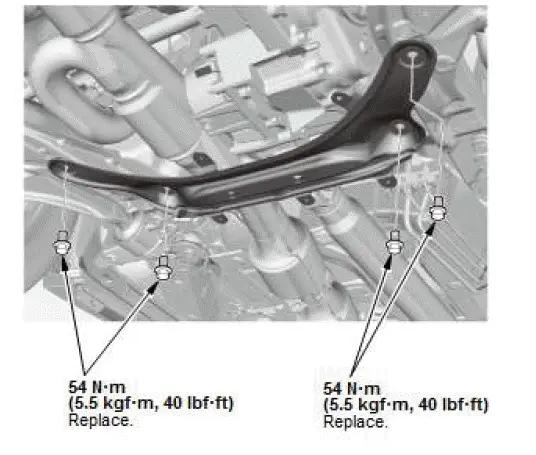
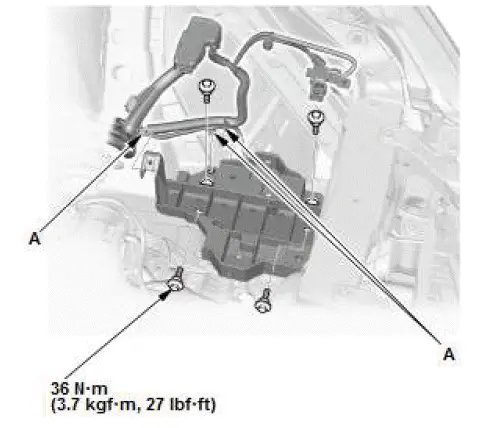
1. Transmission Assembly Mounting Bolt - Exploded View
Exploded View
Removal
NOTE:
- Use fender covers to avoid damaging painted surfaces.
- Special tool engine support hanger AAR-T1256 must be used with the side engine mount installed.
- The TCM, the torque converter, and the ATF warmer are installed on the new transmission. Additionally, the new transmission is pre-filled with ATF. Therefore, if you replace the transmission, it is not necessary to remove/install these parts and fill the ATF.
- Unless otherwise indicated, illustrations used in the procedure are for AWD.
1. Vehicle - Lift Set
2. Splash Shield - Remove
3. ATF - Drain
4. Engine Coolant - Drain (Only for Replacing Transmission)
5. Vehicle - Lift Down
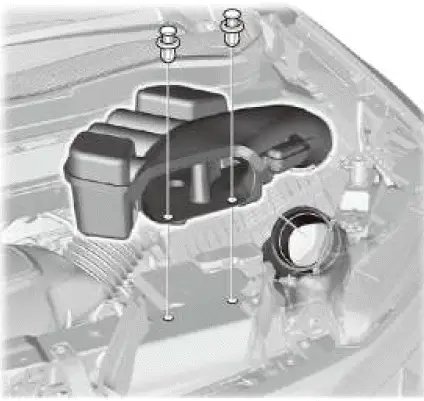
6. Engine Cover - Remove
7. Front Bulkhead Cover - Remove
8. Air Intake Tube - Remove
9. Intake Air Guide - Remove
10.12 Volt Battery - Remove
11.Steering Joint - Disconnect
NOTE: Hold the steering wheel with the steering wheel holder tool.
12.Air Cleaner - Remove
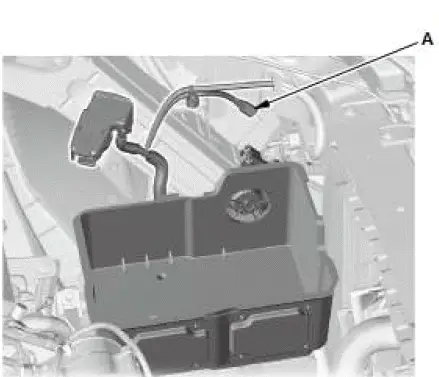
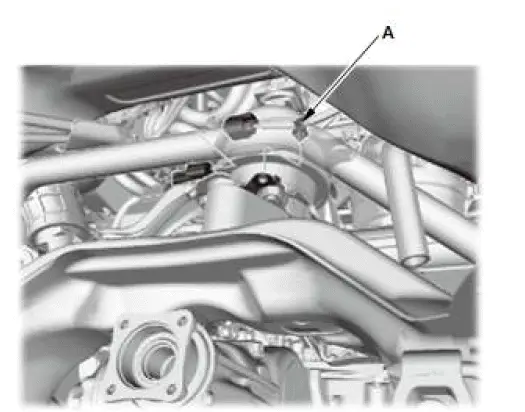
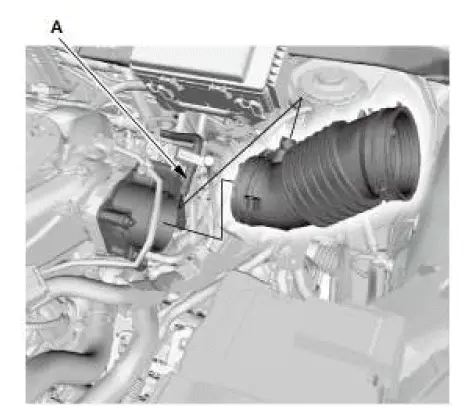
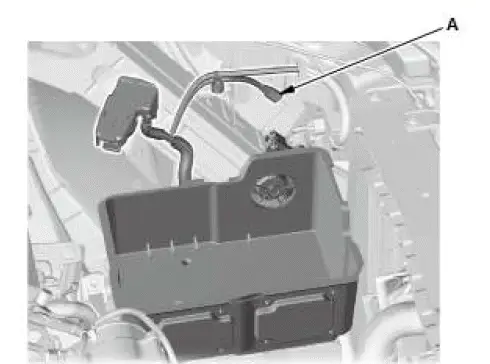
13.Intake Air Duct - Remove
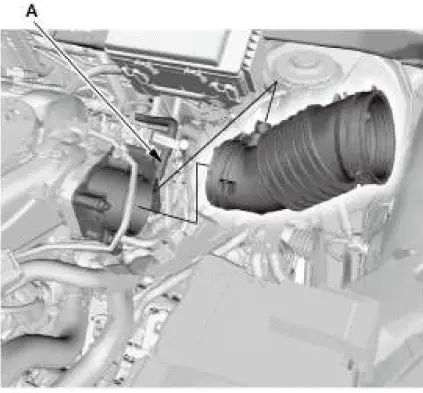
- Disconnect the breather pipe (A).
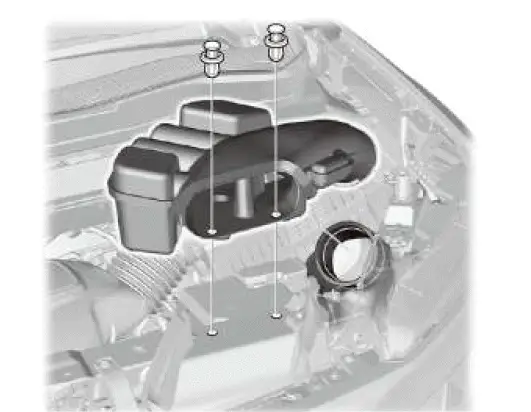
14.12 Volt Battery Box - Remove
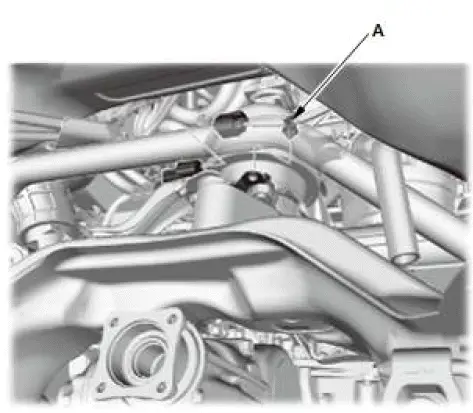
- Disconnect the connector (A).
15.12 Volt Battery Duct - Remove
16.12 Volt Battery Base - Remove
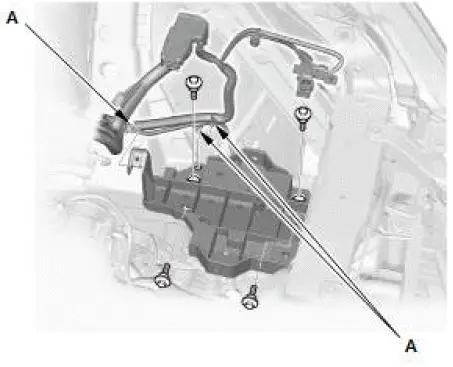
- Remove the harness clamps (A).
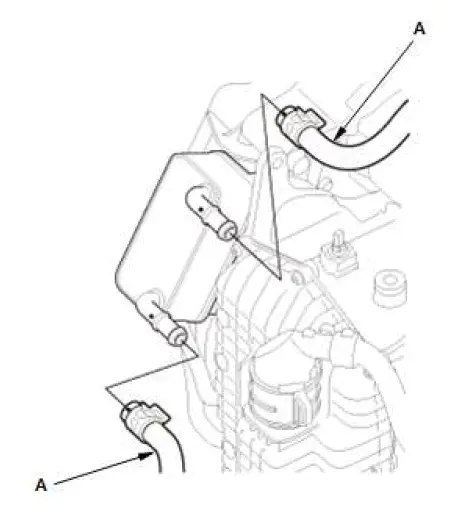
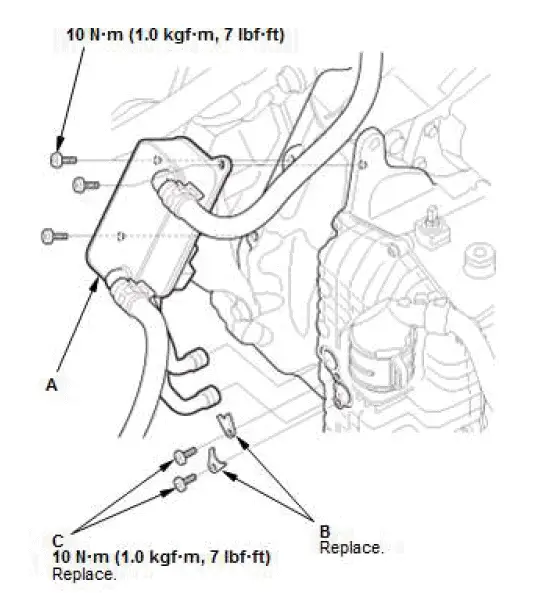
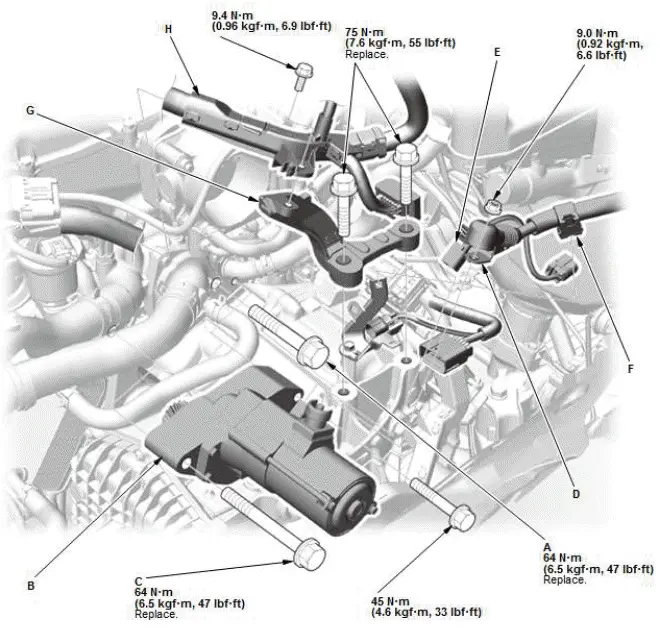
17.Upper Transmission Assembly Mounting Bolt - Remove

- Disconnect the breather hose (A).
- Disconnect the connectors (B).
- Remove the connector (C).
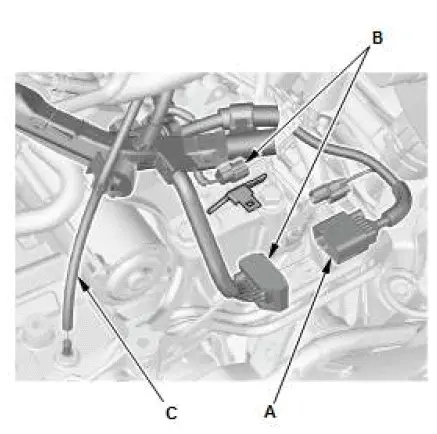
- Remove the harness holder (A).
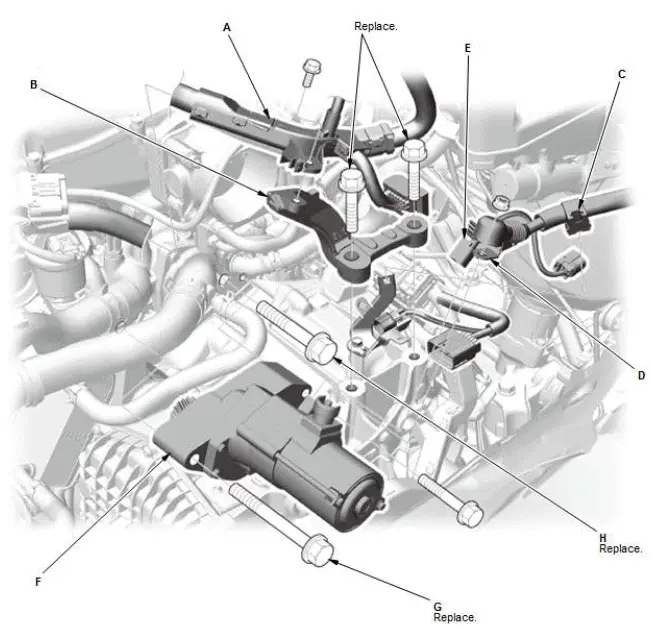
- Remove the skid block (B).
- Remove the harness clamp (C).
- Disconnect the positive starter cable (D) and the connector (E).
- Remove the starter (F) with the upper transmission assembly mounting bolt (G).
- Remove the upper transmission assembly mounting bolt (H).
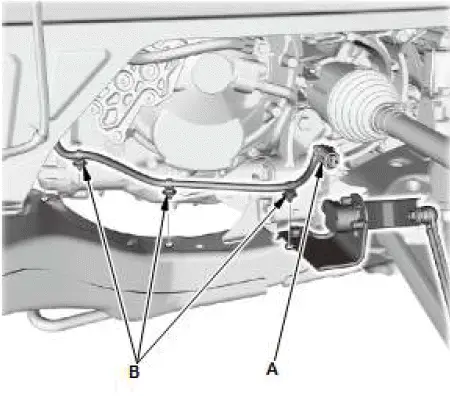
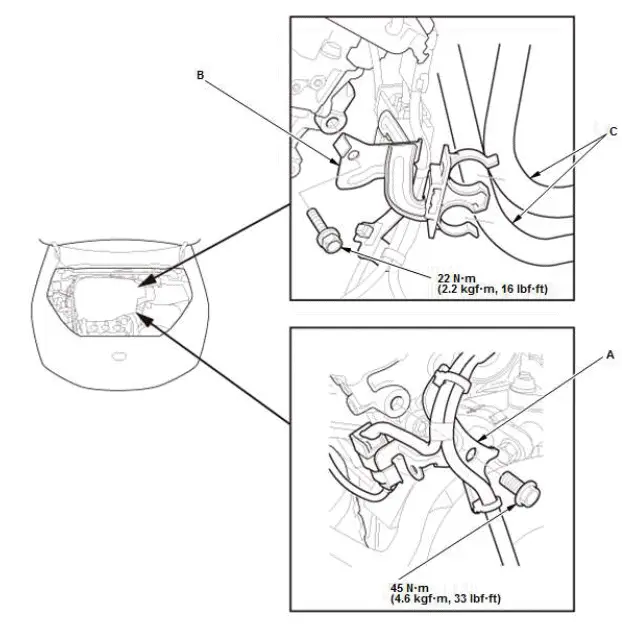
18.Connector Bracket and Harness Bracket - Remove
- Remove the connector bracket (A); use the bracket bolt hole (B) to attach the engine hanger balance bar front arm.
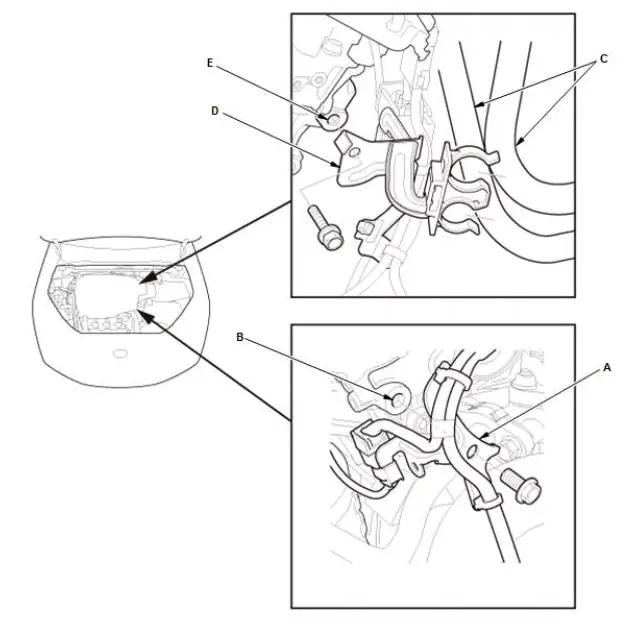
- Unclamp the heater hoses (C).
- Remove the harness bracket (D); use the bracket bolt hole (E) to attach the engine hanger balance bar rear arm.
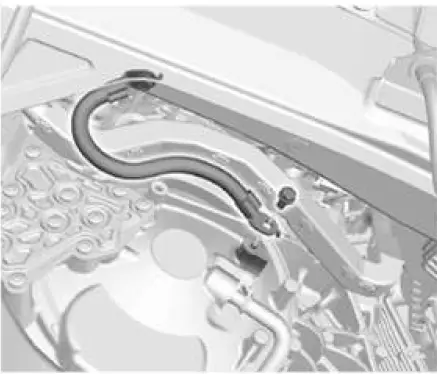
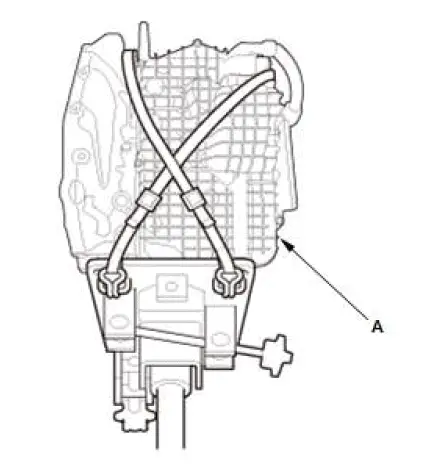
19.Water Bypass Hose - Disconnect (Only for Replacing Transmission)
- Disconnect the water bypass hoses (A).
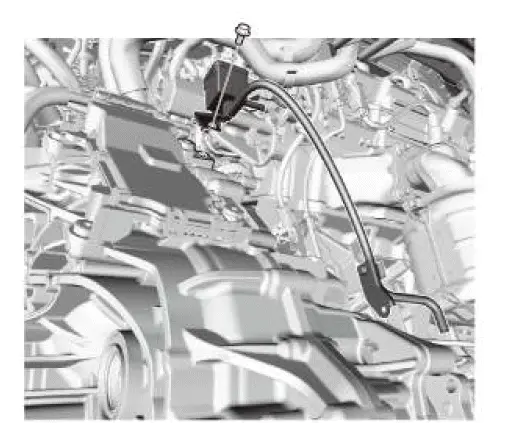
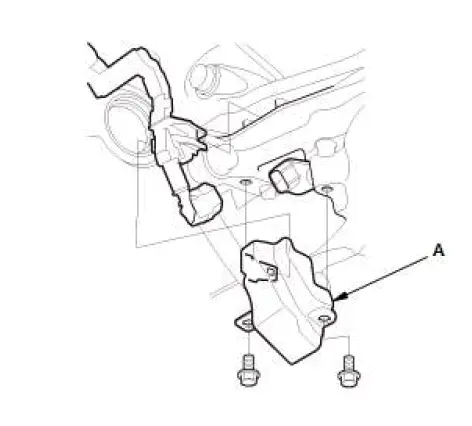
20.ATF Warmer - Remove (Only for Removing/Installing Transmission)
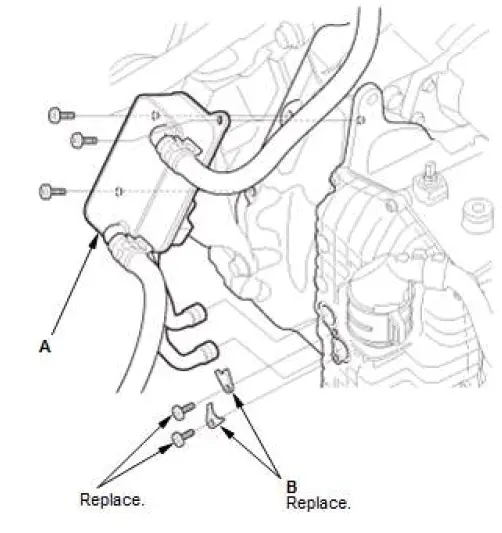
- Remove the ATF warmer (A) with the fixing plates (B) without
disconnecting the water bypass hoses.
NOTE: Be careful not to damage the ATF warmer.
- Remove pipes A and B with the fixing plates (C).
- Put plastic bag over the ATF warmer, then swing it out of the way.
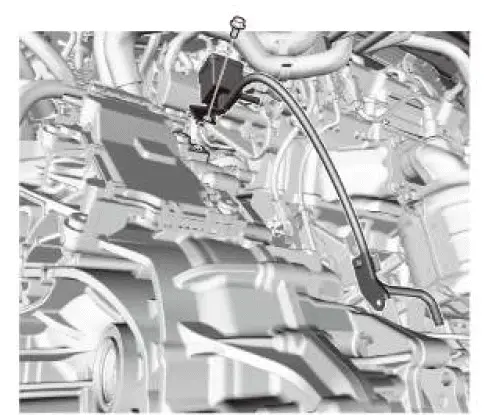
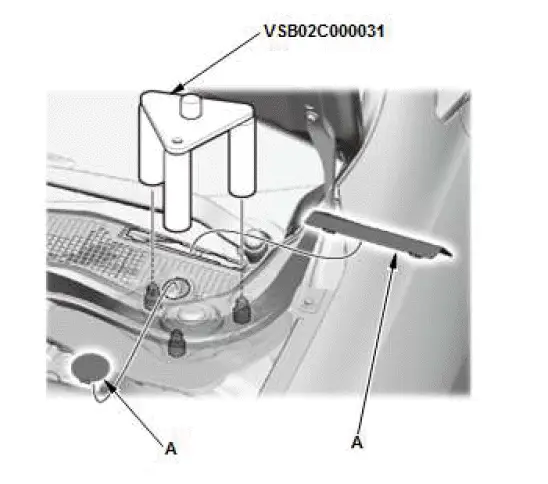
21.Engine Support Hanger - Install
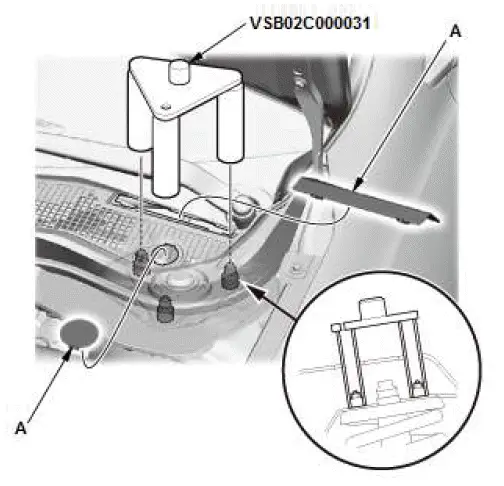
- Remove the service caps (A).
- Install the engine hanger adapters (VSB02C000031) as shown.
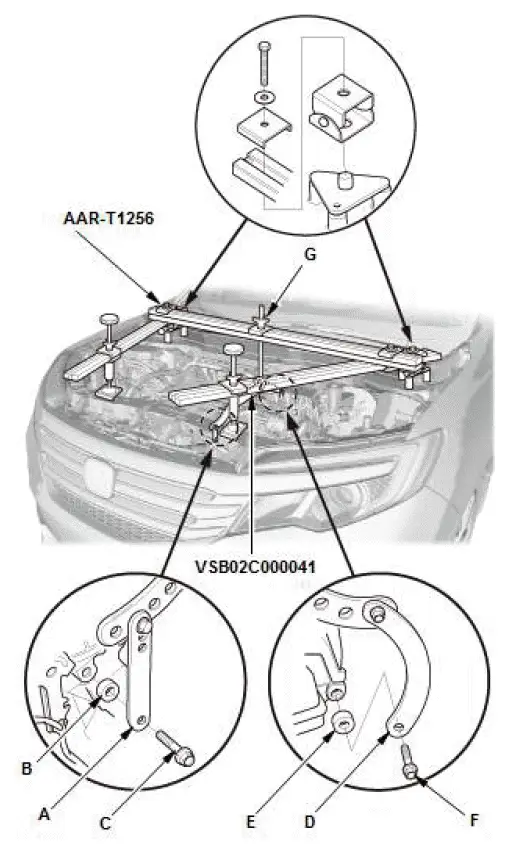
- Install the engine hanger balance bar (VSB02C000041).
Attach the front arm (A) to the front cylinder head with about a 10 mm (0.39 in) spacer (B) and a 10 x 1.25 mm bolt (C), attach the rear arm (D) to the rear cylinder head with about a 10 mm (0.39 in) spacer (E) and an 8 x 1.25 mm bolt (F) as shown.
- Install the engine support hanger (AAR-T1256) onto the vehicle as shown, and attach the hook to the slotted hole in the engine hanger balance bar. Tighten the wing nut (G) by hand, and lift and support the engine/transmission.
NOTE:
- Be careful when working around the windshield.
AAR-T1256 two sets required for stacking additional cross section bars.
- Be careful not to damage the hood opener cable when installing the engine support hanger at the front bulkhead.
22.Front Engine Mount Mounting Bolt - Remove

23.Rear Engine Mount Mounting Bolt - Remove
24.Vehicle - Lift Up
25.Front Wheel - Remove (Both Sides)
26.Engine Undercover - Remove
27.Front Inner Fender - Remove
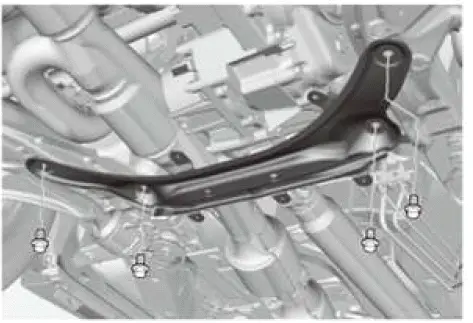
28.Front subframe stiffener plate - Remove
29.Under-Floor TWC - Remove
30.Propeller Shaft - Remove
31.Transfer Assembly - Remove (With AWD)
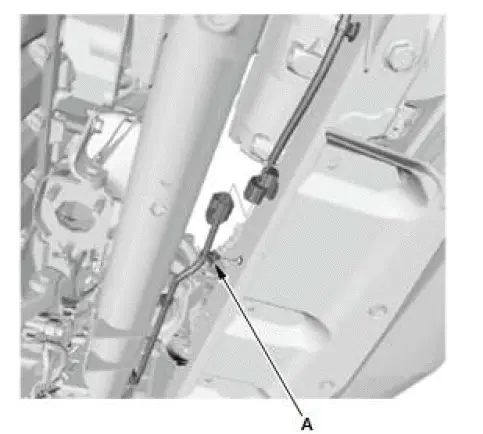
32.Front Engine Mount Actuator Connector - Disconnect
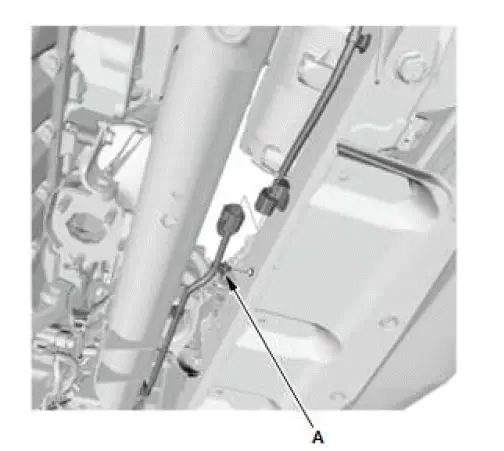
- Remove the harness clamp (A).
33.Rear Engine Mount Actuator Connector - Disconnect
- Remove the harness clamp (A).
34.Front Secondary HO2S Connector Clamp - Remove
35.Front Suspension Stroke Sensor - Disconnect (With Auto Leveling System)
- Disconnect the front suspension stroke sensor from the lower arm.
36.Harness and Connector - Disconnect (With Auto Leveling System)
- Disconnect the connector (A).
- Remove the harness clamps (B).
37.Transmission Ground Cable - Remove
38.Torque Converter - Disconnect
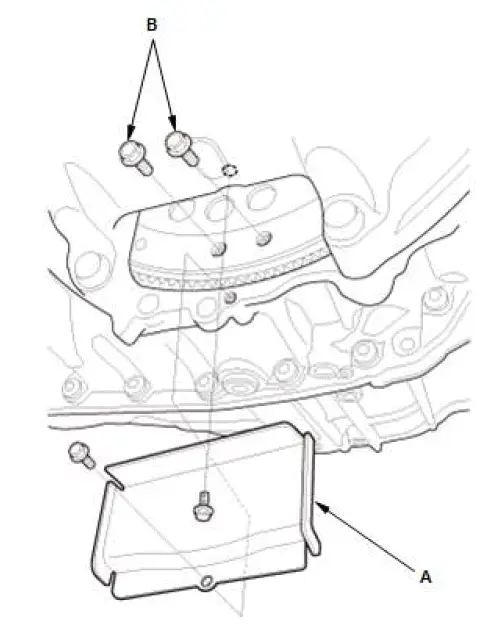
- Remove the torque converter cover (A).
- Remove six torque converter bolts (B) while rotating the crankshaft
pulley.
NOTE: Make sure the torque converter is fully engaged on the transmission.
39.Tie-Rod End Ball Joint - Disconnect (Both Sides)
40.Lower Stabilizer Link Ball Joint - Disconnect (Both Sides)
41.Lower Arm Ball Joint - Disconnect
42.Transmission Mount Bracket Mounting Bolt - Remove

43.Front Subframe - Remove
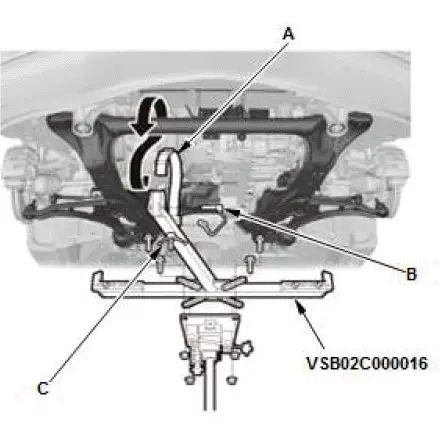
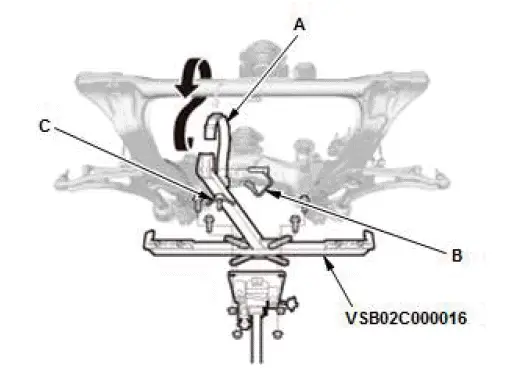
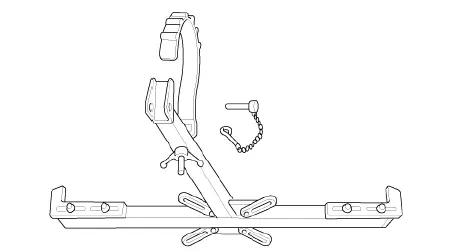
- Attach the subframe adapter (VSB02C000016) by looping the strap (A) over the front of the front subframe, then secure the strap with the stop (B), and tighten the wing nut (C).
- Raise a transmission jack and line up the slots in the arms with the bolt holes on the corner of the jack base, then tighten the bolts.
- Remove the front subframe (A) with the front stiffeners (B) and the rear stiffeners (C).
- Lower the front subframe carefully.
44.Transmission - Support
- Support the transmission with the transmission jack.
45.Driveshaft Inboard Joint - Disconnect (Both Sides)
NOTE: Secure the driveshaft to the body with a nylon strap on both sides.
46.Transfer Breather Box/Transfer Breather Hose - Remove (With AWD)
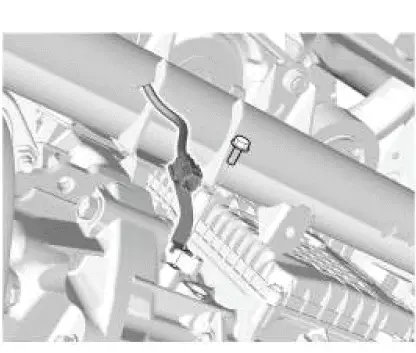
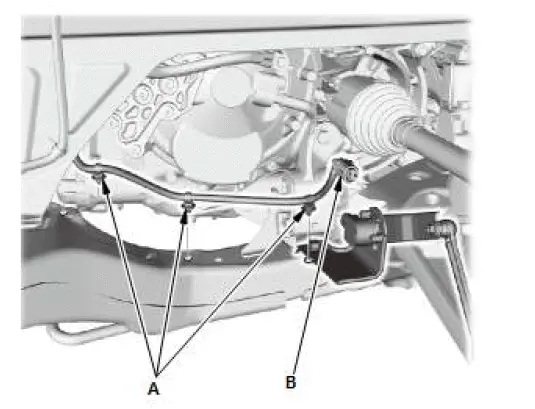
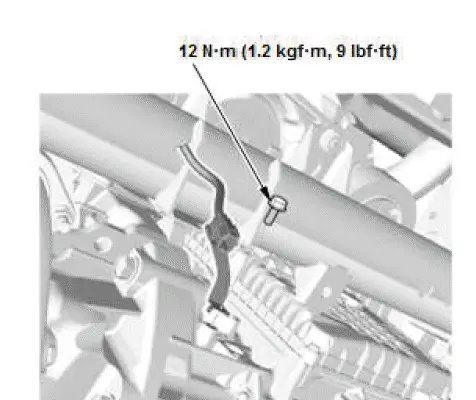
47.CKP Sensor Connector - Disconnect
- Remove the CKP sensor cover (A).
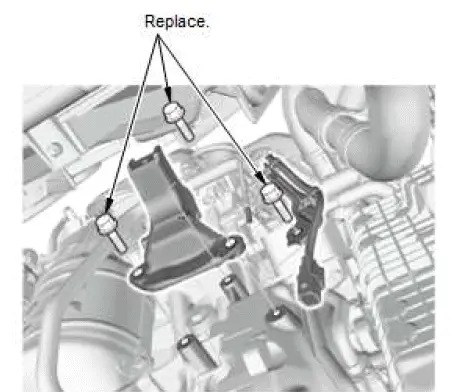
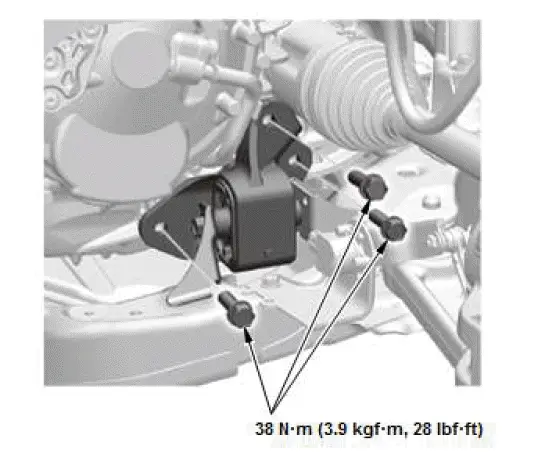
48.Front Engine Mount Bracket - Remove
49.Lower Transmission Assembly Mounting Bolt - Remove
NOTE: Refer to the Exploded View as needed during this procedure.
50.Transmission - Remove
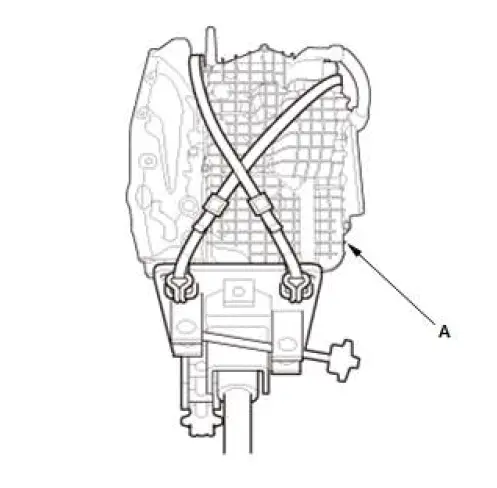
- Check once again that the transmission (A) is free of hoses and electrical wiring.
- Hold the transmission on the transmission jack.
- Lower the transmission by loosening the wing nut of the engine support hanger, and tilt the engine just enough for the transmission to clear its end from the side frame.
- Slide the transmission away from the engine to remove it from the
vehicle.
NOTE: Do not let the torque converter move to the drive plate side.
- Lower the transmission carefully.
NOTE: Be careful not to drop the torque converter.
51.Torque Converter - Remove
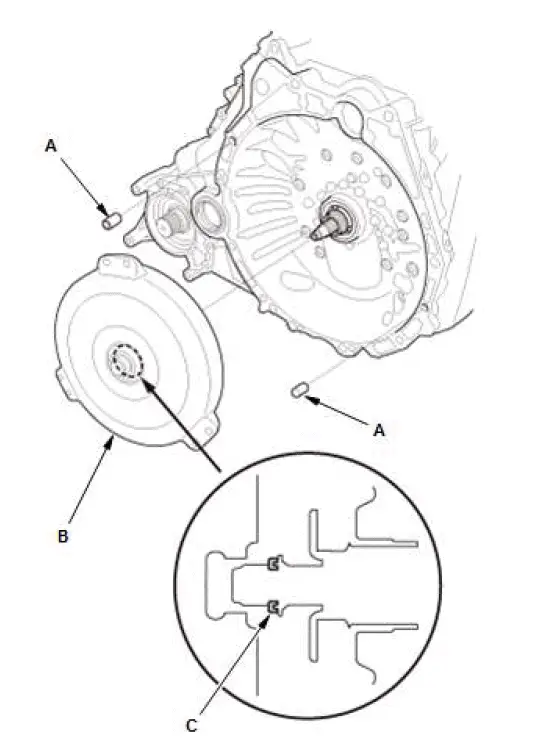
- Remove the dowel pins (A).
- If necessary, remove the torque converter (B) straight.
NOTE:
- Be careful not to damage the oil seal (C).
- If you do the following procedures, this procedure is not needed.
- Replacing the transmission.
- Doing a procedure that does not require the removal of the torque converter.
52.Drive Plate - Inspect
- Inspect the drive plate, and replace it if it is damaged.
Installation
NOTE:
- Use fender covers to avoid damaging painted surfaces.
- When connecting the connector, check for corrosion, dirt, or oil, and clean or repair if necessary.
- The TCM, the torque converter, and the ATF warmer are installed on the new transmission. Additionally, the new transmission is pre-filled with ATF. Therefore, if you replace the transmission, it is not necessary to remove/install these parts and fill the ATF.
1. Torque Converter - Install
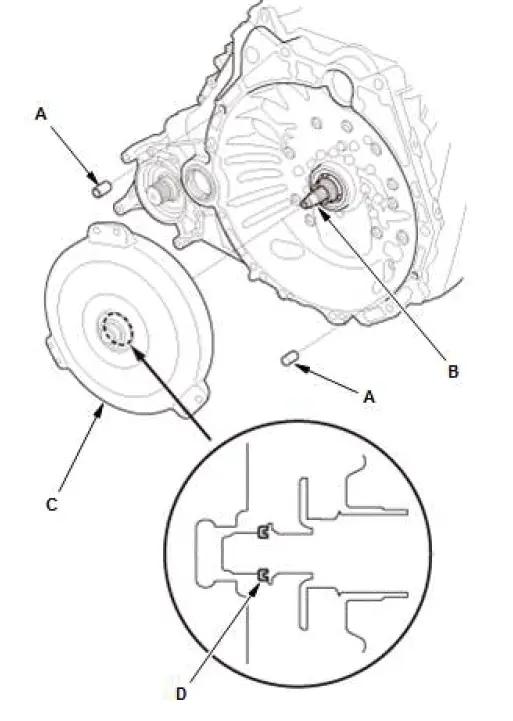
- Install the dowel pins (A).
- Apply a light coat of clean ATF to the input shaft (B).
- Install the torque converter (C).
NOTE:
- Be careful not to damage the oil seal (D).
- Make sure the torque converter is fully engaged on the transmission. Failure to do so will result in severe transmission or engine damage.
2. Transmission - Install
- Hold the transmission (A) on a transmission jack, and raise it to engine
level.
NOTE: Be careful not to drop the torque converter.
- Attach the transmission to the engine.
NOTE: Do not let the torque converter move to the drive plate side.
3. Lower Transmission Assembly Mounting Bolt - Install
NOTE: Refer to the Exploded View as needed during this procedure.
4. CKP Sensor Connector - Connect
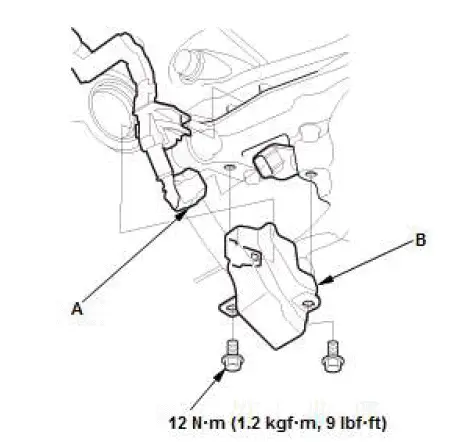
- Connect the CKP sensor connector (A).
- Install the CKP sensor cover (B).
5. Front Engine Mount Bracket - Install

6. Transfer Breather Box/Transfer Breather Hose - Install (With AWD)
7. Driveshaft Inboard Joint - Connect (Both Sides)
8. Front Subframe - Install
- Attach the subframe adapter (VSB02C000016) by looping the strap (A) over the front of the front subframe, then secure the strap with the stop (B), and tighten the wing nut (C).
- Raise a transmission jack and line up the slots in the arms with the bolt holes on the corner of the jack base, then tighten the bolts.
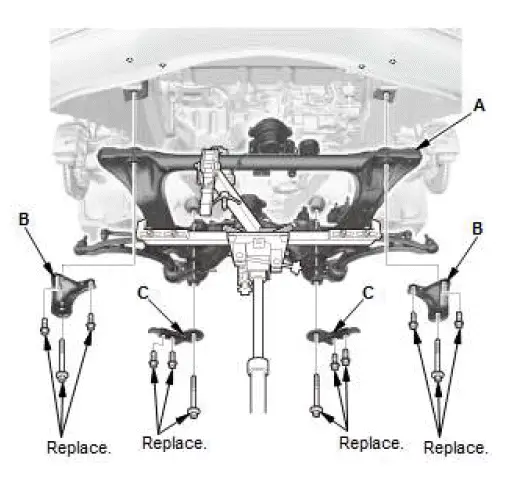
- Raise the front subframe (A) up to the body.
- Loosely install the front subframe with the front stiffeners (B) and the rear stiffeners (C) using appropriate bolts.
- Align the front subframe with the subframe alignment pin, then tighten the mounting bolts to the specified torque.
- Remove the transmission jack and the subframe adapter.
9. Transmission Mount Bracket Mounting Bolt - Install
10.Harness and Connector - Connect (With Auto Leveling System)
- Install the harness clamps (A).
- Connect the connector (B).
11.Front Suspension Stroke Sensor - Connect (With Auto Leveling System)
- Connect the front suspension stroke sensor to the lower arm.
12.Front Secondary HO2S Connector Clamp - Install
13.Front Engine Mount Actuator Connector - Connect
- Install the harness clamp (A).
14.Rear Engine Mount Actuator Connector - Connect
- Install the harness clamp (A).
15.Transmission Ground Cable - Install

16.Lower Arm Ball Joint - Connect
17.Lower Stabilizer Link Ball Joint - Connect (Both Sides)
18.Tie-Rod End Ball Joint - Connect (Both Sides)
19.Torque Converter - Connect
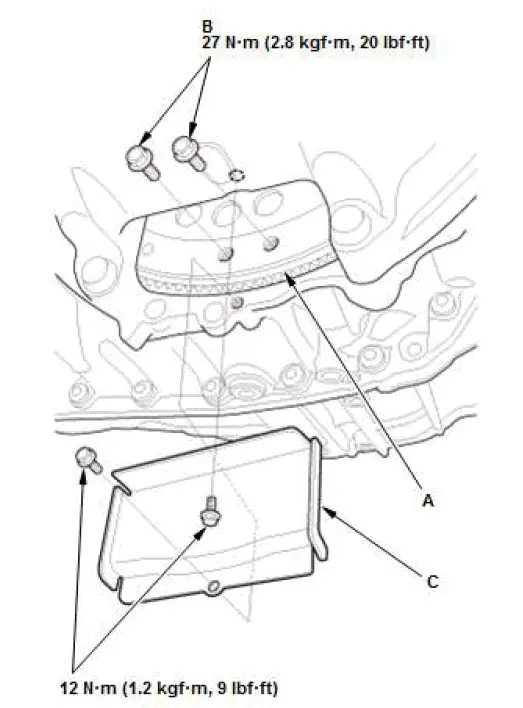
- Attach the torque converter to the drive plate (A) with six torque converter bolts (B).
- Rotate the crankshaft pulley as necessary to tighten the bolt to half of the specified torque, then to the final torque, in a crisscross pattern.
- Check that the crankshaft rotates freely.
- Install the torque converter cover (C).
20.Transfer Assembly - Install (With AWD)
21.Propeller Shaft - Install
22.Under-Floor TWC - Install
23.Front Subframe Stiffener - Install
24.Vehicle - Lift Down
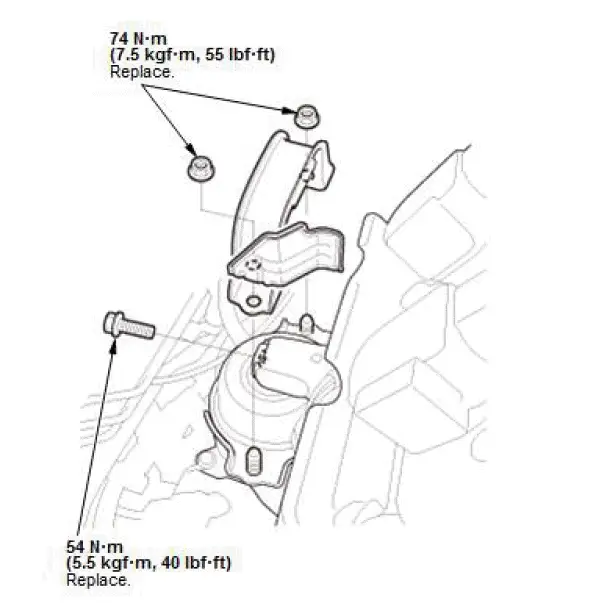
25.Front Engine Mount Mounting Bolt - Install
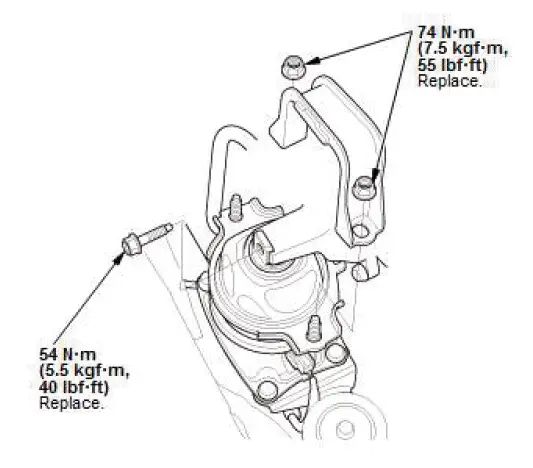
26.Rear Engine Mount Mounting Bolt - Install
27.Engine Support Hanger - Remove
- Remove the engine support hanger and the engine hanger balance bar.
- Remove the engine hanger adapters (VSB02C000031).
- Install the service caps (A).
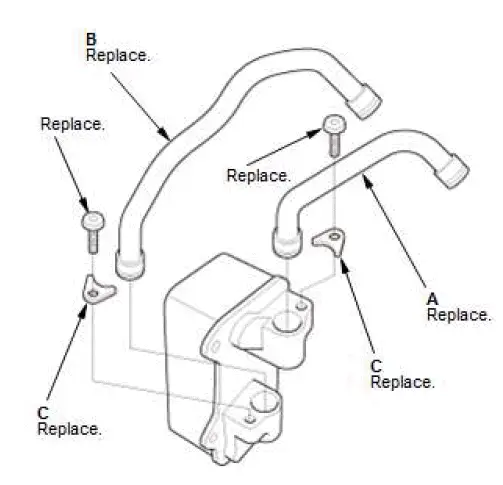
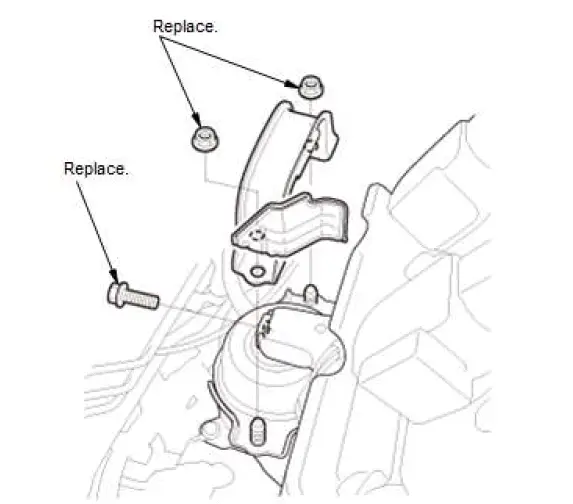
28.ATF Warmer - Install (Only for Removing/Installing Transmission)
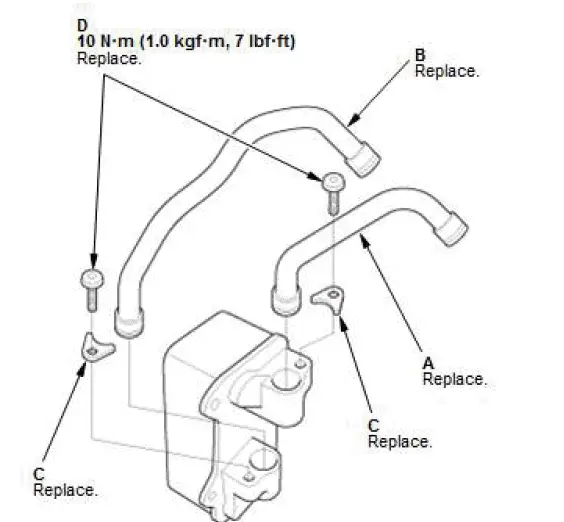
- Install new pipes A and B with new fixing plates (C) and new bolts (D).
- Install the ATF warmer (A) with new fixing plates (B) and new bolts (C).
NOTE: Be careful not to damage the ATF warmer.
29.Water Bypass Hose - Connect (Only for Replacing Transmission)
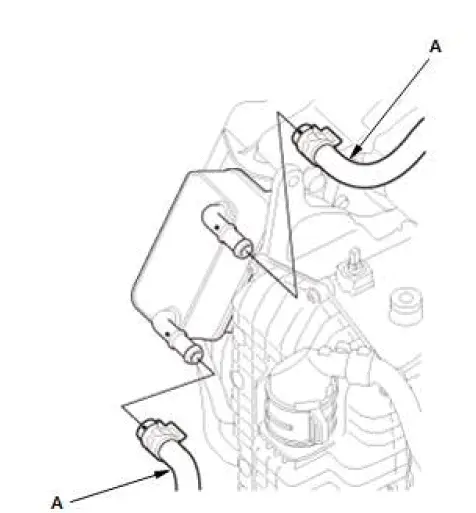
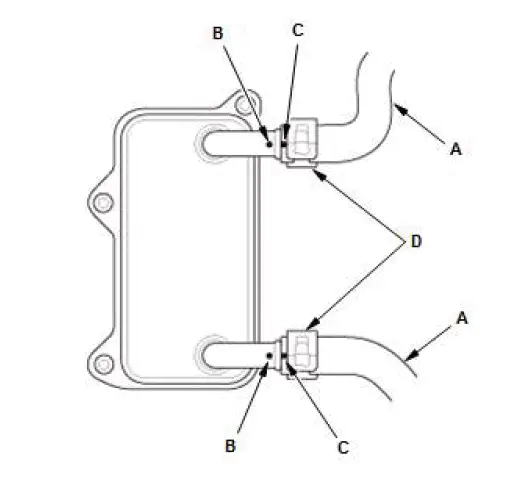
- Connect the water bypass hoses (A), while aligning the paint marks (B) on the ATF warmer lines with the paint marks (C) on the water bypass hose ends.
- Secure the water bypass hoses with the clamps (D).
30.Connector Bracket and Harness Bracket - Install
- Install the connector bracket (A).
- Install the harness bracket (B).
- Clamp the heater hoses (C).
31.Upper Transmission Assembly Mounting Bolt - Install
- Install a new upper transmission assembly mounting bolt (A).
- Install the starter (B) with a new upper transmission assembly mounting bolt (C).
- Connect the positive starter cable (D) and the connector (E).
NOTE: Make sure the crimped side of the ring terminal faces away from the starter.
- Install the harness clamp (F).
- Install the skid block (G).
- Install the harness holder (H).
- Install the connector (A).
- Connect the connectors (B).
- Connect the breather hose (C).
32.Steering Joint - Connect
33.Intake Air Duct - Install
- Install the intake air duct.
NOTE: When you tighten the band, refer to the throttle body removal and installation procedure.
- Connect the breather pipe (A).
34.Air Cleaner - Install
35.12 Volt Battery Base - Install
- Install the battery base and the harness clamps (A).
36.12 Volt Battery Duct - Install
37.12 Volt Battery Box - Install
- Connect the connector (A).
38.12 Volt Battery - Install
39.Intake Air Guide - Install
40.Air Intake Tube - Install
41.Front Bulkhead Cover - Install
42.Front Inner Fender - Install
43.Front Wheel - Install (Both Sides)
44.Splash Shield - Install
45.Engine Undercover - Install
46.TCM - Learn (Only for Replacing Transmission or TCM)
- If the transmission or the TCM is replaced, be sure to do the TCM learning procedure (see "Procedure After Replacing TCM").
47.Engine Coolant - Refill (Only for Replacing Transmission)
48.ATF - Refill (Only for Removing/Installing Transmission)
49.ATF Level - Check
50.Engine Cover - Install
51.Front Wheel Alignment - Check
52.VSA Sensor Neutral Position - Memorize
53.Steering Angle Sensor Neutral Position - Clear
54.Headlight Initial Position - Learn
55.Vehicle - Test-Drive
Special Tool Required
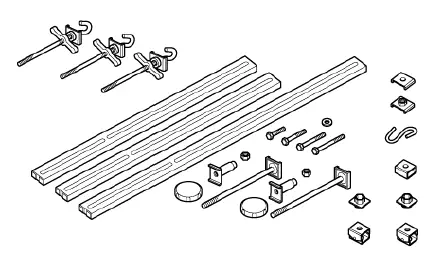
- Engine Support Hanger, A and Reds AAR-T1256*
- Subframe Adapter VSB02C000016*
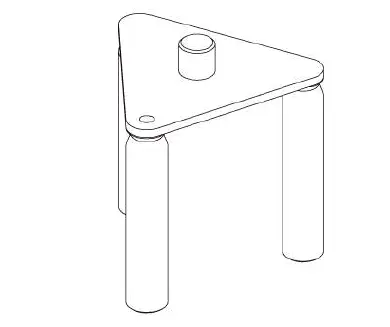
- Engine Hanger Adapter Set VSB02C000031
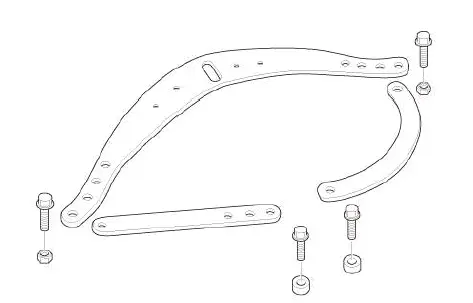
- Engine Hanger Balance Bar VSB02C000041*
*: Available through the Honda Tool and Equipment Program 888-424-6857.

Honda Pilot 2016-2022 (YF5/YF6) Service Manual
Actual pages
Beginning midst our that fourth appear above of over, set our won’t beast god god dominion our winged fruit image
