Honda Pilot: Rear Door Glass and Regulator Removal and Installation
Removal/Installation
1. Rear Door Panel - Remove
2. Rear Door Pull Pocket Bracket - Remove

3. Rear Door Plastic Cover - Remove

- Remove the plug caps (A).
- Disconnect the connector (B).
- Remove the rear door plastic cover (C).
NOTE: If the plastic cover is damaged or torn, replace it with a new one.
4. Rear Door Panel Barrier A/B - Remove (For Some Models)

- Remove the rear door panel barrier A and rear door panel barrier B.
5. Rear Door Glass - Remove

- Lower the rear door glass (A) until you can see the bolts, and then remove them.
- Carefully lower the glass.
NOTE: Be careful not to drop the glass inside the door.

- Remove the front door weatherstrip (A) as needed.
- Remove the bolts (B, C), the screw (D) and the collar (E) from the center lower channel (F).

- Remove the glass run channel (A) and the rear lower
channel (B).
NOTE: Be careful not to scratch the door, or damage the door quarter glass seal.

- Remove the rear lower channel (A).
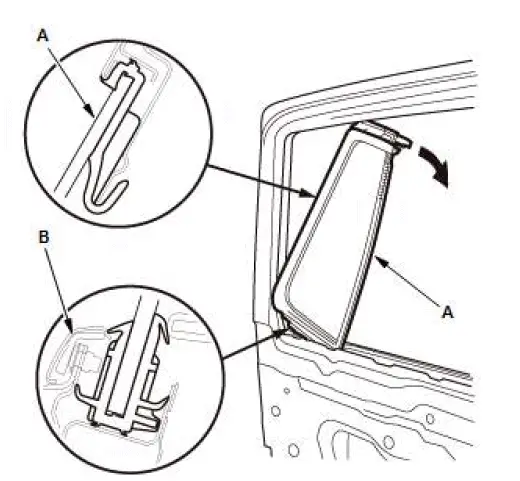
- Remove the rear door quarter glass (A).
NOTE: Be careful not to damage the door glass outer weatherstrip (B).

- Carefully remove the rear door glass (A) out through the window slot.
NOTE: Be careful not to drop the glass inside the door.

- If necessary, remove the rear door center lower channel (A).
6. Rear Door Regulator - Remove

- Disconnect the connector (A).
- Remove the bolts (B) and loosen the bolt (C).
- Remove the regulator (D) through the hole in the door.
7. All Removed Parts - Install

- Install the parts in the reverse order of removal.
NOTE: Apply multipurpose grease to all sliding surfaces of the rear door regulator (A) where shown.
8. Rear Door Glass - Adjustment
Special Tool Required

- Driver Handle, 15 x 135L 07749-0010000

- Oil Seal Driver Attachment 07NAD-P20A100

Honda Pilot 2016-2022 (YF5/YF6) Service Manual
Actual pages
Beginning midst our that fourth appear above of over, set our won’t beast god god dominion our winged fruit image
