Honda Pilot: Rear Window Removal and Installation
Honda Pilot 2016-2022 (YF5/YF6) Service Manual / Remove, Install, Replace, Check info / Rear Window Removal and Installation
Removal
1. Rear Wiper Motor - Remove
2. Tailgate Spoiler Trim - Remove
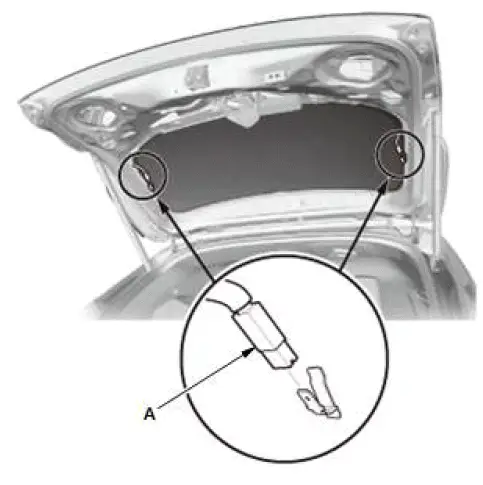
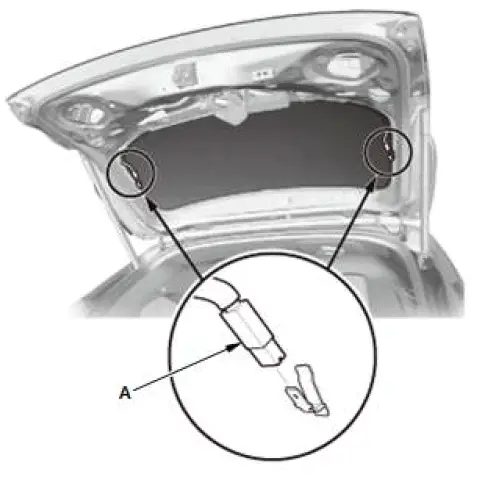
3. Power Tailgate Pinch Sensor - Remove (For Some Models)
4. Rear Window - Remove
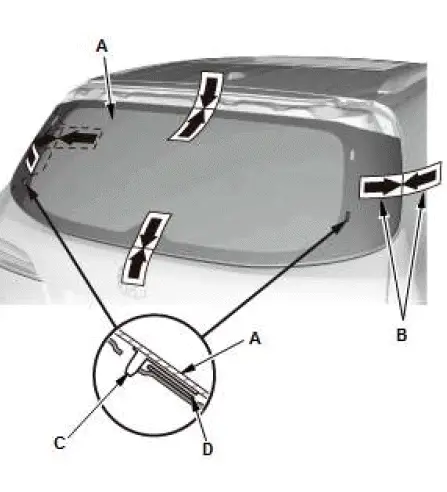
- Disconnect the rear window defogger terminals (A).
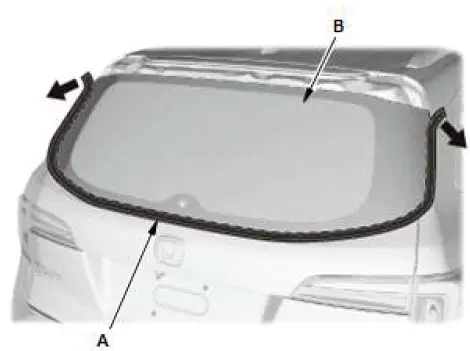
- Remove the rubber dam (A) from the edges of the rear window (B).
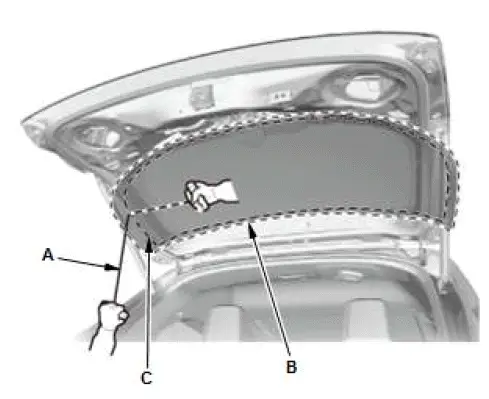
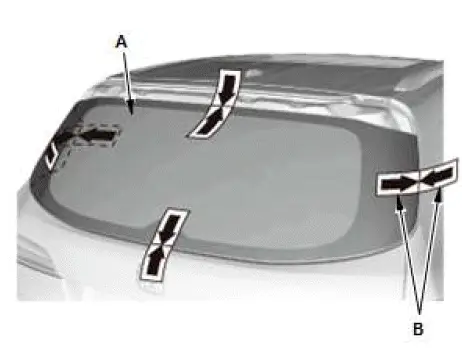
- Apply protective tape along the inside and outside edges of the tailgate. Make a hole with an awl through the adhesive from inside the vehicle at a corner of the rear window. Push a piece of piano wire through the hole, and wrap each end around a piece of wood.
- With a helper on the outside, pull the piano wire (A) back and forth in a sawing motion. Hold the piano wire as close to the rear window (B) as possible to prevent damage to the tailgate, and carefully cut through the adhesive (C) around the entire rear window.
Cutting positions
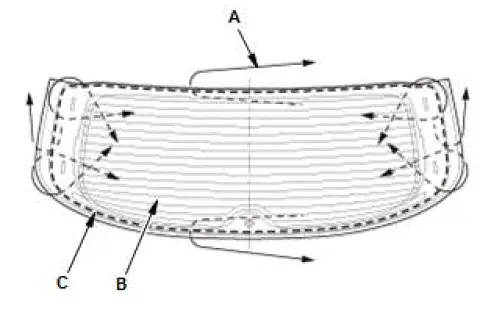
- If the original rear window (A) will be reinstalled, make alignment marks (B) across the rear window and the tailgate with a grease pencil.
- Carefully remove the rear window.
- Scrape the original adhesive smooth to a thickness of about 1 mm (0.04 in) - 2 mm (0.08 in) on the bonding surface around the entire rear window opening flange with a putty knife.
NOTE:
- Do not scrape down to the painted surface of the tailgate; damaged paint will interfere with proper bonding.
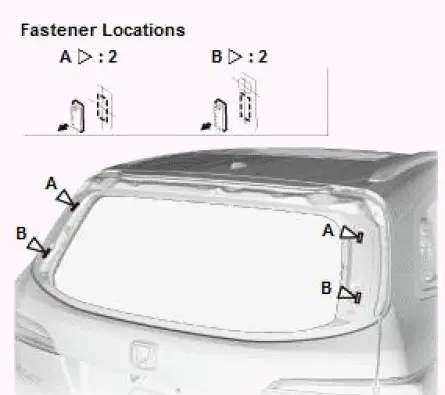
- Remove the fasteners from the tailgate.
Installation
- Clean the body bonding surface with a shop towel dampened with isopropyl alcohol. After cleaning, do not allow oil, grease, and water to contact on the clean surface.
- If you are reinstalling the original rear window, scrape off the original adhesive, the fasteners, and the rubber dam from the rear window with a putty knife. Clean the bonding surface on the inside face and the edge of the rear window with isopropyl alcohol. Make sure the bonding surface is kept free of water, oil, and grease.
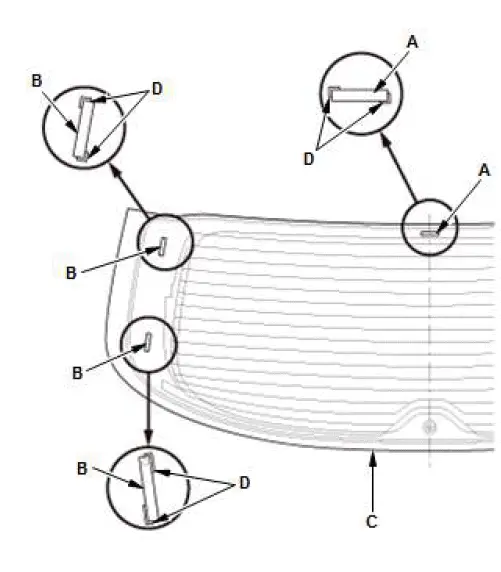
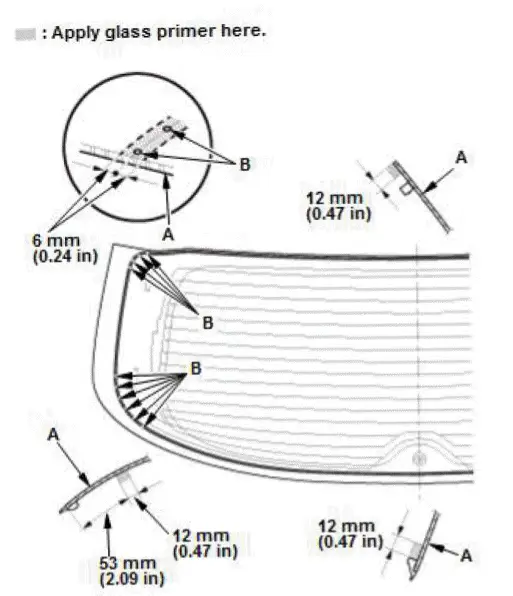
- Install the spacer (A) and the fasteners (B) with the adhesive tape to the inside face of the rear window (C) as shown.
NOTE:
- Be careful not to touch the rear window where the adhesive will be applied.
- Before installing the spacer and the fasteners, apply glass primer to the area where the adhesive tape will be applied.
- Make sure the spacer and the fasteners line up with the alignment marks (D).
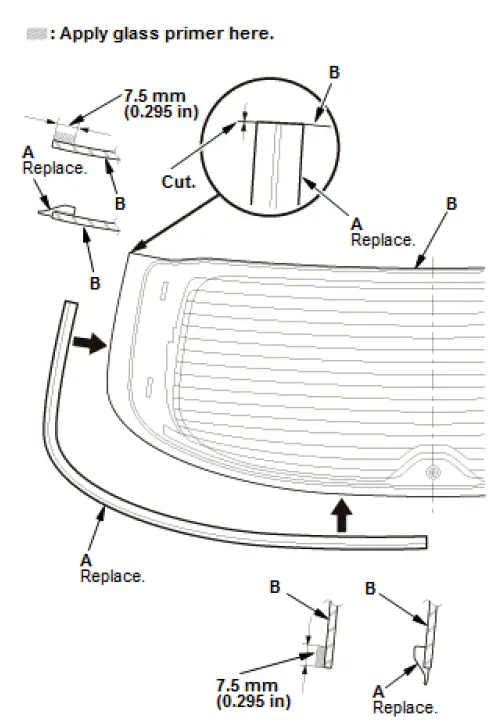
- Install the rubber dam (A) with the adhesive tape to the inside face of the rear window (B) as shown. Before installing the rubber dam, apply a glass primer to the area where the adhesive tape will be applied to the inside face of the rear window.
NOTE:
- After installing the new rubber dam, cut the both ends of rubber dam flush with the edges of the glass as shown.
- Be careful not to touch the rear window where the adhesive will be applied.
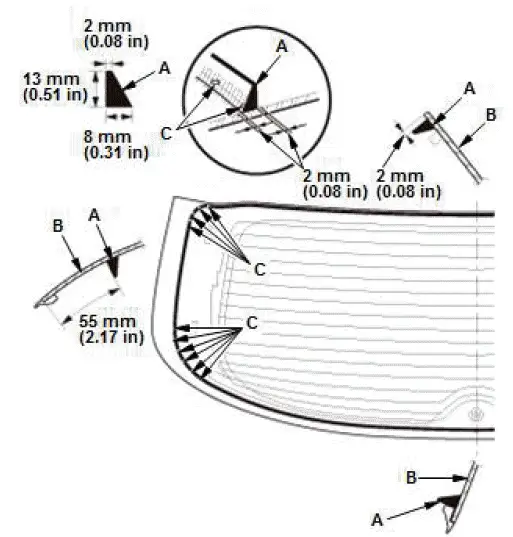
- Attach the fasteners (A, B) with the adhesive tape to the rear window opening flange of the tailgate as shown.
- If you are installing the new rear window (A), set the rear window in the opening, and center it. Make the alignment marks (B) across the rear window and the body with a grease pencil at the four points shown.
- Make sure the pins (C) of the fasteners (D) contact with the edge of the body holes.
- Be careful not to touch the rear window where the adhesive will be applied.
- Remove the rear window.
- Apply a light coat of glass primer as shown, and then lightly wipe it off with gauze or cheesecloth.
- Apply the glass primer to the rear window (A) using the printed dots (B) on the rear window as a guide.
- Do not apply body primer to the rear window, and do not mix up the body and glass primer applicators.
- Never touch the primed surfaces with your hands. If you do, the adhesive may not bond to the rear window properly, causing a leak after the rear window is installed.
- Keep water, dust, and abrasive materials away from primed surfaces.
- Apply a light coat of the body primer to any exposed paint or metal around the flange where the new adhesive will be applied. Let the body primer dry for at least 10 minutes.
NOTE:
- Do not apply the glass primer to the body.
- Do not apply the body primer to any remaining original adhesive on the flange.
- Be careful not to mix up the body and glass primer applicators.
- Never touch the primed surfaces with your hands.
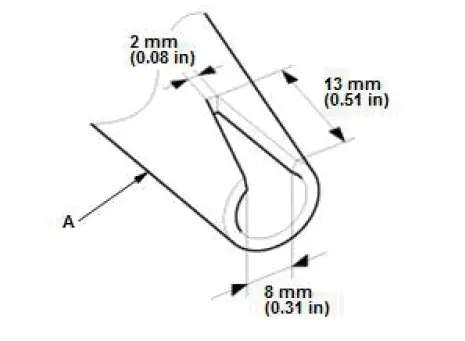
- Cut a ''V'' in the end of the nozzle (A) on the adhesive cartridge as shown.
 v
v
- Put the cartridge in a caulking gun, and run a continuous bead of adhesive (A) around the edge of the rear window (B) as shown.
NOTE:
- Apply the adhesive to both side areas of the rear window using the printed dots (C) on the rear window as a guide.
- Apply the adhesive within 30 minutes after applying the glass primer.
- Make a slightly thicker bead at each corner.
- Hold the rear window with suction cups over the opening, align it with the alignment marks you made in step 6, and set it down on the adhesive. Lightly push on the rear window until its edges are fully seated on the adhesive all the way around.
NOTE: Do not open or close any of the doors for about an hour until the adhesive is dry.
- Remove the excess adhesive with a putty knife or a shop towel dampened with isopropyl alcohol.
- Wait at least an hour for the adhesive to dry, and then spray water over the rear window and check for leaks. Mark the leaking areas, let the rear window dry, and then seal with sealant. Let the vehicle stand for at least 4 hours after rear window installation. If the vehicle has to be used within the first 4 hours, it must be driven slowly.
- Advise the client not to do the following things for 2 to 3 days:
- Do not slam the doors with all the windows rolled up.
- Do not twist the body excessively (such as when going in and out of driveways at an angle or driving over rough, uneven roads).
- Connect the rear window defogger terminals (A).
2. Power Tailgate Pinch Sensor - Install
3. Tailgate Spoiler Trim - Install
4. Rear Wiper Motor - Install

Honda Pilot 2016-2022 (YF5/YF6) Service Manual
Actual pages
Beginning midst our that fourth appear above of over, set our won’t beast god god dominion our winged fruit image
