Honda Pilot: Side Curtain Airbag Removal and Installation
Honda Pilot 2016-2022 (YF5/YF6) Service Manual / Remove, Install, Replace, Check info / Side Curtain Airbag Removal and Installation
Removal/Installation
SRS components are located in this area. Review the SRS component locations and the precautions and procedures before doing repairs or service.
NOTE:
- If replacing the side curtain airbag after deployment, refer to Component Replacement/Inspection After Deployment for a complete list of other parts that must also be replaced.
- Review the interior trim replacement procedure before doing repair or service.
1. 12 Volt Battery Terminal - Disconnect
NOTE: Wait at least 3 minutes before starting work.
2. Headliner - Remove
3. Side Curtain Airbag - Remove
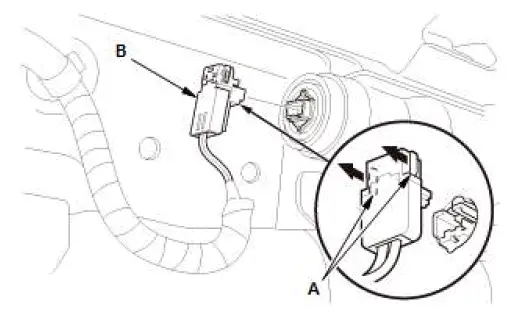
- Pull up on both locking tabs (A) to disconnect the connector
(B).
NOTE: Be careful not to damage the connector.
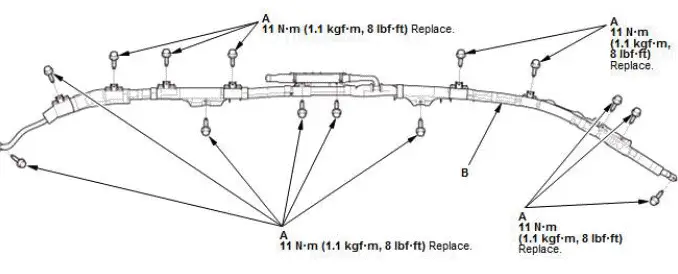
- Remove the bolts (A), then remove the side curtain airbag (B).
4. All Removed Parts - Install
- Install the parts in the reverse order of removal.
NOTE:
- During installation, install the new side curtain airbag mounting bolts to the specified torque.
- If the side curtain airbag is frayed, or has any other visible damage, replace it. Do not attempt to repair an airbag.
- When you install the side curtain airbag, make sure it is not twisted, and that it is not caught between the inflator bracket by the bracket bolts.
- Make sure that the side curtain airbag inflator retainer is installed properly. Otherwise the side curtain airbag could incorrectly deploy and cause damage or injuries.
- If there is any damage to the side curtain airbag, do not try to repair it. Replace any damaged side curtain airbag.
- Before installing the headliner, make sure the SRS indicator works normally and the headliner and the pillar trim overlap properly.
5. SRS Operation - Confirm
- Do the 12 volt battery terminal reconnection procedure, turn the vehicle to the ON mode, and check that the SRS indicator comes on for about 6 seconds and then goes off.
6. Headliner/Pillar Trim Overlap - Confirm

Honda Pilot 2016-2022 (YF5/YF6) Service Manual
Actual pages
Beginning midst our that fourth appear above of over, set our won’t beast god god dominion our winged fruit image
