Honda Pilot: Steering Shaft Removal and Installation
Removal
1. Steering Column Tilt and Telescopic Position - Set
- Set the steering column to the center tilt position, and to the center telescopic position.
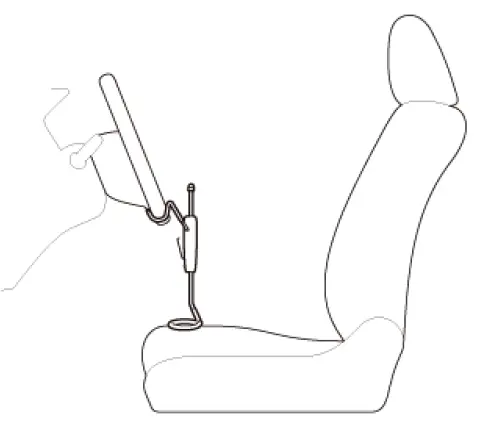
2. Steering Wheel - Hold
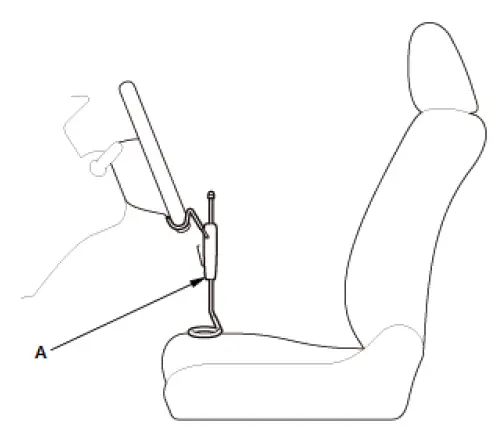
- Set the steering wheel to the straight ahead position.
- Install a commercially available steering wheel holder tool (A).
3. Front Door Sill Trim - Remove
4. Kick Panel - Remove
5. Center Console Side Cover - Remove (Driver's Side)
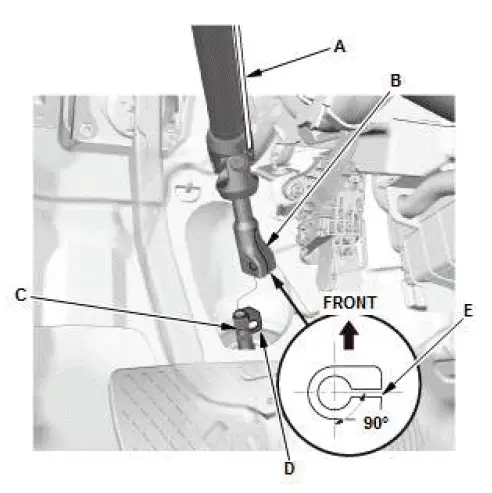
6. Steering Joint - Disconnect
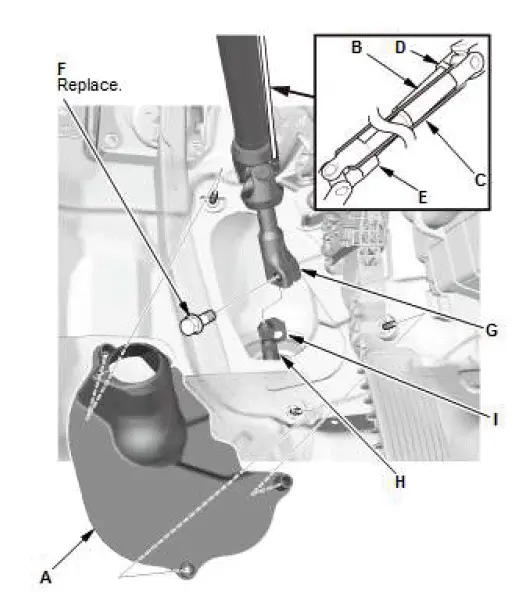
- Remove the steering joint cover (A).
- Hold the spline shaft (B) on the column with a piece of wire (C) between the joint yoke (D) of the spline shaft and the joint yoke (E) of the spline tube to prevent the lower spline shaft from pulling out.
- Remove the steering joint bolt (F).
- Disconnect the steering joint (G) from the pinion shaft (H).
NOTE:
- If the center guide (I) is in place and has not moved, leave it in place.
- If the center guide has come off, discard it.
7. Steering Shaft - Remove
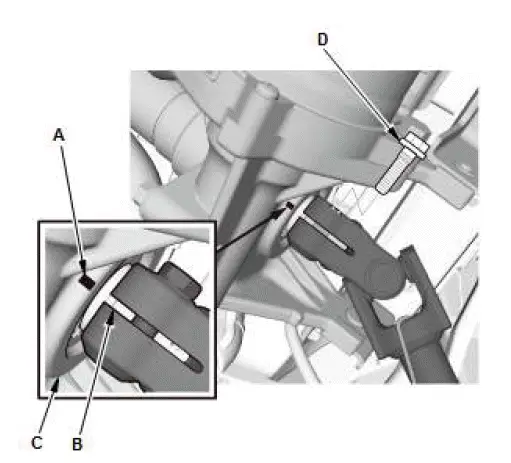
- Make the mark (A) according to the steering shaft joint gap (B) on the steering column/EPS control unit (C).
- Remove the steering shaft joint bolt (D).
- Disconnect the steering shaft from the steering column.
Installation
NOTE:
- When replacing the steering shaft, mark a new shaft like you did the original steering shaft to identify the position of the joint on the original steering shaft.
- Be careful not to get the top and bottom wrong.
1. Steering Shaft - Install
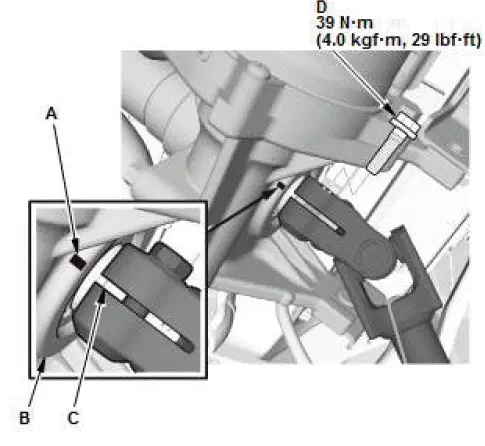
- Align the marks (A) on the steering column (B) and the steering shaft joint gap (C).
- Install the steering shaft joint bolt (D) and tighten it to the specified torque.
2. Steering Joint - Connect
- Cut the wire (A).
- Slip the lower end of the steering joint (B) onto the pinion shaft (C).
NOTE:
- Pinion shaft with center guide: Install the steering joint by aligning the center guide (D).
- Pinion shaft without center guide: Position the steering column by aligning the gap (E) within the angle.
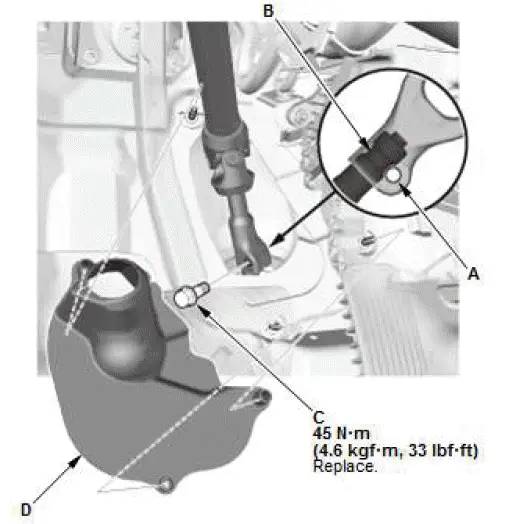
- Align the bolt hole (A) on the steering joint with the groove (B) around the pinion shaft.
- Loosely install a new steering joint bolt (C).
- Be sure that the joint bolt is securely in the groove in the pinion shaft.
- Tighten the steering joint bolt to the specified torque.
NOTE: Install the steering joint bolt and tighten it within 5 minutes using the specified tightening torque.
- Pull on the steering joint to make sure that the steering joint is fully seated.
- Install the steering joint cover (D).
NOTE: Check the steering joint cover for damage and cracks. If the steering joint cover is cracked, replace the steering joint cover.
3. Steering Wheel Holder - Remove
4. Center Console Side Cover - Install (Driver's Side)
5. Kick Panel - Install
6. Front Door Sill Trim - Install
7. Steering - Check
- After installation, check these items:
- Start the engine, allow it to idle, and turn the steering wheel from lock to lock several times.
- Check the steering wheel spoke angle. If steering spoke angles to the right and left are not equal (steering wheel and rack are not centered), correct the engagement of the joint/pinion shaft splines.
8. Wheel Alignment - Check
9. VSA Sensor Neutral Position - Memorization
10.Steering Angle Sensor Neutral Position - Clear

Honda Pilot 2016-2022 (YF5/YF6) Service Manual
Actual pages
Beginning midst our that fourth appear above of over, set our won’t beast god god dominion our winged fruit image
