Honda Pilot: Steering Wheel Removal and Installation
Removal
NOTE: SRS components are located in this area. Review the SRS component locations, and the precautions and procedures before doing repairs or service.
1. 12 Volt Battery Terminal - Disconnect
2. Driver's Airbag - Remove
3. Steering Wheel - Remove
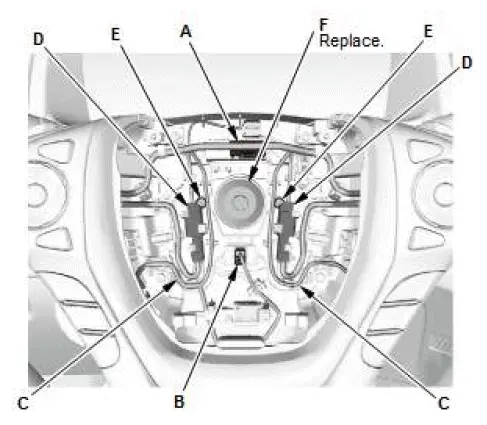
- Set the front wheels in the straight ahead position.
- Disconnect the connector (A).
- With heated steering wheel: Disconnect the connector (B).
- If equipped, remove the harness (C) and the connectors (D) from the harness guide to gain access to the steering wheel puller holes (E).
- Loosen the steering wheel bolt (F) three turns.
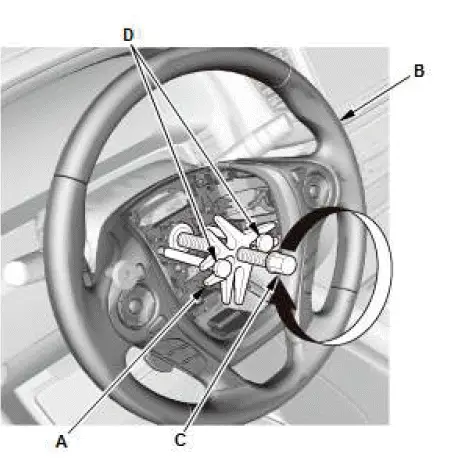
- Install a commercially available steering wheel puller (A) on the steering wheel (B).
- Free the steering wheel from the steering column shaft by turning the pressure bolt (C) of the puller.
Note these items when removing the steering wheel:
- Do not tap on the steering wheel or the steering column shaft when removing the steering wheel.
- f you thread the puller bolts (D) into the wheel hub more than five threads, the bolts will hit the cable reel and damage it. To prevent this, install a pair of jam nuts five threads up on each puller bolt.
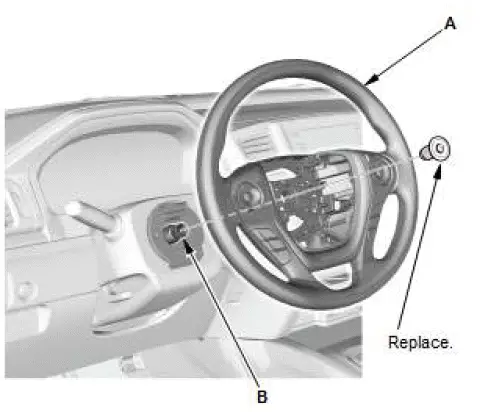
- Remove the steering wheel puller.
- Remove the steering wheel (A).
NOTE: Remove the old sealant from the threads (B) in the column shaft.
Installation
NOTE: SRS components are located in this area. Review the SRS component locations, and the precautions and procedures before doing repairs or service.
1. Steering Wheel - Install
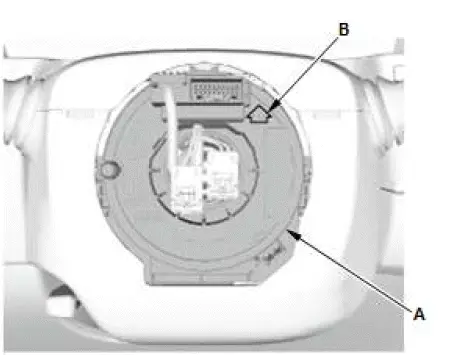
- Make sure the front wheels are pointing straight ahead.
- Center the cable reel (A). Do this by first rotating the cable reel clockwise until it stops.
- Rotate the cable reel counterclockwise about three full turns. The arrow mark (B) on the cable reel label should point straight up.
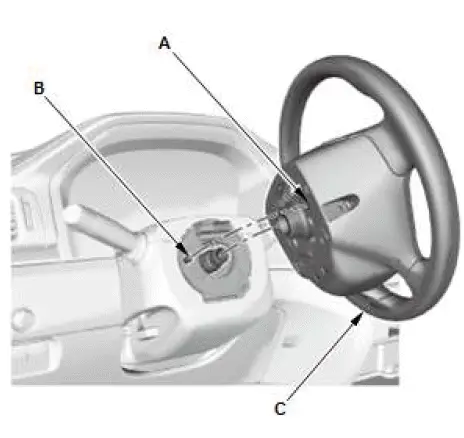
- Position the steering wheel hub (A) so that it engages the pin (B) of the cable reel.
- Install the steering wheel (C) on to the steering column
shaft.
NOTE: Do not tap on the steering wheel or the steering column shaft when installing the steering wheel.
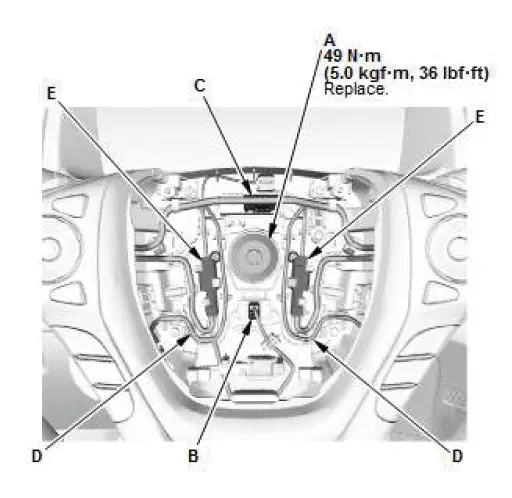
- Install the new steering wheel bolt (A), and tighten it to the
specified torque.
NOTE: Install the steering wheel bolt and tighten it within 5 minutes using the specified tightening torque.
- With heated steering wheel: Connect the connector (B).
- Connect the connector (C).
- If equipped, install the harness (D) and the connectors (E) to the harness guide.
- Make sure the harness is routed and fastened properly.
3. 12 Volt Battery Terminal - Connect
4. Steering Wheel Spoke Angle - Check
- Check the steering wheel spoke angle.
- If steering spoke angles to the right and left are not equal (steering wheel is not centered), correct the engagement of the wheel/column shaft splines.
5. VSA Sensor Neutral Position - Memorize
6. Steering Angle Sensor Neutral Position - Clear
Steering Wheel Rotational Play Check
Check
1. Steering Wheel Rotational Play - Check
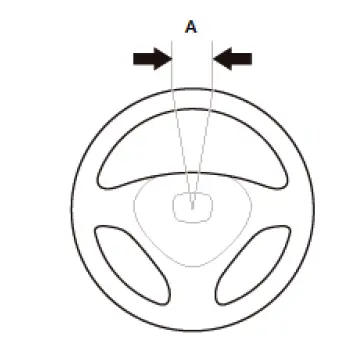
- Set the front wheels in the straight ahead position.
- Measure how far you can turn the steering wheel left and right without moving the front wheels.
- If the play is within the limit, the steering gearbox and the steering linkage are OK.
- If the play exceeds the limit, adjust the rack guide. If the play is still excessive after rack guide adjustment, inspect the steering linkage and the steering gearbox.
Rotational play (A): 0-10 mm (0-0.39 in)

Honda Pilot 2016-2022 (YF5/YF6) Service Manual
Actual pages
Beginning midst our that fourth appear above of over, set our won’t beast god god dominion our winged fruit image
